Showing posts with label Baking and Confections. Show all posts

White Chocolate Chip, Chocolate Cookies


While I'm trailing behind everyone else, on the 'food blogger scene,' I still try to come up with decent photos and different type of recipes. I must admit that I could actually post something every-other day...even every day; let's face it, we all have to eat every day 3 meals a day... but who actually wants to take photos of everything you make?...not me; although I should have taken a picture of my awesome homemade 'nokedli=spaetzli'...or even, my northern bean-vegetable soup cooked in my slow-cooker last week, but then I would have to stop and measure everything from the start because it's from 'scratch' and memory...scratch that, and let's start with my cookies.

Even with the cookies...when you don't have semi-sweet chocolate chips, or any other chocolate chips; just white, what do you do?...well, you make a 'White Chocolate Chip, Chocolate Cookies'...duhh...how easy is that to figure out?

Luckily, I always save the empty bag from the Nestle Semi-Sweet morsels, the 12. oz bag, and follow the recipe on the back, but just alter it a little to make it dark chocolate, with white chocolate chips...no problem...done!


Homemade cookies are so much more appreciated and it is much better than store-bought with all the preservatives, unless it's 'OREOS'..but that is always saved for emergencies.

You can make any kind of 'chip' cookies with the basic Toll House cookies recipe from Nestle's, just keep that in mind. Next time it will be with peanut butter chips with dark chocolate...just switching around the white chocolate chips.

Good thing I have another batch in my fridge...ahh thought you would be wondering why do a have a 'second batch' in my fridge?...saving it for a 'rainy day'...not such a bad idea! Today was actually a rainy day, and I had to be at my service station at 9:00AM sharp to get an oil change, and walk over to Goodwill with my umbrella, while car was being serviced. (didn't really find anything,) or at least nothing that I wanted to carry back on foot to pick up my car...so now, here's the slightly adapted recipe for a different chocolate chip cookie!

White Chocolate Chip Chocolate Cookies
adapted from Nestle's Toll House Cookies

2 cups all-purpose flour
1/4 cup Hershey's or another good brand cocoa powder
1-1 oz block of semi-sweet baking chocolate
1 teaspoon baking soda
1 teaspoon salt
1/2 cup butter (1 stick) melted with the 1 oz. of the semi-sweet chocolate, and cooled
1/2 cup (1 stick margarine) or 1/2 cup shortening
3/4 cup granulated sugar
3/4 cup brown sugar
1 teaspoon vanilla extract
2 large eggs

2 cups (12 oz. pkg.) white chocolate chips or dark chocolate chips

Preheat  oven to to 375 degrees F.

Line a baking pan with parchment paper. Combine flour, baking soda and salt in a small bowl.In a large bowl, beat cooled down melted chocolate and butter mixture, the 1/2 cup (1 stick margarine)...or the 1/2 cup shortening with the granulated sugar and brown sugar, and vanilla extract until creamy. Add eggs one at time, beating well until each addition.

Gradually beat in flour and cocoa mixture. Stir in chocolate morsels.

Drop by rounded teaspoon onto parchment paper lined baking sheets, keep them 2 inches apart. Bake for  9 to 11 minutes. Cool on baking sheet for 2 minutes.

Note: on the photos above, I saved more than half the portion of the dough, patted it down, wrapped it in plastic wrap...then aluminum foil, and took out more as needed the next few days. Score them first, then cut equally, shape into a walnut size ball and press down lightly; follow baking instructions.


Have a cookie...or two...or three:) You'll love these...yumm!
Linking to: Hearth and Soul Blog Hop @ Zesty South Indian Kitchen
                Thursday Favorite Things Blog Hop @ Katherines Corner
                 Full Plate Thursday @ Miz Helen's Country Cottage


Enhanced by Zemanta

Fresh Tomato Tart...and Silent Sunday!

My amazing Fresh Tomato Tart with Gorgonzola Cheese...recipe, to follow!


...a funny sign by an owner or tenant of my complex...which wasn't as serious as they claimed!


Enhanced by Zemanta

Plum Upside-Down Cake


Since I've been food blogging for the last two years...I have not been thinking about that I would actually say,
"I have to bake something for my food blog"...hmm! wonder why did I say that to my daughter Lora, yesterday morning?
She told me the other day that her food blog is getting to be expensive...well, the reason for that is: She bakes every single day...really! There isn't a day that goes by when she does not bake...if nothing else, but the 'staple' banana bread, or homemade pancakes!
I was hoping to get this post up by yesterday...Friday, knowing that I did not have anything else worthwhile to post and that I don't do much baking cakes...although I love to put simple and yummy quick and easy desserts together!
We have such an abundance of plums...not the deep purple Italian ones, but the round ones which are so perfect just by themselves to snack on (which I did eat 3 yesterday)...and decide to make something with it. No time to start browsing through my cookbooks, old recipes, or favorite food bloggers' recipes...so what do you do first, if you don't have the basic recipe on hand?...The Internet...yes, that's the fastest way to google a recipe and do some adaptations of your own, which I did a little on my cake. Since I made this for my blog...still smiling to myself
about that one, I only kept one large piece for myself and shared the rest with my family.

Yesterday was such a stormy day on-and-off, with tropical storm Isaac on our heels by Sunday night...hopefully it's not turning into a hurricane!

Good day to be cooking and baking when you're stuck inside. I did go out on my balcony to take some photos of the beach, the clouds, and no less than 30 minutes wind, and a storm, but the worst is yet to come! We'll just have to be prepaired and be safe.

As you see, for my baking, I like to chose a comfy-cozy home type of dessert. For me they are super easy to make, and I do believe it will be easy for you, if you follow my easy and handy little tips. Don't let the layering of this beautiful upside-down all American simple cake intimidate you...and I DO recommend that you make this from 'scratch' and not from a mix, although I do use cake mixes, only to 'doctor' them up!
Here's the link to this awesome and easy cake!

Plum Upside-Down Cake 

Strawberry Cake...for Father's Day!


Notice something different?...a pink cake...and it's for Father's Day!...just can't stop having 'Lucy' moments, since I agreed to guest post for my friend Ping, and Veronica. It just seemed to have rubbed off on me. Now, I'm enlisted in the 'Lucy Club'

Why a 'pink' cake for Father's Day?...wouldn't it be more appropriate to make a cake with perhaps 'blueberries' that would signify that it's for  a male?...actually, not really Having a strawberry cake is OK, but why go overboard for the pink frosting?...well, I have an explanation for that, as well!

Linking to:
Hearth and Soul Blog Hop @ Swathi's Zesty South Indian Kitchen

OK, I must admit that I got a little carried away with the cake. I had 2 containers of beautiful ripe strawberries, and I just had to do something with them, so I decided to make a cake (last minute)...like a few hours before we were going to eat lunch.

The cake was an absolute success to celebrate Father's Day for my son, and my ex-hubby! They never even notice that it was all PINK, but my little granddaughter sure did. Pink is her favorite color, so it was a double celebration!

Strawberry Cake
my doctored up creation

1 box of strawberry or yellow cake mix
1- 3oz. box of strawberry JELL-O
1/2 cup canola, or vegetable oil
1 cup of plain water
4 eggs
1 1/4 cups mashed strawberries
1 Tbsp sugar


It's a lot easier than you think. Just one box of strawberry cake mix, or yellow cake mix,

For the strawberries: cut the berries in 1/3 pieces, place them in a medium bowl, and add the 1 Tbsp sugar...mash with mashed potato masher, and let it sit for about 20 minutes. It will be juicy and slightly chunky.


In a large mixing bowl, add the cake mix, 1/2 of the 3-oz. JELL-O the eggs, oil, water. Beat on slow speed with electric mixer, until combined, then on high speed for about 3 minute, till creamy, and fluffy.


After mixing the ingredients, pour in the mashed strawberries.


 Gently fold in the mashed strawberries.


Pour into a sprayed and floured 9 inch spring form pan, or 2- 9 inch round pans. (my pan I used only has the bottom removable.
For spring-form pan, bake at 350 degrees F. for 45-50 minutes, for the 2 round 9 inch pans, about 30-35 minutes.


Let it cool on a wire rack, and frost with strawberry cream cheese frosting:

1- 8 oz. pkg Philadelphia cream cheese, at room temp.
1 stick=4 oz, (113.4 g,) unsalted butter, at room temp.
3 cups powder (icing) sugar
1 teaspoon of the strawberry JELL-O
1 teaspoon plain water

With an electric mixer, mix all ingredients together, till combined, and beat until light, and fluffy, on high speed. Spread it on the cake, when cake is cool, and decorate with additional strawberries if you like. Let the cake set in the fridge for about 2hrs before serving! It is yumm, and delish...and no-one will suspect that it's a "doctored-up" cake...let it be YOUR SECRET! 


I finally received the special addition of the Bon Appetit for the Giveaway, and will announce the winner for my next post!

So, for my continuing photos....just wanted to share some S. Florida photos. The mango tree has already been trimmed down...it is at least 50yrs old.

The glorious mango tree...mangoes getting nice, and ripe!

He loves bougainvilleas!


Enhanced by Zemanta

Raspberry Streusel Bars...and a Guest Post

First things first...I would like to thank all of you for your kind comforting, and encouraging words regarding my cat Prince, and my injured hands...which is a whole lot better now. It's healing very nicely, and as for Prince, we're taking one day at a time. As long as he is eating (even though, thin and frail)...his spirits are good, and he can pretty much get around  with minimal vision. He's alert, and sweet as he has always been, but we both know his time is nearing and I have to say good-by to him!
I am so blessed to have such nice friends that I met through blogging...truly caring, and loving dear friends. It's as if I've know them in person, already!
I am so thrilled to have my friend Lizzy from That Skinny Chick can bake...offering to help me out to guest post...oh, I did mention that my daughter Lora will do the guest post, and then Lizzy, but we had to switch it since Lora wasn't quite ready with hers yet!

Well, it turned out even better, not realizing at first that this is my very first guest post on my blog, and my blog is nearing two years soon!
So let's bring out the bubbly, and celebrate Lizzy for my very special honor for her first guest post on my blog!
Thank you Lizzy, I'm truly honored!
xoxo

Lizzy, is an amazing baker...every fabulous cake and dessert recipe is down to a "science," so precise, and accurate. She is a super kind, and wonderful person. She will be the first one to offer help when someone needs it. When you check her blog, every recipe is "tried and true"...just like one of those TEST KITCHENS where day test each recipe. You can feel rest assured that when you try out one of her recipes, that you will be so pleased and will always remember where the recipe came from. I told her in the past, that I already started a folder, just from her recipes.

She will tell you how we met for the first time, the two friends...one Lizzy, and the other Lizzie (that's me)


I am thrilled and honored to be guest posting here on Food and Thrift for one of my dearest blogger friends.
Lizzie joined Foodbuzz, a huge food blogger community, one month before I did…and was the first to befriend me and show me the ropes.  As my other Foodbuzz friends know, there is a huge learning curve….and Lizzie offered me tips and words of support and advice. Plus, she confided that she also had the same nickname, just spelled with an “IE” instead of a “Y.” We bonded immediately.

So when I heard that she had injured BOTH hands and was unable to cook (a food blogger’s nightmare!), I offered to guest post for her. I know she would do the same for me…she’s just that kind of gal. I baked these raspberry bars for a recent bridal shower and am delighted to share them all with all the Food and Thrift fans while Elisabeth recuperates.
Heal quickly, my friend! xoxo


When I prepare for a dessert buffet, I make sure certain categories are covered: chocolate, lemon, cheesecake AND something fruity. Cook's Illustrated does a wonderful job offering fool proof recipes...with detailed instructions...so when I came across these bars, I knew they would be perfect for the shower.

These were easy to whip up...and after finishing up a much more time consuming recipe for cheesecake pops, that was truly a blessing. I only had time to snap a couple quick photos, but I guarantee that raspberry fans will love these!


Raspberry Streusel Bars~

Adapted from Cook's Illustrated

2 1/2 cups flour
2/3 cup sugar

1/4 teaspoon salt
16 tablespoons (2 sticks plus 2 tablespoons butter 1/2-inch pieces, at room temperature
1/4 cup packed light brown sugar
1/2 cup quick oats
1/2 cup pecans, finely chopped
3/4 cup raspberry preserves
3/4 cup fresh raspberries
1 tablespoon fresh lemon juice

Preheat the oven to 375º. Line a 9 x 13-inch pan with non-stick foil so it hangs over the edges. Or use regular foil and spray with nonstick cooking spray.

Using mixer, combine the flour, sugar and salt at low speed to combine, about 5 seconds. With the machine on low, add 1 cup (2 sticks) of the butter, 1 piece at a time, then continue mixing on low for about 1 to 1 1/2 minutes.

Reserve 1 1/4 cups of the flour
sugar and salt at low speed to combine, about 5 seconds. With the machine on low, add 1 cup (2 sticks) of the butter, 1 piece at a time, then continue mixing on low for about 1 to 1 1/2 minutes.

Reserve 1 1/4 cups of the flour mixture and set aside.  Evenly pat the remaining flour mixture in the bottom of the prepared baking pan. Bake until the edges begin to brown, 14 to 18 minutes. Leave oven on.

While the crust is baking, add the brown sugar, oats and pecans to the reserved flour mixture and mix to combine. Using your fingers pinch the remaining 2 tablespoons of butter into the flour and oat mixture until the butter is fully incorporated. Pinch the mixture with fingers to create small clumps; set streusel aside.

Mix preserves, raspberries, and lemon juice in a small bowl, mashing the berries into small pieces.

Using a spatula, spread the filling evenly over the hot crust, then sprinkle the streusel topping evenly over the filling without pressing down on it. Bake 22 to 25 minutes till topping is lightly browned and filling is bubbling.. Cool to room temperature on a wire rack, 1 to 2 hours; remove from the baking pan by lifting the overhanging foil. Cut into squares and serve.

Enhanced by Zemanta

Halloween Birthday Cake...and Fun Celebration!

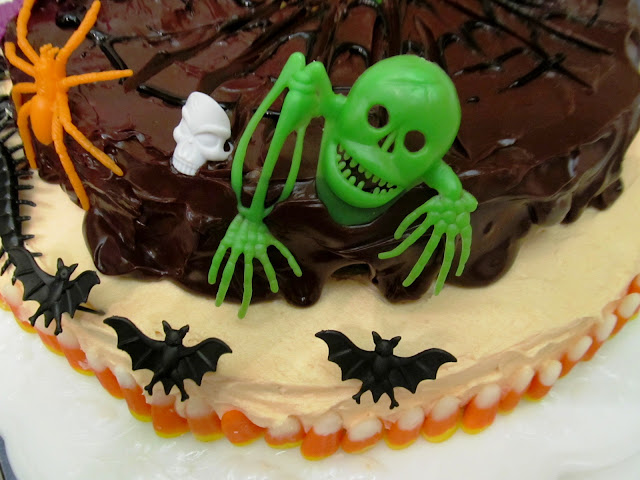
It's showtime! "Theater of Horrors"...or is it "Tales from the Crypt?" In my last post, I mentioned that I was planning to make a birthday cake for my granddaughter Sophia's birthday...a very special 10th birthday. The second of 4 precious grandchildren that I was bless with. I held off till the last day...the day before the birthday party. Just could not decide how it's going to be, since I am not a cake decorator...but yes, I can bake, just not my "forte."...I would rather put ten gourmet meals together, before I would venture into a "cake decorating disaster!"
Did I mention that the little plastic decorations were from the dollar store?...a whole fun bag for $1.
Sophia requested for me to bake special birthday cake, 2 weeks before her birthday...she requested that it should be a Halloween cake, since her birthday is 1 week before Halloween, and decided to have a special birthday party at home for her friends, and parents included. This is her first b-party celebration, since she was born. Every year she had her party out in different fun places, including at an ice-skating rink last year.

I'm linking my Halloween Birthday Cake to: Full Plate Thursday, 10-27-11
@ Miz Helen's Country Cottage

Pudin de Arroz Torta=Rice Pudding Cake, and Awards!

We live in a large Hispanic community here, in West Palm Beach Florida. We have all kinds of Hispanic cultures right here in our local area...in fact, it's advisable to speak the Spanish language, because every store you go into, especially our local Publix supermarket, you feel like you are in "little Havana"...seriously! In that particular supermarket, they have the most variety of Hispanic items, also as you check out you can just order a fabulous cup of "cafe con leche" for a lot less than in any coffee places you go to, along with the Cuban pastries with guava, and all the other amazing sweets can be found in their bakery section. As far as for the Pudin de Arroz Torta...the Rice Pudding Cake, that's my creation, derived right from the authentic Cuban Rice Pudding.

I learned how to make the authentic Cuban rice pudding from my younger sister's former Cuban m-in-law from Miami, that should have opened up a little "rice pudding"  stand, because her pudding is out of this world. They have this little secret of boiling the rice with large strips of lemon and/or lime strips, cinnamon sticks, and for more flavor, anise seeds. Also a must, is the sweetened condensed milk, and more cinnamon sprinkled on the top. The raisins are optional.


My recipe is versatile, as a cake, and I promise you so moist, and delicious, whether you choose to eat it warm, or cold, which I prefer. It is smooth, and melt in your mouth yummy! You don't really have to get fancy serving this heavenly cake because it is so, very rich. I actually made this cake for my daughter Lora, to have some nutrition since she needs to eat soft foods, and not necessary puddings. So why not a pudding cake?...just use more rice to the recipe, and less milk. No flour is needed in the recipe, but for sure, you need eggs. Four, to be exact. Again...I was preparing to guest post for Lora, but after all, she has more cakes, and sweets in her house, that she and Teresa are packing up for their friends, and neighbors to take home. As for me...I can only have a small piece, and even the rare desserts that I make, goes directly over to them. Surprisingly enough, I have a "skinny" family...LOL...go figure!

Cross Country- Oatmeal Cookies and Blog Award

This morning was a cloudy, and gloomy morning that turned into a half way decent looking day, here in South Florida, but temperature only at about 68 degrees F. My daughter dropped off my little grandson at my place for a couple hours so she could go take care of errands, son-in-law had his only 1 day off, and he had to take care of things, as well. My little sweetheart came all set with his "Finding Nemo" CDVD, as he calls it, and I knew I didn't have his favorite little "Goldfish" crackers snack for him, so I thought, I better start making something real quick and yummy for him. Sure enough I had Ghirardelli Bittersweet Chocolates, but no chocolate chips. Found some quick cooking oats, and I knew I had the rest of the ingredients...so why not, some chocolate chunk cookies, instead of chocolate chip cookies?

Ready to jump into action, and in less than 30 minutes, warm cookies were waiting for my little guy, with a big smile on his face. For some reason, every time I'm looking for a recipe, that I have just about all the ingredients for, is the "Best Recipes" book, the latest copyright, 1982, that have a compiled great list from backs of boxes, cans, jars, but you really have to do some adaptation to make it up to date by switching, and adding ingredients, which I love to do, and adapt it my way. Interesting, about the Mazola corn oil, which the original recipe calls for 3/4 cups? and no butter?...well, I quickly narrowed the amount down to 1/3 cup of vegetable oil, instead, and I knew it would need at least a little butter, so I added 1/2 unsalted butter, and had to confidence of knowing it will turn out better, than with all oil, which would make it too wet, as well!...The result, was a light, perfect, chocolaty goodness with healthy oats!

Old-Fashioned Date and Nut Bread-Cookbook Sundays

Not again, not another banana bread?...you're probably wondering. Well it's not, it is a super wonderful Date bread, with walnuts, from another "thrift find" book of mine, which cost only $2.49, from Goodwill. This book does not have any pictures, it is, what it is! Just simple, and I love it, because these are recipes from backs of labels on cans, boxes,  jars, you name it...these are the forgotten, and tossed away recipes, compiled into one super great book.

I made this bread for my family, to have with their extremely early breakfast at about 4:00AM, for their caffe latte. They were rushing off to catch their plane to New York City...it's beyond me...why at this time for the year, would you wand to spend 3 days in snow, ice, and sleet in the city? ...the answer is...NEW YORK, NEW YORK..."the city, that never sleeps". It's a city that welcomes you 365 days a year, and 24/7. Also when you are in the restaurant business, as my son-in-law is, He likes to check out the restaurants in Miami, and the best ones, in New York.

I am staying away from the extreme cold and snow, but for them, it's an adventure. The little ones have never seen snow. My children got all bundled up in their snugly winter gear, from head to toe. For the last three days my daughter Lora was gathering stuff for them from her friend who has children their age. Her friend and little family spend every Christmas in Idaho with their family, so obviously they have all the winter clothes.
I've been away from the cold climate in Ohio for over 35 years, and that's a long time. Your blood thins out when you are not used to such cold weather, they say. We had our lowest temperature here, in South Florida, which is a record low of 29 degrees with a 12 degree wind chill, which cooled it even more into the teens. I was not about to budge and venture out that day.

Cookbook Sundays-Cream Cheese Brownies

For someone who rarely bakes, I must say this decadent brownie turned out super great. When I decide to bake, it has to be either very simple, like chocolate chip cookies, or banana bread, but I couldn't resist making these brownies, because I love chocolate, and so does just about every one else in the family, except my daughter, who can live without it. She's an apple-anything, with apples lover. I found this wonderful book  called, How to Cook Everything, by Mark Bittman...where else?...but at Goodwill, for $.79. This bright gold color, caught my attention, and I immediately delved into it, grabbing it off the book shelf. This is a paperback, it was and I say, seriously, brand new. I know for a fact that the hard cover book costs $29.99, so the paperback must cost about $10.00 less. What a bargain! I am so happy that I joined Brenda at Brenda's Canadian Kitchen for the Cookbooks Sundays, except, 75% of my cookbooks are collected from my thrift finds, that I should be feeling "guilty" about for finding such treasures, but maybe not so guilty...after all those people that got rid of them had their own reasons. Just like to know what reasons?

So sorry for the inconvenience...I will post the recipe ASAP, just a lot of things going on here!

A Lovely Blog Award


I am so honored to have The Lovely Blog Award bestowed upon me, not once, but twice. The first one was one week ago, from Emma, at  Sunflower Days, and the second, today, from Lora,
at cake duchess. I am so excited every day to think of new things to blog about, and also checking to see what my foodie friends are blogging about
.
If it wasn't for the Foodbuzz Community, I would not have some many wonderful, and talented people from all over the world.There are so many beautiful blogs out there, and I have been fortunate to have made friends with a lot of them.
I have been so inspired by all the different cultures, and their dishes that every day is such a joy for me to be able to get into contact with all my friends.

So this is a "shout out" now to the 30 bloggers.
Thank you Emma...thank you Lora, and thanks to all of you!

I apologize for the delay...I came up with with my list, just have to link it and shout it out!


Anecdotes and Applecores-Monet
Angie's Recipes -Angie
Books, Thoughts, and a few Adventures-Patty
Brenda's Canadian Kitchen-Brenda
Cake Duchess-Lora
Cardomom Hills
Chic Gorgeous-Jo
Citrom hab
Culorile din Farfurie-Sara
Deba Roo Roo-Debbie
Dreams of Sugarplums-Alexandria 
Food Fun Freak-Sabby
Green Girl
La Kocinera-Koci
Liv Life too-Kim
Mari's Cakes-Mari
More than a Mountfull-Chef Dennis
My Kitchen in the Rockies-Kirsten 
Priya's easy n tasty recipes-Priya
Quay Po Cooks-Veronica
Shosh's yummy foods
Susi Kochen und Backen-Susi
Spoon-and-Chopsticks  
Tasty-Trials-Karen
Shepwell Kitchen -Anne
That skinny chick can bake-Lizzy
US Masala-Aipi
Weekend Gourmet-Wendy
What's for dinner-across Statelines-Gina
Yesim Style Kitchen-Yesim


Enhanced by Zemanta

New York Style Cheesecake

I decided to re post my New York Style Cheesecake from this summer, just about when I started my blog. The actual reason I'm posting it is, because I lent my digital camera to my daughter, so she could upload her photos that she took with my camera. Yesterday, I made my good old fashioned meat loaf, and a yummy apple SALSA...

 
Recipe...adapted from the JOY OF BAKING
New York Cheesecake:
Grease, or spray with Pam, a 9 inch (23 cm) springform pan.  Place the springform pan on a larger baking pan to catch any leakage while the cheesecake is baking. Preheat oven to 350 degrees F (177 degrees C) with rack in center of oven.
For Crust:
In a medium sized bowl combine the graham cracker crumbs, sugar, and melted butter.  Press the crumbs evenly over the bottom and about 1 inch (2.5 cm) up the sides of the springform pan.  Cover and refrigerate while you make the filling.
For Filling
In bowl of your electric mixer place the cream cheese, sugar, and flour.  Beat on medium speed until smooth (about 2 minutes), scraping down the bowl as needed.  Add the eggs, one at a time, beating well (about 30 seconds) after each addition.  Scrape down the sides of the bowl. Add the whipping cream, lemon zest, vanilla extract and beat until incorporated.  Remove the crust from the refrigerator and pour in the filling.  Place the cheesecake pan on a larger baking pan and place in the oven.
Bake for 15 minutes and then lower the oven temperature to 250 degrees F (120 degrees C) and continue to bake for about another 1 1/2 hours or until firm and only the center of the cheesecake looks a little wet and wobbly.  Remove from oven and place on a wire rack.
Meanwhile, in a small bowl combine the sour cream, sugar, and vanilla extract.  Spread the topping over the warm cheesecake and return to oven to bake for 15 more minutes.  Remove from oven and carefully run a knife or spatula around the inside edge of pan
to loosen the cheesecake (helps prevent the surface from cracking as it cools).
Let cool before covering with plastic wrap and refrigerating.  This cheesecake tastes best after being refrigerated for at least a day.
Serve with fresh fruit or fruit sauces.
Makes one - 9 inch (23 cm) cheesecake.
To freeze
Place the cooled cheesecake on a baking pan and freeze, uncovered, until firm.  Remove the cheesecake from the freezer, wrap it in heavy duty aluminum foil and place in a freezer bag.  Seal and return to freezer.  Can be frozen for several months.  Thaw uncovered cheesecake in the refrigerator overnight.
Adapted from Cheesecake Extraordinaire by Mary Crownover.

Crust:

2 cups (200 grams) of graham wafer crumbs or finely crushed vanilla wafers or gingersnaps (process whole cookies in a food processor until they are crumbs)
1/4 cup (50 grams) granulated white sugar
1/2 cup (114 grams) unsalted butter, melted
Filling:
32 ounces (1 kg) (4 - 8 ounces packages) cream cheese, room temperature (use full fat, not reduced or fat free cream cheese)
1 cup (200 grams) granulated white sugar
3 tablespoons (35 grams) all purpose flour
5 large eggs, room temperature
1/3 cup (80 ml) heavy whipping cream
1 tablespoon lemon zest
1 teaspoon pure vanilla extract
Topping:
1 cup (240 ml) sour cream (not low fat or fat free)
2 tablespoons (30 grams) granulated white sugar
1/2 teaspoon pure vanilla extract
Tips:  Sometimes the surface of the cheesecake cracks.  To help prevent this from happening do not over beat the batter, especially when creaming the cheese and sugar. 
Another reason for cracking is overbaking the cheesecake.  Your cheesecake is done when it is firm but the middle may still look a little wet. 
Also, make sure the springform pan is well greased as cracking can occur if the cheesecake sticks to the sides as it cools. 
Enhanced by Zemanta

Cleveland Winter 2017

Hello my friends, I hope you all had a great holiday. I just got back from Ohio and I thought it would be nice to put together a post to s...