Showing posts with label fall. Show all posts

White Chicken Chili

I've been contemplating whether to just quit the whole blogging, or continue on, even if I post once a month...at least it's better than none at all. I've invested five years into food blogging. so I'm not gonna stop now! I've been using my smart phone to take quick photos of everyday 'life' and I must say it's a lot more convenient than lugging around your digital camera although, today I decided to get my camera out for this 'brainstorming' quick idea of making chili...not just any chili with the beef, I decided to use white chicken breasts...no big deal just leftover rotisserie chicken from my local Publix supermarket.

What a fun way to welcome September, and fall season just around the 'corner' to come up with all these beautiful and vivid falls colors, and hardy 'stick to your bones' goodness with a bowl of warm chili with chicken which is so much lighter than beef. Instead of making it in the slow cooker (crockpot) I just didn't want to wait for it to cook for 6 hours...although, I did cook the dark red kidney beans, and the Great Northern beans ahead of time separately, and added the shredded chicken at the end of cooking time.
 Let me tell you, this amazing chili with is such a $ stretcher...a real 'thrift' bargain, you can feed an 'army' with it and they will love it and thank you for it, and you can 'pat' yourself in the back that you have a winning recipe idea on your hand. Also, you most likely have most of these ingredients in your cupboard and in your fridge. As for the spices, they are also very basic as well. You can make this as hot, medium, or mild if young children are eating it. Since I'm such a Pinterest 'geek' I actually did find this recipe on Pinterest by a well know food blogger, so I will post her recipe and my adaptation of how I made it!


    { Crockpot} White Chicken Chili
My adaptation in BLUE
serves: 8-10

  • 1 large yellow onion, chopped
  • 1 can (15-ounces) low sodium Great Northern Beans, drained and rinsed well
  • 2 cups dry cooked Great Northern Beans+ ( save1 cup of the liquid it was cooked in)
  • 1 can (15-ounces) low sodium Red Kidney Beans, drained and rinsed well
  • 2 cups dry cooked dark Red Kidney Beans + (save 1 cup of the liquid it was cooked in)
  • 2 cans (10-ounces each) diced tomatoes with green chilies
  • 1-28 oz can diced tomatoes (drain liquid and save in a measuring cup)
  • 1 can (15-ounces) sweet corn kernels
  • I used 2 fresh leftover cooked corn (shaved off the kernels to add at the end)
  • ¼-teaspoon chili powder
  • 1 teaspoon chili powder
  • ¼-teaspoon ground cumin
  • 1/2 teaspoon ground cumin
  • ¼-teaspoon garlic powder
  • 1/2 teaspoon dry granule garlic and parsley
  • ⅛-teaspoon paprika
  • 1 teaspoon Hungarian sweet paprika
  • salt and fresh ground pepper, to taste
  • 1 cup low-sodium chicken broth
  • 2 cups of the liquid from the beans it was cooked in
  • 1 tablespoon extra virgin olive oil
  • 1 bottle (12-ounces) beer
  • 1 bottle Samuel Adams beer
  • 4 chicken breast halves
  • whole breast of a store bought rotisserie chicken taken off the bone
  • 1 avocado, diced, for garnish
  • shredded cheddar cheese, for garnish
  • sour cream, optional
Instructions
  1. Place the chopped onions, beans, tomatoes, and corn in the crock pot.
  2. 1-1lb. bag of dry Great Northern Beans soaked for 2 hrs. after bringing it to a boil (in a large pot covering it with water) adding 2 bay leaves, 1 half onion, salt and pepper. Do the same with the red Kidney Beans. Simmer beans on low heat till almost tender to the 'al dente' about 1 hr.
  1. Stir in chili powder, cumin, garlic powder, paprika, salt and pepper.
  2. Add both beans with their liquid to a 'Dutch oven' (heavy duty large pot) the drained diced tomatoes, add the spices, and the beer. Cook for an additional 1 hr. on med- low uncovered.
  3. Add chicken broth and beer.
  4. Place chicken breasts on top.
  5. Cover and cook for 3.5 to 4 hours ON HIGH, or until chicken is thoroughly cooked. Or cook
  6. on LOW for 5 to 6 hours, or until chicken is done.
  7. Shred the deboned chicken breast, and add it to the pot, along with the corn kernels. Add the olive oil. Add 1/4 cup of flour to the reserved tomato juice, which is about 1/2 cup, whisking it till a smooth paste, and add it to the pot with all the ingredients. Simmer for an additional 25 minutes
  8. Remove chicken breasts from the pot and place on a cutting board; let cool for a few minutes.
  9. Shred chicken and stir it back into the pot; cover and continue to cook for 15 minutes.
  10. Ladle chili into bowls and garnish with avocado, shredded cheddar cheese and sour cream.
  11. Serve.
Notes
RECIPE SOURCE: DIETHOOD
Nutrition Information
Serving size: 486 grams (17-ounces) Calories: 345 Fat: 5.3 


Pumpkin Bread

I'm so excited about my Pumpkin Bread, which I rarely make...my daughter is the Pumpkin Bread 'queen' and also makes the best Pumpkin Pie for Thanksgiving, with her amazing homemade crust.
When I was  a 'kid' I hated pumpkins, and squash...how absurd was that! Even now, it's still not my favorites; but I've learned to adapt a liking to all of these wonderful fall treasures!
I normally would not have even made it, but my daughter and family were away for a long weekend last week, kids were out of school the following Monday. I was happy to  'dog sit' for my favorite little guys that I have spoiled since the last few years and they were so excited to have me around to give them treats and take them for walks. In the meantime, I was treated royally by my son and family to invite me over for dinner each evening, so I didn't even have to cook, and just bring dessert which happens to be my 8yr. old granddaughter's favorite...Pumpkin Bread!...my, how times have changed...tastes have changed since I was their age. Kids are so much more adventurous with their foods and are offered a lot more healthier choices!
Instead of googling for a Pumpkin Bread recipe, I decided to look for one in Martha Stewart's cookbook, which was of course a 'thrift find'...a 1995 edition that has so many great recipes...even if the book does not have any photos...you gotta love anything from Martha Stewart! Instead of making one loaf of bread spending precious time to make it, why not make 2 or 3 loaves? I can't even find this recipe online so I will have to type it out, and the modifications I had to make, that even gave it a nicer and much more flavorful, moist bread!
I was totally looking forward to making the Pumpkin Bread, and have an extra loaf to keep. I love these cute little loaf pans, and they're so perfect and handy being attached instead of separated.

Pumpkin Bread
source; Martha Stewart, from the Martha Stewart
cookbook...1995 edition

my modifications in blue

12 Tbsp. (1 1/2 sticks) unsalted butter, at room temperature
I used 1 stick of butter
3 Tbsp. molasses
I omitted the molasses
2 cups sugar
I used 1 1/2 cups sugar
2/3 cup orange juice or water
I used 1 cup fresh orange juice from 2 oranges
also grated the zest from one of the oranges
2 cups pumpkin or squash puree
I used 1 can (15 oz. 425g.) Libby's pumpkin puree
3 1/3 cups flour
I use 3 cups unbleached all-purpose flour
1/2 teaspoon baking powder
I used 1 teaspoon baking powder
2 teaspoons baking soda
1 teaspoon salt
I used 1/2 teaspoon salt
1 teaspoon ground cinnamon
1 teaspoon ground cloves
I used 1 teaspoon pumpkin spice
1 teaspoon vanilla extract
1 cup raisins or currants
I omitted raisins and currants

Preheat the oven to 350 degrees F. Butter 3- 9x5x3-inch loaf pans.
I sprayed cooking spray (for baking that has flour mixed in) Used 1 used 4 attached mini loaf pans, and 1- 9x5x3 loaf pan.
With an electric mixer, cream the butter, molasses,and sugar until light and fluffy.
I used a metal whisk to cream the butter,eggs and sugar until light and fluffy
Beat in the eggs one at a time.
I added the 4 eggs to the butter, and sugar, the vanilla extract, and whisked it until a light lemony color.
Add orange juice and pumpkin puree and mix well.
Sift the dry ingredients together into a large bowl.
No need to sift...just mix them all together without sifting. 
Add the pumpkin mixture to the dry ingredients with a wooden spoon, stirring well incorporated.
Add the raisins at this time. I omitted the raisins.
Spoon into prepared pans. Bake for 1 hr. or until toothpick inserted comes  out clean. Cool in pans for 10 minutes, then turn out unto racks to cool.
I baked the mini pans for 35 minutes at 350 degrees F. along with the larger loaf pans...took the mini pans out of the oven, leaving the 9x5 loaf pan in the oven...lowered temperature to 325 degrees F. and bake for an additional 20 minutes...tested with toothpick and it was done in 55 minutes.

For Orange Glaze; 2 cups of powdered (icing) sugar, and 1 Tbsp. orange juice...mix it well together, until smooth (you should have a thick paste) ...drizzle on the bread with a soup spoon, or omit the drizzle.

Note: This was the best Pumpkin Bread that turned out so moist, the orange zest and the extra orange juice gave it such a pretty color, and flavor with the vanilla extract addition. The glaze is optional, but you don't have to use it on all the Pumpkin Breads...leave some without it if you prefer!


Tuna Salad-Stuffed Tomatoes with Arugula

I've always loved and enjoyed fresh salads and lately I have gotten bored with the simple 'hum-drum' salad with just cucumbers, tomatoes, and sliced or chopped onions (which I love all kinds, but mostly the red onions.) As for the dressing, just a simple extra virgin olive oil, and white balsamic vinegar.
Sometimes I just run out of ideas what type of salads I should make, and I simply grab one of my cooking magazines...especially my newest subscription; Eating Well, which I share with my daughter among our other great cooking magazines the she and I subscribe to. The best kind of inspirations you get are of course...the ones with photos, and also knowing you don't have to run out to purchase so many ingredients just for that recipe.
Here in the U.S. we tend to eat lunch 'on the run'...sometime just grabbing some 'takeout' fast food,
if you happen to eat at home; maybe leftover stuff from the night before...or if you happen to be in 'luck'...a friend might take you out to a nice restaurant or eatery place not too expensive. You can of course split the bill! Well, I don't seem to fit any of these categories, because most of the time I skip lunch (not good)...eating breakfast too late, and I would be 'starving' by dinner time, which is so unhealthy!
The only ingredient that I had to buy was the baby Arugula...also known as Roquette, or Rocket. I like to buy it in the small plastic bags, already sealed and the leaves are perfect, and tender...just love the peppery taste when you take a bite, it almost burns your tongue; but mixed with other ingredients, it blends so well!

Tomatoes, stuffed with tuna salad is a classic elegant lunch dish...now, there's a healthier twist to it, just leaving out the mayo, and adding oil and vinegar, salt and pepper. I must tell you, this was such an amazing light and enjoyable lunch for 2, or 4 people. Did not even require bread or rolls!

Hope you are all having a beautiful weekend, with most of you starting your Fall Season...oh, how I miss the beautiful fall colors of yellow, orange, red, brown, and burgundy leaves adorning the trees...only to be falling so quickly.

Before you know it, Halloween is around the corner! xo

Tuna Salad-Stuffed Tomatoes with Arugula

July/August 2014           

The tuna in this great-looking stuffed tomato recipe isn’t your typical mayo-based affair. The sherry vinaigrette does double duty: it adds fresh flavor to the tuna filling and also dresses the baby arugula and white bean salad.

My modifications are in red

Ingredients   

  • 3 tablespoons extra-virgin olive oil
  • 3 tablespoons sherry vinegar I used white balsamic vinegar...you can use your favorite
  • 1/4 teaspoon salt
  • 1/4 teaspoon freshly ground pepper
  • 4 large tomatoes  I used 2 large beefsteak tomatoes (for 2)
  • 2 5-ounce cans chunk light tuna in olive oil, drained I used 1 can of same tuna
  • 1/3 cup chopped celery
  • 1/4 cup finely chopped red onion
  • 1/4 cup chopped Kalamata olives
  • I also added 1 Tbsp of rinsed small capers
  • 1 teaspoon dried thyme
  • 1 15-ounce can great northern beans, rinsed Navy Beans are almost the same; I used 1/2 the amount.
  • 8 cups baby arugula  4 cups
  • You can cut down on the ingredients, or just 'eyeball' it...use your own judgement
 Preparation
  1. Whisk oil, vinegar, salt and pepper in a medium bowl. Transfer 3 tablespoons of the dressing to a large bowl and set aside.
  2. Slice enough off the top of each tomato to remove the core (1/2 to 1 inch). Chop enough of the tops to equal 1/2 cup and add to the medium bowl. Scoop out the tomato pulp using a teaspoon or melon baller. (Discard the pulp or save for another use.)
  3. Add tuna, celery, onion, olives and thyme to the medium bowl; gently toss to combine. Fill the hollowed tomatoes with the tuna mixture.
  4. Add beans and arugula to the dressing in the large bowl and toss to combine. Divide the salad among 4 plates and top each with a stuffed tomato.

Nutrition

Per serving: 353 calories; 18 g fat (2 g sat, 11 g mono); 7 mg cholesterol; 30 g carbohydrates; 0 g added sugars; 9 g total sugars; 20 g protein; 11 g fiber; 476 mg sodium; 878 mg potassium.
Nutrition Bonus: Vitamin C (70% daily value), Vitamin A (63% dv), Potassium (25% dv), Folate (21% dv), Magnesium (16% dv), Vitamin B12 (15% dv)


Aglio Olio-Garlic and Oil Pasta

I have making Aglio Olio-Garlic and Oil Pasta for years...never, but ever, had I used anchovy fillets; it could be for the reason, that this is one of those 'hand-me-down' recipes that is by 'word of mouth' and only needs basic every day ingredients.
I own several Rachel Ray cookbooks...six, to be exact, and they are all 30 minutes or less meals. All of these cookbooks, except for 1...I paid 79 cents @Goodwill. They are all paperback, and all new books. One book which I got recently, was $3.00...also, from Goodwill. Yesterday, when I was checking out the cookbooks; even the paperback cookbook of Rachel Ray, was $5.00...still, a lot less than the retail price of $14.95. Prices have gone up on books at Goodwill...and now, they are selling their cookbooks @Amazon.com for probably less, and you would have to pay another $3.99 for shipping charge, as well. Although, if you buy $25.00 or more at Amazon; shipping is 'free'!

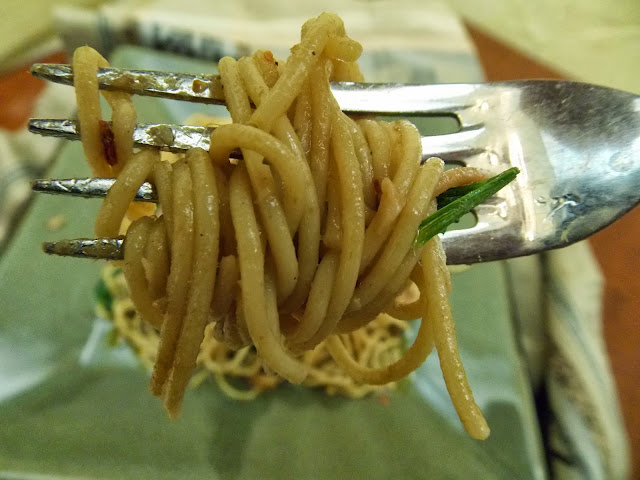
I'm so glad that I browsed through Rachel's 30-Minute Meals book, which every now-and-then, I consult for a quick meal. The addition of the anchovies really made a huge difference in the texture, and flavor of this simple pasta dish. You can use spaghetti or, linguine...I used a whole wheat spaghetti that stayed so firm to the bite=alt dente...and oh, so satisfying with a simple green salad, and nice crusty bread!

AGLIO OLIO-GARLIC AND OIL PASTA
Rachel Ray 30-Minute Meals

Ingredients

  • Salt
  • 1 pound spaghetti
  • 1/4 cup extra virgin olive oil (EVOO)
  • 1 container imported Italian anchovy fillets with red pepper flakes (2 ounces) – if you can't find these, use regular anchovies and add 1/2 teaspoon crushed red pepper flakes
  • 6-8 large cloves garlic
  • 1/2 cup finely chopped flat leaf parsley
  • Freshly ground black pepper
  • 1 loaf crusty bread
Serves 4

Preparation

Place a large pot of water over high heat and bring up to a boil. Once boiling, add some salt and then the pasta. Cook to al dente according to package directions. Right before draining, remove and reserve one cup of the pasta cooking water.

Place a large skillet over medium-high heat and add EVOO, about one turn of the pan. Add anchovies, garlic and pepper flakes, if you’re using them. Break up anchovies with a wooden spoon until they melt into the oil and garlic mixture.

Add reserved pasta water to the skillet, and then add the spaghetti, parsley, lots of pepper and a little salt to taste. Toss together and cook for one more minute so that the pasta has a chance to soak up some of the sauce. Serve with chunks of crusty bread for mopping up the excess goodness.


This is our fall season in Palm Beach, Florida...as of today, temperatures have fallen to a comfortable and slightly cooler feeling of what seems to be fall. This evening, just before dark...checked out the skies. Gloomy and gray; still did not rain all day long. No falling leaves, just a more comfortable cooler temperature. that tourists love to get away from the cold and snowy climate.

We are not nearly...or will be near anywhere the cold temperatures that some of you are experiencing...some sudden snow, in my hometown, in Ohio and temp. @ 39 degrees F. That is way too cold for me!
Have a wonderful weekend to all you dear friends...and readers! Hugs,

Cleveland Winter 2017

Hello my friends, I hope you all had a great holiday. I just got back from Ohio and I thought it would be nice to put together a post to s...