Showing posts with label Cream. Show all posts

Chocolate-Peanut Butter Pudding...a Guest Post

It's beautiful spring, everywhere...although here, in South Florida we do not know the difference, because for us, as they say "spring has sprung"...and it sprung quite early which we consider a truly spring weather, was back in February, and March. Even April is very nice, but soon as May is around the corner, our summer has begun, just like for all you folks up north. I hear it's about in the upper 80's in Cleveland, my old home town...less than what we have here today, in the low 80's.

Enough, about the weather. What I really would like to mention is my guest post for my dear friend Ping! Would you believe that when I first met her and we started following each other's blogs, which is almost 2 years for me...I was calling her blog Ping's Picklings...as in pickle?...she graciously corrected me that it's PICKINGS, and not the pickle kind!


I am so thrilled and honored to guest post for my dear friend Ping, whom I had the pleasure of meeting since we both started our food blogs, nearly two years ago... and have been supporting each other throughout the entire time. Ping has a meticulous food blog, and is very specific about her photos...no more than one, or two, and always a specific size...unlike my photos, which vary in sizes, and step-by-step directions when time permits. Ping has an amazing sense of humor, and always has the right thing to say, on any subject given...only in a "lighthearted" way! Her photos are always perfect, and immaculate, her choice of dishes, desserts, and baked goods are "dropped dead" gorgeous, and makes you want to see, and get more! She is kind, and caring, and you will feel blessed to have her as a friend...a beautiful friend, indeed!

Thank you Ping for asking me to guest post..."the second time around!" 


For my recipe...just click over to  Ping's lovely blog @ Ping's Pickings

Enhanced by Zemanta

Very Berry...oh, so Good Shortcakes


I am so way behind with commenting, and even my posting. Here it is, Wednesday, and I missed my Monday's post due to the holidays, and all the catching up to do in my household. I also downsized so much, donating at least 20 cookbooks that I have not looked into, just sitting around my bookshelf. Lately, food magazines and my older collection in neatly organized binder notebook with their plastic jackets, where I have tucked away recipes.
With all the abundance of berries available at this time of the year in South Florida, why not just enjoy the beautiful fresh and bright berries...especially the strawberries that are so affordable right now, and they are absolutely perfectly ripe, and flawless, so delicious, and so full of vitamin C that is so good for you. I hope you all had a wonderful Eater holiday, and are back into the normal routine of your daily lives.

First, and foremost, I do want to share with you as I have promised; my Flourless Chocolate Mousse Cake recipe which I have just recently found, tucked away in my binders notebook in a plastic jacket, behind some other recipes.
It seems, like every recipe of mine brings back special memories of places I've worked at, making  something special for the occasion, or holiday.
I'm not trying to take a short-cut, but I do have to, so this is the best way to post the recipe! Obviously, I don't have the source where this recipe originated from, I do know that I typed it myself, and this is how I used it.
Instead of the 2 ounces of the unsweetened chocolate, I used 2 ounces=which equals to 1/4 cup of dark cocoa powder. As for the cake pan, I used a 9 inch spring form pan...just spray the pan with cooking spray first. Everything else is just perfect...right down to a "science". Make sure you beat the egg whites, and egg yolks real well, and fold in the melted chocolate into the egg yolks first...then add the whites carefully in 2 additions, gently folding it in.

For the glaze: I used 1 cup of orange marmalade, 1/4 cup water mixed together (you can use other flavors such as apricot, or peach) follow the same way; heat up in a medium saucepan, bring to boil. slice strawberries, or leave them whole. Decorate the cake with the berries after it has been cooled, and removed from the pan, and take a medium mesh colander to spoon over on top of the berries. Place in the fridge, and let it set for about 2hrs. before serving.
Now, continuing the recipe for the Shortcake and strawberries!


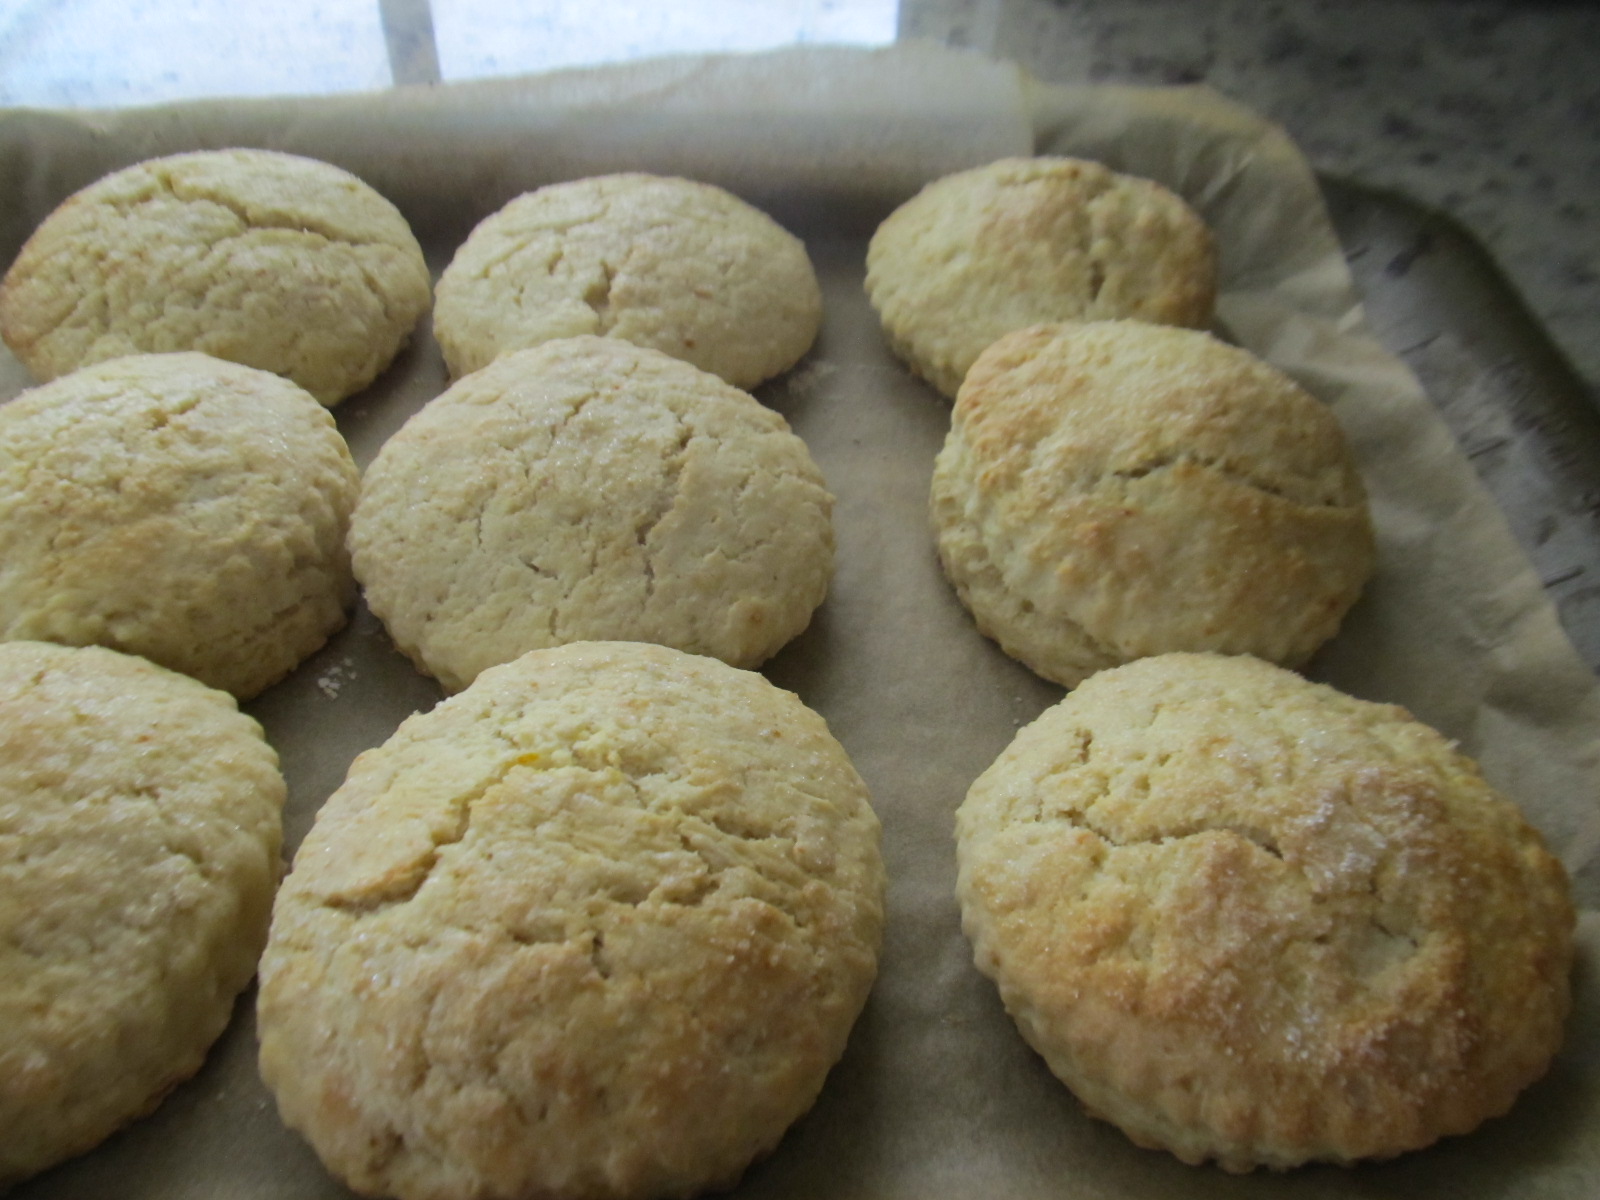
Fresh Strawberry Shortcake
adapted from unknown source

for the shortcake:

6 cups all-purpose flour
1/2 cup sugar
1 Tbsp baking powder
1 Tbsp grated orange peel
1/2 teaspoon salt
1/2 cup col butter, cubed
1 cup heavy whipping cream
1/2 cup sour cream
1 egg
1 egg yolk
1 tsp. vanilla extract
Coarse sugar, for topping

Combine flour, the flour, 1/2 cup sugar, baking powder, orange peel and salt; cut in butter until mixture resembles coarse crumbs.
Whisk together 1 cup cream, egg, egg yolk sour cream, and vanilla, add to flour mixture, stirring just until moistened. Turn onto a lightly floured surface, gently knead 8 to 10 times.

Roll out to 1 inch thickness.


Cut with floured, 3 inch scalloped or round biscuit cutter, place on a parchment paper line- baking dish about 2 inches apart.Brush tops with 1 Tbsp. cream, sprinkle with coarse sugar, if desired.


Bake at 400 degrees F. for 15 to 18 minutes.


Cool on wire rack for 5 minutes. Just before serving, cut shortcakes in half, horizontally. Place bottoms on dessert plates, top with strawberry mixture. Replace tops.


Replace tops, and spoon over the top with whipped cream, and serve extra strawberries on the side, if you like.
This is the best shortcake recipe that I can suggest. So light, crispy on the outside, soft, and fluffy on the inside.


For the strawberries:

6 cups of strawberries, sliced
1/2 cup sugar
1/4 cup orange juice

In a small bowl, combine the strawberries, sugar, and orange juice, set aside, till ready to assemble, the shortcakes.

For the whipped cream:

2 cups of heavy whipping cream
1/4 cup confectioners' sugar
1/2 teaspoon vanilla

Beat cream in a large bowl until it begins to thicken. Add confectioners' sugar and vanilla; beat until soft peaks form.
Enhanced by Zemanta

Farfalle Pasta with Cream, Salmon, and Peas

I've been making this delicious pasta since the nineties but cannot remember the original source...I just know that it's absolutely divine! The only difference is, that I cut down on the butter and the heavy cream used in this dish to lighten it up a bit. There are other similar pasta dishes out there but with the smoked salmon, instead of the fresh and they don't use the petite frozen peas, or garnish it with dill. The fresh salmon gives it a lighter taste where you don't get that "smoky" aftertaste from the smoked salmon.
This beautiful dish represent Spring, it is also linked to #greenslove @ Mis Pensamientos and will be honoring St. Patrick's Day...although it's far from being an Irish dish, but at least it's green!

Farfalle Pasta with Cream, Salmon, and Peas
my own creation

12 ounces  (1 1/2 pound) Farfalle Pasta
1 Tbsp. unsalted butter
1 Tbsp. extra virgin olive oil
1 shallot chopped
1/4 cup dry white wine
3/4 cup heavy cream
1 teaspoon grated lemon zest
juice of one fresh lemon
1/2 pound fresh salmon with skin on
2 Tbsp. sliced thin scallions (green part only)
2 Tbsp. fresh dill snipped with kitchen shears
sea salt, and freshly ground pepper

Boil pasta in a large pot, less than al-dente. Drain pasta, reserving 1/2 cup. In a large wok or skillet, saute shallots till soft and wilted. Add the wine and cook down until almost evaporated. Add cream, and bring to a boil.Add the peas, and just let it cook for a minute or two in the cream. In the meantime bake, or cook in a skillet the salmon piece adding the 1 Tbsp olive oil and sprinkle a little sea salt, and freshly ground pepper.Cook for about 8 minutes (will be cooking for an addition 2 minutes combined in the pasta)

Add pasta to cream mixture, along with the lemon juice, lemon zest. With a fork flake the salmon in small pieces off from the skin, and add to the pasta mixture. Add the scallions, 1 Tbsp. of the fresh dill, and add the reserved pasta water, if needed. Adjust the seasoning with sea salt and pepper.You can also drizzle a little bit of the extra virgin olive oil on top.
Serves 4


May you always have walls for the winds,
a roof for the rain, tea beside the fire,
laughter to cheer you, those you love near you,
and all your heart might desire.
`Irish Blessing
Happy St. Patrick's Day!
Enhanced by Zemanta

Lemon and Cinnamon Scented Flan...and Citrus Love Month

Since I'm into my second week of the WeightWatchers diet program, you would think that I gave up after this super delicious flan...but I did not give up, I am continuing with more enthusiasm, as ever! I lost an additional pound...4 lbs, loss, as of this morning. Yesterday, I went to the gym to work out for 50 minutes, and I mean...really work out, cardio, 30 minutes, and weights, another 20 minutes. I wanted to join in on the Citrus Love Month with something used with citrus. I can't be spending too much time with desserts, knowing that I can only have one bite, or maybe 1 cookie for a treat, so I'm sharing my flan to link up! Also, I will show off my very well planned out dinner...but only, when I have dinner at my daughter Lora's is when I get enthusiastic about it...otherwise, it's dinner for one, and it better be from the WeightWatchers, or similar type of dish!

Lemon and Cinnamon Scented Flan
inspired by Food & Wine

2 1/2 cups whole milk
Peel of half lemon
1 medium cinnamon stick, broken
1 cup sugar
1/4 cup water
5 large eggs


  1. Preheat the oven to 300°. Set six 5- to 6-ounce ramekins or custard cups in a medium baking pan.
  2. In a medium saucepan, combine the milk, lemon peel and cinnamon stick and bring to a boil. Remove from the heat and let stand for 15 minutes; discard the lemon peel and cinnamon stick pieces.
  3. Meanwhile, in a small saucepan, cook 1/2 cup of the sugar with the water over moderately high heat, stirring just until the sugar dissolves. Lower the heat to moderate and let the sugar syrup simmer, without stirring, until a deep amber caramel forms, about 15 minutes. Immediately pour the caramel into the ramekins, tilting them as necessary to evenly coat the bottoms.
  4. In a large bowl, whisk the eggs with the remaining 1/2 cup of sugar. Slowly whisk in the warm milk, then strain through a fine sieve into a large measuring cup or a bowl. Pour the custard into the ramekins. Pour enough hot water into the baking pan to reach halfway up the sides of the ramekins. Bake for about 40 minutes, until a knife inserted into a flan comes out clean. Transfer the ramekins to a rack and let the flans cool to room temperature. Refrigerate the flans for at least 4 hours or overnight.
  5. To serve, run a thin knife around each flan. Top each flan with an inverted dessert plate and unmold, letting the caramel run over the flans. Serve at once.
Make Ahead: The flans can be refrigerated for up to 2 days in the ramekins.

Linking to: Citruslove @ Mis Pensamientos
                   Thursday Favorite Things @ Katherines Corner

Strawberry Ice Box Cake

 I rarely try recipes from cooking magazines these days because I have so many selections from cookboos that I own, also from previous old recipe collections of mine, the Internet, and even better, recipes from my foodie friends' blogs which I could be trying out every single day. I also have the newest issues of Bon Appetit, Cooking Light, and Food and Wine, but for now, those are just reading materials for now until I can catch up with all the others.
For the tutorial video, with the proper round wafers...click: Strawberry Ice Box Cake
I'm linking the Strawberry Ice Box Cake to: 
 Hearth and Soul Hop #60 @Zesty South Indian Kitchen
So what's wrong with this dessert?...the wafer cookies!...the directions!
I bought the August, 2011 issue of Woman's Day, at the checkout isle, from my local Publix supermarket, and I was so thrilled with all the light summer recipes, as in my previous post with the Watermelon Feta salad. I still want to try a few more recipes in this issue, but I have to resolve this wafer, and directions problem first. I was looking for a good quality of chocolate wafer cookies...the ones I remember, from 20 or 30 years ago, that were such high quality for ice-box cakes. No Luck!
I had no other choice than to buy a much less quality wafers, that turned out to be a dry, tasteless, soggy tasting mess, that totally ruined my yummy, tasty, and healthy frozen delight!
I will post the recipe, as it is in the magazine, and you be the judge as to what went wrong, besides the tasteless wafer cookies. We enjoyed the frozen delight...minus the wafers. I will make this again, now that I googled the wafers, and found out that I can actually buy Nabisco wafer cookies online! While I was googling, just check this awesome recipe out on this site with Oreo Fridge Cake
This also is a must try for me!

Chocolate Eclair Cake, and Father's Day!


I realize that I should have uploaded Part 3 of my blueberry creation, and after that was a blackberry creation...just wanted to take a little brake from all the berries, and concentrate on this super yummy dessert that inspired me from Lizzy's blog...That Skinny Chick Can Bake!!! 
I mentioned to her that I cannot get the Whip it whip cream stabilizer, although I did want to make this dessert desperately. She is such a wonderful and caring friend, she sent me a couple packets of the product that I was supposed to receive it by Saturday so I can make this for Father's Day. Unfortunately, I had to make drastic measures to find a different route of make stabilizer for whipped cream, other than the gelatin method.

 Stabilizer Whipped Cream
source: Rose Levy Beranbaum
 
For 1 cup of heavy whipping cream, use 2 Tbsp of powdered sugar, and 1 teaspoon of cornstarch and add 1/2 teaspoon of pure vanilla extract.
Bring to a boil, stirring constantly, and simmer for just a few seconds, until liquid is thickened. Scrape into a small bowl, and cool completely to room temperature. Now, add the vanilla, and stir. When you are ready to whip your cream, beat 3/4 cup of heavy whipping cream, until it starts to thicken, and add in a slow stream, the cornstarch mixture, and whip until stiff peaks form when the beater is raised.

I followed Lizzy's exact recipe...the only difference was, that for the whipped cream I substituted corn starch, powder sugar, diluted with heavy whipped cream (not whipped) and when cooled, added to the custard.
So if I can inspire you with this amazing delight that truly looks like an eclair cake, and also reminds you of Napoleons, but really...just think! perfect summer dessert...a NO-BAKE...without the excessive heat in the kitchen.
I have never made a custard without eggs, or pudding powder...the custard in these layers are from pure heavy cream, butter, pure vanilla, delicately layered with...of all things, graham cracker cookies!

 I just went downstairs to check my mail, since I saw the mail truck pull up, and wouldn't you know?...Yeayy! I got my Dr. Oetker Whip it ...stabilizer for Whipping Cream:D I am so, so, happy that I have such nice and generous friend. Thank you so much Lizzy!... so gracious and kind to help me out, but I already made it from my homemade "scratch" stabilizer, so I will use it next time. I'm telling you this dessert looks like you "slaved away" for hours making this droolworthy dessert, with the decadent chocolate smooth as silk, ooey, gooey topping, and the cream is heavenly.
I could not wait for six hours to cool off, I made space in the freezer and chilled it for nearly an hour. So, if you want to try this dessert, click on the recipe.. and I guarantee you will stay on to browse for more of her amazing dishes, and fabulous desserts!

No Bake Raspberry Marshmallow Cream Cheesecake

I've always wanted to adapt a nice no bake cheese cake, but I hesitated, until now. Forget the Jello no bake cheese cake. This version is fresh, light, and easy to make. If you don't want to use my marshmallow frosting/creme recipe with it, you could use jar of Marshmallow creme, but it won't be the same.
Showing off my milk glass plate which I mentioned before on my blog. What a lucky find...a real treasure. The raspberries are so refreshing in this cheese cake.You couldn't possibly fold in fresh raspberries into the baked version. This is why it's so light.
The whole pieces of  raspberries are folded into it...you can see the swirl of the organic raspberry spread folded in...Yumm!
I decided to cut this recipe out from the back of the Nabisco Grahams, but did not use the 8x8 square pan, instead I used my  8x8 removable sides Wilton cheesecake pan. Used less raspberries and my own marshmallow creme, from scratch.
Who would want to get ride of their Wilton cheesecake pan? I got lucky with this. I just love it, such good quality, can't complain about the price, either. Goodwill find $1.99
No sooner than cutting out the recipe from the back of the Graham cracker box, I stopped by at my other favorite thrift store...World Thrift, and came across this great book which has recipes from labels on jars, cans, boxes and I can actually recognize some of these recipes, from a hundred years ago..(just kidding)...from 1979. Wow, 31 years ago. It has some real good ones, but obviously I will be adapting them to a lighter, and healthier version. My daughter didn't like this book because it has no pictures of the foods in them. You don't need to have pictures, you can pretty much imagine what it's going to look like when you make it your own. I can hardly wait to reminisce with the "oldies" and make it up to date.By the way, how could you lose for $.95?
 No Bake Raspberry Marshmallow Cream Cheesecake


1 pkg. (6oz.) raspberries
8 Graham crackers (1/2 box) crushed in food processor
2 teaspoons sugar
4 tablespoons unsalted butter, melted
2 pkg. (8oz). light Philadelphia creme cheese at room temp.
1 cup of home made marshmallow frosting/creme
grated zest of 1 lemon
juice of the same lemon, after grating
2 Tablespoons of seedless organic raspberry spread


Mix graham crackers sugar and melted butter. Press firmly with a back of a large spoon onto the bottom and up the sides, 1 inches in an 8x8 spring form pan. Chill, in refrigerator, until cream is assembled. In a large bowl, make marshmallow frosting, according to recipe. Take out 1 cup to use, and save the rest for frosting cup cakes, or cake, or divide recipe in half to use. Beat creme cheese and marshmallow frosting, adding zest of lemon, and juice. Beat until light and fluffy. Fold in half the raspberries, and gently swirl in the raspberry spread, Spread evenly over crust, and decorate with the remaining raspberries. Chill in refrigerator for at least 4 hours before serving. Makes about 8 servings.
Enhanced by Zemanta

Fettuccine Alfredo

A glass of pinot grigio wine.Image via Wikipedia
Fettuccine Alfredo is such an easy pasta dish to make. I recommend dry pasta for this. I tried it with homemade pasta, but it just seems to soak up all the sauce, and you need more sauce than recipe requires. This one also soaks it all up but just to the point of perfection.
There are quite a few versions of this, but I just like to use my version for now. Heavy cream, unsalted butter, imported parmigiana cheese-lots of it, a small amount of freshly grated nutmeg, very little sea salt, and fresh grated tricolor pepper. A small amount of snipped fresh parsley on the top. This is what 8 ounces looks like, not to mention what 16 ounces would look like. You can feed an army with one pound of pasta, This portion generously feeds at least 2 adults. and perhaps 2 children. Very filling, and oh so tasty.
This is what 1/4 pound looks like. Parsley already mixed in, not just for decoration. A nice glass of good quality Chardonnay, or Pinot Grigio goes well with it. This is so filling, you may not even want to have a salad with it, just another glass of wine, and a nice espresso later.
I highly recommend De Cecco pasta, one of the best out there. My favorite supermarket had this on sale, 3 for $5.00. What a bargain. They usually cost nearly $3.00 or more, for a 16 ounce box. Check for bugs, in the box! Maybe it's old?...Not to worry, just kidding. Our supermarket is immaculate, and everything is dated, and all the fresh produce could not be better, even at the produce market, unless you have your own garden.
These wonderful graters work best. The larger one I've had, since I don't know when, it's at least 30 years old,  Ekco brand, made in the U.S.A. The smaller one with the fine grating is a Farberware. Both are stainless steel and they last forever.
Recipe for Fettuccine Alfredo:
Fettuccine Alfredo
8 ozs. of dry De Cecco fettuccine (half a box of a 16oz.)
1 cup of heavy cream
4 tablespoon (1/4 lb.) unsalted butter
3/4 cup imported parmigiana (Parmesan cheese)
small amount of freshly grated nutmeg (dry is good too)
A small amount of snipped, (not chopped) parsley. (snip it with a kitchen scissor)
very small amount of sea salt
fresh grated tricolor pepper, or black pepper (I don't use white pepper)
1/2 cup cooking water reserved
In a large skillet, melt butter with cream, and 1/4 cup of the grated Parmesan. Slowly heat, and stir, until it gets nice and thick. In the meantime, boil pasta until al-dente, saving 1/2 cup of the cooking water.(I always save at least one cup for reserve.) Mix the pasta with the sauce, right into the large, skillet. It should be at least a 12 inch skillet, or a large pot, if you prefer. Now, grated the nutmeg, the sea salt, careful, not to add too much because the cheese is salty too. add another 1/4 cup portion of the cheese. At this point, the pasta has absorbed quite amount of the sauce, so you need to thin it out a little, with the reserved cooking water, a small amount while you are heating up the pasta. When it's nicely incorporated, put it into a medium serving bowl, or separate serving plates. Dived the cheese to sprinkle on top, and add parsley, not just for presentation, but it really tastes very nice with it.
Serves at least 3.
 
Enhanced by Zemanta

New York Style Cheesecake

 I have made so many different kinds of cheesecakes in the past, but this particular recipe is the best by far. No need to change a thing , or adapting it your way, other than perhaps adding a fruit topping, such as berries. I prefer to have the berries on the side. I have made this exact recipe over the last 3 years and have not change a thing. If you follow exactly, it will turn out perfect for you. It is not a difficult process. I have memorized the recipe by heart, and made it in Italy when I was visiting my son-in-law's family. You can actually get Philadelphia creme cheese there also, but nothing beats he American brand, solid and creamy. The egg yolks in Italy are like pure gold, therefore the cheesecake turns out a bit of yellowish shade, but the texture and flavor are the same. Also, you cannot find graham crackers there, so I had to use vanilla cookies to crush, but the recipe, and the method of baking was exactly the same. I copied and pasted the recipe, it was way too long for me to type, and besides, this is NOT my original recipe. Courtesy, of "Joys of Baking."
New York Cheesecake:
Grease, or spray with Pam, a 9 inch (23 cm) springform pan.  Place the springform pan on a larger baking pan to catch any leakage while the cheesecake is baking. Preheat oven to 350 degrees F (177 degrees C) with rack in center of oven.
For Crust:
In a medium sized bowl combine the graham cracker crumbs, sugar, and melted butter.  Press the crumbs evenly over the bottom and about 1 inch (2.5 cm) up the sides of the springform pan.  Cover and refrigerate while you make the filling.
For Filling
In bowl of your electric mixer place the cream cheese, sugar, and flour.  Beat on medium speed until smooth (about 2 minutes), scraping down the bowl as needed.  Add the eggs, one at a time, beating well (about 30 seconds) after each addition.  Scrape down the sides of the bowl. Add the whipping cream, lemon zest, vanilla extract and beat until incorporated.  Remove the crust from the refrigerator and pour in the filling.  Place the cheesecake pan on a larger baking pan and place in the oven.
Bake for 15 minutes and then lower the oven temperature to 250 degrees F (120 degrees C) and continue to bake for about another 1 1/2 hours or until firm and only the center of the cheesecake looks a little wet and wobbly.  Remove from oven and place on a wire rack.
Meanwhile, in a small bowl combine the sour cream, sugar, and vanilla extract.  Spread the topping over the warm cheesecake and return to oven to bake for 15 more minutes.  Remove from oven and carefully run a knife or spatula around the inside edge of pan
to loosen the cheesecake (helps prevent the surface from cracking as it cools).
Let cool before covering with plastic wrap and refrigerating.  This cheesecake tastes best after being refrigerated for at least a day.
Serve with fresh fruit or fruit sauces.
Makes one - 9 inch (23 cm) cheesecake.
To freeze:
Place the cooled cheesecake on a baking pan and freeze, uncovered, until firm.  Remove the cheesecake from the freezer, wrap it in heavy duty aluminum foil and place in a freezer bag.  Seal and return to freezer.  Can be frozen for several months.  Thaw uncovered cheesecake in the refrigerator overnight.
Adapted from Cheesecake Extraordinaire by Mary Crownover.
 
Crust:
2 cups (200 grams) of graham wafer crumbs or finely crushed vanilla wafers or gingersnaps (process whole cookies in a food processor until they are crumbs)
1/4 cup (50 grams) granulated white sugar
1/2 cup (114 grams) unsalted butter, melted
Filling:
32 ounces (1 kg) (4 - 8 ounces packages) cream cheese, room temperature (use full fat, not reduced or fat free cream cheese)
1 cup (200 grams) granulated white sugar
3 tablespoons (35 grams) all purpose flour
5 large eggs, room temperature
1/3 cup (80 ml) heavy whipping cream
1 tablespoon lemon zest
1 teaspoon pure vanilla extract
Topping:
1 cup (240 ml) sour cream (not low fat or fat free)
2 tablespoons (30 grams) granulated white sugar
1/2 teaspoon pure vanilla extract
Tips:  Sometimes the surface of the cheesecake cracks.  To help prevent this from happening do not over beat the batter, especially when creaming the cheese and sugar. 
Another reason for cracking is overbaking the cheesecake.  Your cheesecake is done when it is firm but the middle may still look a little wet. 
Also, make sure the springform pan is well greased as cracking can occur if the cheesecake sticks to the sides as it cools.
Read more: http://joyofbaking.com/Cheesecake.html#ixzz0utDeKZWI
Another satisfied customer. Megan, the "all American girl, from Rimini, Italy. Ciao Bella!
Enhanced by Zemanta

Cleveland Winter 2017

Hello my friends, I hope you all had a great holiday. I just got back from Ohio and I thought it would be nice to put together a post to s...