Showing posts with label Fruit. Show all posts

End of the Mango Season in S. Florida

I'm not trying to bore you with more mangoes...but this time, I just want to share with you the last of our mangoes and the  Mango Jam recipe that my daughter Lora and I share. My recipe calls for lemon juice, which her Italian recipe does not, but from the last batch that I made she like the slight tangy lemon taste...this time, I used the juice of fresh lime, and that even made it taste better!
I'm going to share my little secret of how to can jams perfectly and to make sure they stay sealed, tight. You have to hear that 'pop sound' when you twist the jar to open...otherwise its not sealed right! I could never do this kind of work in my tiny beach condo kitchen, now you can understand why I spend just about every day at my daughter's house...not so much because she has a much larger kitchen, but because they have plenty of counter space and the kitchen is open and well lit! Also, the patio has ample natural lighting as well. I made this batch last week, and hoped I would catch a little sunlight that was 'sneaking around' for a short time...then the rain came!

I will guide you through the easy process...although a little time consuming, but I promise you that you can make this with the half of the amount from the full recipe!

This is what 1 kilo (2.2 lbs) of fruit will allow you to make. These are 12 oz canning jars with lids, that have to be sterilized (just run it through the dishwasher cycle lid too) or boil in a large pot of water, and let it cool to the touch.

You can make this with other fruits...peaches is what I would love to make it with, hoping that the price will come down from $1.99 a pound, we will probably get it less at our local produce market. Plums would work well also, for this recipe.

I used Sure-Jell pectin for my previous batch, but this time I use my daughter's Italian pectin that comes in a big pouch, so I counted out how many Tablespoons it requires, and marked down everything on paper to be saved, so good thing that I'm actually typing up this recipe and method to save for myself too!

With a jar of leftover mango jam, I also made cream cheese bars filled with mango jam

Mango Jam
adapted from Italian basic jam recipe

2 kilo (4.4 lbs) mango, or other fruit
750 g.(about 2 1/2 cups sugar
juice of 2 lemons, or limes
5 Tablespoons pectin (I used Italian import)

note: you can cut the amount exactly in half if you
want to make less jam.

Wash, peel, and dice the mango, or other fruit, and put into a large bowl. With a potato masher mash it well, but leaving little chunks of fruit which is really very tasty.


Add the pulp of the fruit to a large heavy stainless steel, or other heavy duty pot. Add the sugar, the pectin and the juice of the lemon or lime, and simmer constantly, over med. high heat.


Make sure you keep stirring, constantly, until it comes to a bubble and a slow boil. You must take it off the heat as soon as it does that, and start getting your jars ready to be filled by the hot jam. Don't be alarmed that it looks liquidy, because it will start to jel, as soon as it starts to cool a little.


With a ladle, carefully spoon the jam up to about where the neck of the jar is, to assure it will not spill over...do not fill to the very top!


Just set them on a dish towel making sure the lids are well sealed, and here comes the tricky part that will assure double seal!


Turn the filled jars upside-down, and leave them sitting like that for about 10 minutes to assure safe sealing for the lids. You can also do a water bath in a large pot with water only up to half way, and simmer for 10 minutes, or just follow this method!

note: if you are planning to leave jams in a cool place in your cupboard, then you have to do the water bath method...otherwise just proceed with this method, but you must refrigerate after opening the jar...either way, when you open a jar of jam you must refrigerate it!

Jam is done...now you can go 'jamming along'...a cool song of Bob Marley...Jammin!

Enjoy the jam...and share, sparingly...it's that GOOD!

Linking to: Thursday Favorite Things @ Katherines Corner

Mango-Lime Sorbet

'Rainy Days, and Mondays'...is precisely what is happening here, in S. Florida at this very time! It is a lazy day...or I should say morning. I'm watching the Olympics as I'm typing my post...barely able to take my eyes off the T.V...watching the water polo with U.S. and Hungary...with a 4 - 0 ...Hungary leading! (ending with 11-6, Hungary winning!)

Very strong defense from Hungary! ...last night I watched the women's volleyball...U.S. against Italy, with U.S. pummeling the Italian team, wow!
Mango season is just about over now...I saw 3 lonely mangoes leftover on the mango tree, but we did get quite a few even towards the end to make some more mango creations. Nothing compares to fresh fruit sorbet...I love sorbet, more than ice cream...because of the light texture and pure fruit flavors along with the citrus fruit, such as lime! You really just have to know the formula, in making sorbet. It has to be equal amount of sugar and water for the simple syrup, which you just bring to a boil, and cool down, even best to chill several hours, or overnight!
Just add the chilled fruit puree with the cold simple syrup, and the lime juice, and you're good to go, mixing it in your ice cream maker.

Mango-Lime Sorbet
recipe by; Elisabeth

1 1/2 cups granulated sugar
1 1/2 cups water
4 cups mango puree
juice of 3 limes
a pinch of salt

In a medium saucepan, bring water and sugar to boil.
Stir frequently, just until sugar melts, and water comes to a full boil. Set aside to cool.
Peel and dice about 4  mangoes...more if needed to make 4 cups of puree. Add the juice of the 3 limes to the puree. Cool the the simple syrup in the fridge for several hours, ore overnight, before adding to the puree.


Combine the simple syrup and the mango puree in in the ice cream maker, and mix for about 20-40 minutes. Next...with the mango sorbet in the ice cream maker cylinder, put into freezer...no more than 40 minutes.


Spoon sorbet into a quart size plastic container, and freeze until firm! It is the best sorbet, that you can make homemade with other fruits as well. I would love to make a strawberry, or blueberry sorbet. Next, on my list!

Speaking of which, I totally wiped out my blog list by mistake...always messing around, fixing things. Now, I have to add my favorites...one-by-one. I did not intentionally wipe your blog out, will get my list back up soon, since I rely so much on my regular commenter friends.


Linking to: Full Plate Thrusday, @ Miz Helen's Country Cottage

                Thursday Favorite Things @ Katherines Corner

Enhanced by Zemanta

Hungarian Sour Cherry Strudel

When you see a plate of delicate and light cherry strudel...you know Spring is here!...in South Florida, we are now experiencing the most beautiful spring weather any state in the U.S. can experience. Although most of your northerners have the unusual early spring weather that you probably have not witnessed in years...or maybe not at all! Fresh cherries are very hard to find these days, and they are extremely expensive if you do find them, and not so sweet!

I love cherries, and especially in desserts. Cherry pie has to be my favorite pies of them all, but I cannot, and will not use the ooey-goeey cherry pie filling loaded with sugar, color, and corn sweetener...although (never say, never) because the famous cherry pie "filling and topping" looks so darn pretty on top of our ever so famous Philadelphia Cheese cakes! In this particular brand of canned cherries...it is all natural sour cherries in their own juice, and you only need to sweeten, and thicken the cherries for this amazing Hungarian Cherry Strudel!
You'll probably ask..."what makes it Hungarian?" and my answer would be the method of layering this delicate phyllo...or fillo, (which ever way you write or pronounce it)...I don't know of any other nationality that layers each and every layer (6) all together, with ground almonds, or walnuts, mixed together with fine plain bread crumbs, and sugar combined, that also goes into the plain sour cherries. You save the juice of the cherries to color your Easter eggs with...all natural!
I remember from my childhood, how my grandmother used to make her own strudel dough (phyllo) rolling the delicate dough on a huge table lined with floured table cloth, and just keep going around in a circle, gathering the dough until it's paper thin, and working with it quickly, so it doesn't dry out. Well, now you have the convenience of buying this fabulous dough, pre-packed, in the freezer section of your local grocery super market!

It just irritates me when you serve a nice plate of a classic European dessert...and immediately you get your first comment of "I don't like the powdered sugar on the top"...well, in this case, why not make half with, and the other half without the powdery sugar on the top?...I like to make everybody happy, so I do it that way! The following recipe...from memory, will let you make 2 nice generous rolls, and you can leave one without the sugar on the top!

Hungarian Sour Cherry Strudel
my own recipe

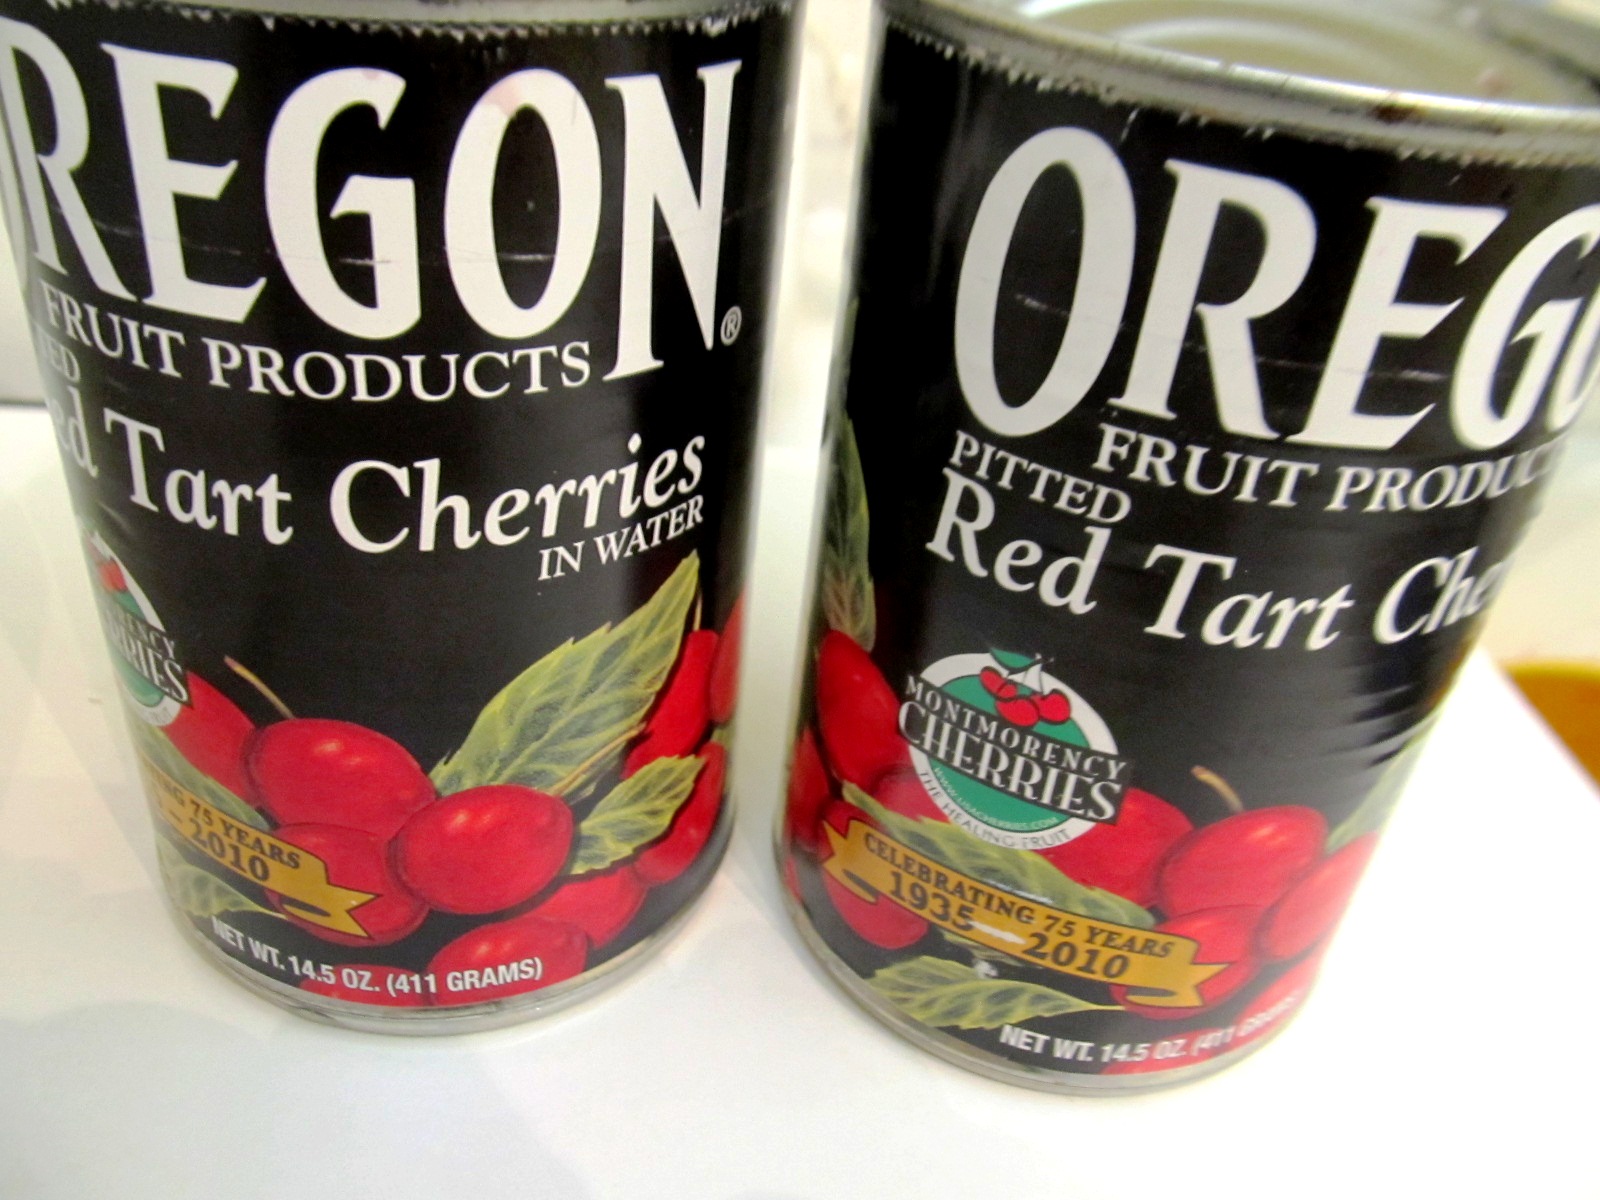
2- 14 1/2 ounce cans of pitted Sour Cherries in their own natural juice (not cherry pie filling)
2 cups of fine ground breadcrumbs
2 cups of ground almonds, (ground walnuts is good too)
2 cups of cane sugar, divided
1 teaspoon vanilla extract
2- portions of 6 layers of phyllo-fillo dough
(defrost dough in fridge, the day before)
8 Tbsp. (1 stick unsalted butter melted)


Even though it says Tart...it's really sour, and the label says: in water, but it has really dark cherry liquid, which you will want to save, for another use!


Drain the liquid from the cherries, and add the cherries into a medium size bowl.
First, mix the above mentioned bread crumbs, ground almonds, and 1 cup of sugar in a separate bowl.
From the mixture, add 1 cup to the cherries, and add an additional 1 cup of sugar, 1 teaspoon of vanilla extract and carefully stir together...set aside.


I purchase my Fillo pastry sheets in a Middle Eastern market, but they are sold in supermarkets with a different brand, and could be labeled, as PHYLLO, and not Fillo...same thing!


You have to work with the pastry sheets quickly, because they dry out fast. Any unused sheets, as you're working with them should be covered with  wet sheets of paper towel, or damp dish towel.
Take your firs 6 sheets of the pastry dough, and layer them one at a time.
First, take a fine brush, and dip into the melted butter that you have prepared in a small bowl. Don't over saturate the dough layers, just dab them a little here, and there, sprinkle with about a tablespoon of the mixed bread crumbs, sugar, and ground walnuts combination, not too much just scatter them around.

Do this same method, on every sheet, layering them as shown. (some sheets may tear, break, but it's OK, still use them).

When you get to the 6th layer, do the same by drizzling, with butter, and the combo of the crumbs, and almonds, and sugar.
Spoon half the portion of the cherries, not quite to the end of the roll...the long end, leaving at least a 2 inch border on each end. Carefully roll up in jelly roll style, tuck the ends in. Lastly, drizzle the last portion of the butter, and crumb mixture.


On a parchment lined baking sheet, (actually you have to be layering all this on the parchment lined baking sheet, so you don't have to transfer the dough)

In a preheated 400 degrees F. oven, bake for 25- 35 minutes, depending how hot your oven is. Remove...DO NOT slice immediately, wait for it to cool a little and for the filling to set, Carefully slice about 2 to 3 inches, with a sharp serrated knife. You can repeat the second portion, or save for another time (use within 2 days) I made 2 portions, one with, and one without powder (icing sugar) on the top.
Note: you have to work fast with the Phyllo, and also carefully, because the dough is very delicate.
Also, you can use different fillings, and make several different sweet, or savory things with this amazing Fillo!
This particular brand is a GREEK brand, and I will be making my favorite SPANAKOPITA...spinach pie, the next time!
Points value: 8 per serving
Enhanced by Zemanta

Three in One Salad

After all those ooey-gooey cheesie comfort food dishes, it's time to get down to real serious salad eatings. I created this salad at my daughter's (you can see, the blue plates are hers, not a thrift find,..a perfect lunch, yet comfortably pleasing with Greek pita bread she purchased, and the wonderful Greek yogurt from our local Middle Eastern market. The avocado was from the local Cuban produce market, so is this Greece, meet Cuba, in South Florida. Not too shabby!

Three in One Salad

Top Layer: Tzatziki

1 large cucumber peeled, halved, and cut into thirds,
 insides scooped out and  cut into 1/4 inch small slices. 
1/2 cup Greek plain yogurt
small amount of fresh snipped, or dried mint, or dill, or oregano (I used dried oregano)
salt and pepper to taste
a dash of rice vinegar (very mild)

Mix all the ingredients together, and serve it on top of the salad, (or on the side if you prefer)
Serves 2

Middle layer: Avocado and tomato salad

2-4 small mature, just ripe avocados,
skin removed, split in half and diced into cubes
2-4 plum tomatoes, cut in half and cubed
1 bunch scallions, sliced thin
2 cloves garlic chopped
2 jalapeno peppers diced
juice of 1 lime 
2 Tbsp. extra virgin olive oil
salt and pepper to taste.

Mix together all the ingredients, in a medium bowl, and save it for the middle layer of the salad, along with the dressing in it. No additional dressing needed.

Bottom layer: 1 bag of European mixed salad

1 6 oz can of imported Italian light  tuna in olive oil (or your favorite brand)
Start out on a dinner plate, with a nice portion, or half of the bag of salad, next, divide the tuna into nice chunks and scatter it evenly on 2 dinner plates, with oil in it..(don't drain liquid, or oil)...next, divide, and layer the avocado tomato salad including the dressing. The top portion is the tzatziki, just scoop that on the top, and serve it with pita bread, or naan, or bread of your choice. A hearty, healthy, satisfying lunch. Serves 2-4, if smaller portions are to be prepared.


Can you believe it? 12 limes for $1.00. Can't beat this price!

Fresh Plum Cobbler

I'll be honest with you! There's nothing more satisfying, than a nice portion of fresh fruit cobbler, even in the fall, which happens to be a plum cobbler. So beautiful, and robust color, the sweetness is totally divine. Just a touch of cinnamon and sugar, really livens up the flavors, it's so irresistible!
Just look at the natural colors, and the flaky homemade biscuit topping. Easy to prepare, yet it's so elegant!
Perfect fall dessert...no fuss...no mess...just simply down home "all American" No substitute!
 Fresh Plum Cobbler

3/4 cup, plus 2 Tbsp of sugar
10 fresh plums, about 4 cups, sliced and seeded
2 Tbsp. corn starch
1 teaspoon ground cinnamon
1 cup all purpose flour
1 1/2 teaspoon baking powder
1/4 teaspoon salt
1/4 cup + 1 Tbsp. butter
1/4 cup milk
1 egg

Preheat oven to 350 degrees. In a large bowl, combine the 3/4 cup sugar, plums, cornstarch and cinnamon. Place the fruit mixture in a 2 quart ovenproof casserole. In a medium bowl, combine remaining. 2 Tablespoons sugar, baking powder, and salt . Cut the butter with a fork, or pastry blender until it resembles coarse crumbs. Stir in the milk, mixed with 1 egg, and blend the mixture, just until blended.  Drop batter with a large soup spoon, and bake for 35 to 40 minutes,  till it gets lightly golden, and fruit mixture starts bubbling. Serves 6.


Enhanced by Zemanta

Cleveland Winter 2017

Hello my friends, I hope you all had a great holiday. I just got back from Ohio and I thought it would be nice to put together a post to s...