Showing posts with label Flour. Show all posts

Töpörtyüs Pogácsa-Hungarian (crackling) Biscuits


This is a difficult emotional task for me...I have actually made my Hungarian tepertős...or töpörtyüs pogácsa...a savory bacon bits biscuits...strictly Hungarian style, that is from my childhood!...one caution! Do not attempt to make this, unless you want a real challenge, or it's a childhood memory recall!...It's a huge challenge, and takes about 4 to 5 hours of folding, resting, rolling out the dough at least 3 times. I did have a Weight Watchers recipe for you (will have to post it next time)...made a delicious Manhattan Clam Chowder, which was in the cookbook.

I actually made a batch and scored the top...but when I baked it it had a "mind of its own" but all is well, they are incredibly delicious! 

As you can see...these biscuits turned out so flaky, savory, and delicious. A lot of work, but they were worth every minute of it!


Best Potato Latkes...and end of Holidays

As the holidays are winding down, and we're facing the new year, we can reflect back to last year, at this time, already thinking about the changes we are going to make in our lives, our homes, our friends, our bad habits, and start our diets for the hundredth time!...Yeah, sure! I do this every year, and keep promising to go back to Weight Watchers where I actually successfully lost 35 lbs, and kept it off for about 3 years, but gradually gained it back...and then some! So now, I will try the Weight Watchers online, and don't have to go to those boring meetings!
Well, let me tell you...it's a good thing that the year is ending, because December is the last month we can "pig out" with all the good food, and desserts...never say "never" to latkes, at least once a year, which is at Hanukkah! I promise you that I stand by my "best potato latkes recipe!"...it's not even a recipe it's really from all the failures of trying out different ways, but the best kept secret, is adding equal amount of Matzo Meal to your flour, a small amount of baking powder, and to make sure your grated potatoes do not turn brown, adding a tablespoon of whit distilled vinegar to the water. I will be glad to show you the directions, and promise that your latkes will come out crispy, light, and you don't even have to blot any excess grease if you use parchment paper...honest!

Having a 10 or 12 inch well seasoned cast iron skillet is another helpful utensil, that I feel every kitchen should have. It has so many uses, and will never, ever wear out....the older it gets if it's treated properly, the more use you get out of it. Just look at the fresh clean vegetable oil bubbling away, and the potatoes so light, and crispy. Never overcrowd the pan, or it will slow down the cooking process!

Best Potato Latkes
recipe by; Elisabeth


For single batch:


4-5 medium Russet (baking) potatoes, or your favorite
1/2 cup all purpose flour
1/2 cup Matzo Meal
1/2 teaspoon baking powder
salt and pepper to taste
2 eggs lightly beaten
1 medium onion chopped
vegetable, or canola oil, for frying
1 Tbsp. white vinegar
In a large bowl add water, and add the peeled potatoes and vinegar.
(you can use double batch by doubling the potatoes, 8 to 10, but it's less work with half the amount)
Cut the potatoes in half lenghtwise and in a food processor feed them right into the water, just like it's show in the photo.
Note: The starchier the water gets, but not dark, the crispier and lighter the latkes will be.


This is how the grated potatoes will look in the water...all starchy, cloudy, and beautiful. That's how you want it.


Now, you're ready to put the potatoes with the liquid, and strain it. Rinse it if you like, but you don't have to. The important thing, is to squeeze out all the liquid.


Add the potatoes back into the cleaned out bowl, and add all the ingredients, (except the oil, and vinegar)

With clean hands, or wear plastic gloves, mix together all the ingredients to combine well.


With a small ice cream scooper, scoop out portions, and add to the preheated heavy skillet, if you don't have cast iron skillet.


You can easily scoop out as much as it can fit, but make sure when you drop the scoop, do not touch it for a couple minutes, fry them over med-high heat, without disturbing them.


You can now flatten them down with a spatula, and turn them over to fry until lightly golden. Have your oven ready, at 350 degrees F. Line a baking sheet, or two, with parchment paper. When all the latkes are ready to be taken out of the frying pan, just line them up on the parchment lined baking sheet, and bake for an additional 25 minutes, turning them once.

You should have about 12 small latkes. Serve them with apple sauce, and sour cream!
Yields about 4- 6 servings


When you see the jagged, lacy edges, is how you know it is perfect, lightly golden...no need to blot with paper towel, no grease is left on the parchment paper!
The latkes are also really delicious with brisket, or pot roast, you can serve them with chicken, or just on the side. Every one loves this, especially young children, and adults alike!


Linking to:
Thursday Favorite Things Blog Hop 16 @ Katherines Corner
Full Plate Thursday 12-29-11 @ Miz Helen's Country Cottage 

Hungarian Nut Roll...and Counting Our Blessings

The holidays are almost over, and the new year will begin, in less than one week. We have so much to be thankful for...but mostly for our life, our freedom, to enjoy our choice of practicing our religion, our ethnic tradition, and respect one-another. This is the time of year when families get together and celebrate the "gift of giving!" It's not about how expensive, or how bright the gift should be...it's about the true meaning of our giving from the heart, and not putting a price on it!

My daughter Lora specifically asked me to make her Kalács (Hungarian Nut Roll) and I just put it off not realizing that it's the traditional value of the holiday season that she still remembers from the time she was little and my aunt making all the wonderful bake goods every Christmas! So, on Christmas Eve...just a few hours before we went to our dear friends for their Southern American/Italian dinner, I, at the last minute literally threw this wonderful quick nut roll together to have it for Christmas day! I rarely make yeast dough, but I made this with the full recipe, and freezing half of the dough! The filling is the same filling, that I used for my Kifli, in my previous post. I just did not have the time to make it the traditional way.

Googled the recipe, for the dough...just did not have the time to figure out the metric system to our American system. Turned out real moist, and everyone loved it. I got the nicest compliment from Lora, telling me that this was the best Christmas gift...better than any other present!

Hungarian Nut Roll
Adapted from Taste of Home

2 packages (1/4 ounce each active dry yeast
1/2 cup warm 2% milk
1/4 cup plus 2 Tablespoon sugar
3/4 teaspoon salt
1 cup butter softened
1 cup (8 ounces) sour cream
3 eggs, lightly beaten
6 to 6-1/2 cups all-purpose flour


Filling:
my own recipe

1/2  lb. walnuts
1 cup apricot preserves
1/4 cup sugar
Grated zest of 1 lemon
1/2 cup light raisins (optional)

In a large bowl, dissolve yeast in warm milk. Add the sugar, salt, butter, sour cream, eggs, and 3 cups flour. Beat on medium speed for 3 minutes. Beat until smooth. Stir in enough remaining flour to form a soft dough.( Dough will be sticky.)
Turn onto a floured surface; knead until smooth and elastic, about 6-9 minutes. Place in a greased bowl, turning once to grease top. Cover and let rise in a warm place until doubled, about 1 hour.


This is how the dough will look, doubled in size, nice and puffy!


Recipe calls for dividing dough into 4 portions, I divided mine into three. Roll out dough on a floured surface. Roll each into a 12x10 inch rectangle. Spread filling within 1/2 inch of edges. Roll up jelly roll style, starting with the long side; pinch seam to seal. Place seam side down on parchment paper lined baking sheet.


Cover and let rise until doubled, about 30 minutes. This is how it looks after 30 minutes...doubled in size. You can use egg wash with 2 eggs beaten with about 1 Tbsp. water, and with a pastry brush, just paint the tops and sides. Bake at 350 degrees F. for 30-40 minutes or until lightly browned. Remove from pan to wire rack, and cool.


For traditional walnut filling:

4 cups walnuts
1/2 cups sugar
1 teaspoon ground cinnamon
2 Tbsp. brandy
1/3 cup hot milk

Mix all the ingredients in a food processor, ending with the brandy, and hot milk. Spread on the rectangles, and roll up jelly roll fashion, and proceed with the instructions!


Linzer Cookies...and White Christmas Recipe Challenge


I am such a procrastinator...always the last one to join an event, unless someone is pushing me to do so! I did join the Very Good Recipes, as you can see the badge on my sidebar, and I do love this group, and to think that I didn't have to do a thing, just to sign up and they do all the work for you, to feature your blog with your latest posts automatically linked into your own page...now how hard awesome is that!? I'm also entering in this fun event with the Very Good Recipes White Christmas Challenge

Just click on, to see what the challenge is about, and check out the fabulous judges, including my dear friend Veronica, from Quay Po Cooks!

 linking to: Full Plate Thursday, 12-22-2011 @ Miz Helen's Country Cottage
                  Thursday Favorite Things Blog Hop 15 @ Katherines Corner

There's so many different versions of these lovely Viennese cookies that each country calls it their own, but it was actually originated during the 19th century
what was then, the famous well know Austria-Hungary empire! So, there you have the short history on these delicate buttery sandwich cookies...filled with apricot and various other fruit jams.
As a child, I have fond memories of these Linzer cookies, and I don't have my mom's or my aunt's recipes...only just remembering how it was made, so I adapted my version, from a trusted source!


Linzer Cookies

adapted from, Joy of Baking

1 cup (110 grams) blanched sliced almonds
1/4 cup (50 grams)

1 cup (227 grams)  (2 sticks) unsalted butter, room temp.
2/3 cup (135 grams) granulated white sugar, divided
2 large egg yolks
2 cups (220grams) all purpose flour
14 teaspoon salt
1/2 teaspoon cinnamon (optional)
1 teaspoon pure vanilla extract
1/2 teaspoon baking powder
Zest of 1 lemon

Confectioners' icing sugar, for dusting
choice of jams; raspberry (seedless preferred) blackberry
I used organic apricot, and organic blueberry, but you can use
choice of your own, even Nutella, which is great for chocolate lovers,
recipe, continued...

Orange Almond Mandelbrot...a.k.a Jewish Biscotti!

To think that I was going to skip making cookies for the holidays...when this morning, I called my daughter Lora, and said..."I want to make some biscotti...but you know, that  my kitchen is way too small, so I will come over to
your house and will make it there! Of course, she agreed, as she always does, because she likes to see me out of my "rut"...even though I live on the beach, but I get into those "holiday blues" just before the holidays, and I tell you...You got to snap out of it!!!...seriously! Life is too short...life is GOOD! It's what you make of it!
You want to feel sorry for this person...for that person...their sad situation, but when you seriously think about it, you really have to think about "yourself!"...You have "issues" just as the next person does...except, you deal with it much better than they do! They make you feel, that you have to help them, it's your responsibility!...enough said, just check out my amazing Orange Almond Mandelbrot (Jewish Biscotti) for the holidays!

Linking my Orange Almond Manderbrot to: Full Plate Thursday 12-8-11 @ Miz Helen's Country Cottage

Hungarian Kifli and a Quiet Weekend

While other people were piling up outside, after Thanksgiving dinner at various locations for the famous Black Friday shopping, 24 hours before, I was glad to get home and just chill out after a huge Thanksgiving feast with friends and family. Whatever happened to just the plain old "day after Thanksgiving Sale?"...now it's BLACK FRIDAY!...pretty scary, especially when you have to camp out the day before...luckily, this year they opened the doors at some stores, as early, as 9:00pm on Thursday, and midnight, instead of 4:00am on Friday! Granted, the sales are incredible, 40 to 60% savings, is for sure a bargain. I saw a few incidence on the news last night about an irate customer that was going around with pepper spray...spraying his/ her opponents so they can't get the bargains that she was aiming for: she did get arrested, but that is "bizarre" ...think I'm just going to take advantage on the online shopping, and leave the stress behind!
The reason this is called Hungarian Kifli, which means "crescent"  in English, or "kipfel" in German The dough is either a yeast based type of dough or in this case, is dough that is combined with equal amount of butter, and cream cheese, combined with flour. No eggs used in this recipe. This is the basic dough for the famous Rugelach, as well! On the front row, they are filled with ground walnuts, raisins and apricot jam, and in the back row, shaped like the Rugelach, but slightly bigger, filled with Nutella, which was the kids' favorite!
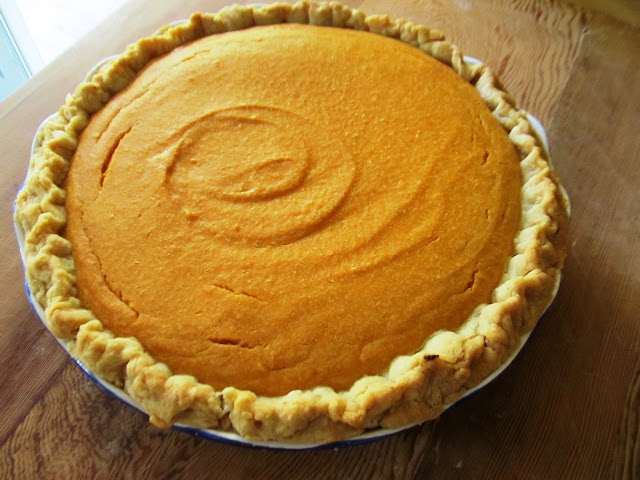
I also made the fluffiest, and most amazing Sweet Potato Pie, at the same time, with homemade pie crust. Lora and I were able to work alongside at the same time...making pies, and other pastries. As you can see, I got the favorite butcher block table, and she had the entire granite top counter, which she likes to use.
 I did not get a chance to take hardly any photos at the dinner party, but did not want to miss the chance of my son-in-law's Chef Fabrizio's Vegetable Lasagna, that was a huge hit!

 Lora's Cranberry cake...light, and moist, not too sweet, absolutely delicious!

Reese's Peanut Butter Chip Chocolate Cookies


Now that Halloween is  over, and your little ones have their candies sorted out by the parents, just to make sure that there are no unsafe, opened candy or something suspicious in the their "goodie bags." Such a fun time of the year for kids and adults, all alike...except for early snow, as some of you have experienced it.
In the meantime, while the kids are enjoying their Halloween goodies...sparingly, for their health sake, I decide to make a large batch of these wonderful chocolate cookies, made with Hershey's Cocoa Powder, using less sugar, because the Reese's Peanut Butter Chips are just perfectly sweet; made from real peanuts and are so darn addictive, you can just snack on those Reese's chips by themselves, packed with peanutty goodness!
Now, for the big announcement! I will be leaving early...I mean real early morning, on Friday, Nov. 4th flying out, at 5:45am to the Foodbuzz Festival, in San Francisco. This is the 3rd. annual event, and it's my first time that I am attending. It is from Nov. 4th, thru Nov. 6th. I was saving my excitement until now...and now, I can hardly contain it. Finally, I will be meeting up with other food bloggers, and get to know them in person.

The sad part is that I have to leave my poor old kitty, Prince, a tall Maine Coon... who is close to 19 years old, and getting frail, otherwise he is still quite alert, and very sweet and caring. He is my "alarm clock" in the morning, and at night reminds me it's late, and makes sure I don't stay up past the 11:00 news...so funny!

Apple-Date Cobbler...and Homemade Biscuit Mix


I have been searching around in my little trusted file box from Better Homes and Gardens to pull out some "magic"...as in pulling a rabbit out of a magic hat?...well, it certainly came down to that, because I am just fresh out of ideas, for finding something out of my favorite cookbooks, ie: How To Cook Everything, by Mark Bittman, or my Southern Living collection, my Food and Wine Collections, or my Cooking Light collection of series, from the year 2000 all the way through 2010...all of which are "thrift finds," but my collections of newspaper clippings, which I have totally narrowed down, and have stopped collecting, and index cards that I have pasted or written recipes on, are now, a "thing of the past."...done, and gone!


Nowadays, you can find so many recipes on the Internet, and you don't have to go further than, your foodie buddies' blogs, to get inspired by all the amazing recipes they create, and post. I get inspired just by visiting, and commenting on all the my favorite blogs...most of, who are my friends that I like to keep in touch with! So why don't I just stay comfy-cozy, and keep getting ideas from their blog?...it's because I need to accomplish what I set out to do, is to go through my collection of recipes...or just toss them out...which most I have already done so!

Homemade Biscuit Mix
from Sun Sentinel, West Palm Beach, 1994

1 3/4 cups all-purpose flour
1 Tbsp. baking powder
1 Tbsp. sugar
1/2 teaspoon salt
1/3 cup vegetable shortening

In a medium mixing bowl, stir together flour, baking
powder, sugar, and salt. cut in shortening until mixture resembles coarse crumbs.
Store in an airtight container, and refrigerate. It will keep fresh for up to one month, or you can freeze it and keep up to 6 months. Just let it come to room temperature before using it, either way.
Makes up to 2 1//2 cups.


Apple Date Cobbler
my own recipe

1/2 cup Homemade Biscuit Mix
2 Tbsp. whole-wheat flour
2 Tbsp. light brown sugar
1 Tbsp. cane sugar
1 teaspoon cinnamon powder
1 egg, lightly beaten
2 Tbsp. milk
4 apples, peeled, cored, and thinly sliced
juice of 1 lemon
2 Tbsp. unsalted butter
1 cup pitted dates

In a medium mixing bowl, combine biscuit mix, flour, and 1 Tbsp. of cane sugar. Stir in the lightly beaten eggs, and the 2 Tbsp. milk, just until they are combined, and smooth. In another medium bowl, combine the sliced apples, the 2 Tbsp. brown sugar the one teaspoon cinnamon powder, juice of the one lemon. In a medium skillet, melt butter, add the apple mixture, and saute until al-dente (not quite soft)...add the 1 cup of the pitted dates, stir for a few minutes to let the dates heat up, and soften a little.

Transfer the mixture to a 1 quart oven proof casserole that has been sprayed with cooking spray. Immediately spoon biscuit mixture atop of the hot fruit mixture, into 4, or six mound (I added 6) Bake in a 400 -degree F. oven for about 15-20 minutes. Spoon out, 1 biscuit, and surround with fruit. You can sprinkle with powdered sugar, or additional cinnamon, mixed with sugar.
Serves 6.
Note: If you are using frozen fruits for the cobbler, you can mix 1 Tbsp. cornstarch into 3 Tbsp. water, to add to the fruit mix to heat up.

Enjoy!
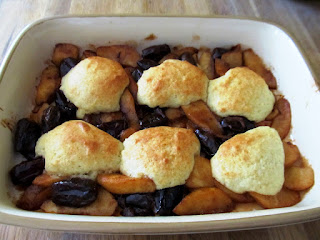
I made this in the middle of the afternoon, and my 10 yr.old  granddaughter Gabby and I enjoyed a serving of this...just check out the biscuit, how light, and fluffy, the apples still in beautiful pieces, and the dates, slightly softened...Mmmm...let me tell you, this is a TREAT!...a great middle of the afternoon snack, with a nice cup of hot tea (which I don't drink unless it gets cool outside)...or a cup of cold glass of milk!

Chocolate Chip Fudge Brownies...and Breast Cancer Awareness!

I have featured my brownies quite a few times since a little over a year ago that I have been blogging...but trust me, this one is so different...so perfect...so chocolaty goodness...fudgy, and oh, so yummy! Really! I kid you not!
Exactly one year ago..give or take a week earlier, or later, I posted my Breast Cancer Awareness Month post, and  linked it back to my sweet food blogger friend, Joanna, from ChicGorgeous  since she had the most gorgeous pink cupcakes posted.

Linking this with Hearth and Soul Blog Hop #69


Chocolate Chip Fudge Brownies
adapted from: Bon Appetit magazine 1999

3/4 cup (1 1/2 sticks unsalted butter
4 ounces bittersweet Girardelli chocolate chopped
4 large eggs
1 1/2 cups sugar
2 teaspoons vanilla extract
3/4 cups all purpose flour
1 cup bittersweet Girardelli chocolate chips

Preheat oven to 350 degrees F. Butter a 13x9x2 inch metal baking pan. Stir butter and bittersweet chocolate in heavy medium saucepan over medium-low heat until melted and smooth. Remove from heat. Whisk eggs and 1 1/2 cups sugar in large bowl until pale yellow and light, about 3 minutes. Gradually, whisk in warm chocolate mixture. Whisk in vanilla, then flour. Mix in chocolate chips. Pour batter into prepared pan.

Bake brownies until tester inserted into center comes out with moist crumbs attached, about 25 minutes. Cool brownies completely in pan on rack. Cut into squares. (Can be prepared 1 day ahead.) Store in airtight container at room temperature. You can sift powdered sugar over the top!


Warm Chocolate Pudding Cakes...and a special 7 Links


People tend to have addictions to all sorts of things, which I do not want to list right now, but if you would have a chocolate addiction like I do, and my granddaughter Gabby...you would understand why I on purposely do not bake a lot of things with chocolate, or even tempt my granddaughter with it.

I cannot trust myself to have chocolate around me, because I would eat the whole thing. Same thing goes for chocolate cake. So, I simply stay away from it, and have it once in a while, but honestly, if you're a "true chocolate lover" this would really satisfy your chocolate addiction. Not too sweet, not heavy, no cream added, just pure "chocolate heaven."
She must take after me, because she and I taste tested this Warm Chocolate Pudding cake, with the excuse of taking a photo of how it looks on the inside, just before my daughter served dinner...Gabby said to me "please don't tell mom I ate most of this...or she'll get so mad at me!..."and me"...I said. We not only taste tested it, but we ate the whole thing. The other spoon you see on the right is with another empty dish...and after that, we proceed to eat a nice dish of pasta, with homemade fresh tomato sauce, and a light salad.
Has any one of you done that? ...or are we just strange?

I'm linking my Warm Chocolate Putting Cakes, to Full Plate Thursday,
@Miz Helen's Country Cottage
Incidentally, I have left a comment @ Vicki's Blog At Home with Vicki Bensinger how I love to eat this pasta, with the fresh tomato sauce. She has just posted her recipe on it. Yumm!
Another delicious fresh tomato sauce recipe with Pennette, from Linda @ Vittles and Committals

Also, I wanted to share with you a special 7 Links from a wonderful blogger friend, Shabs,
@Yum and Delish whom I have tagged a couple weeks ago, if she would like to participate in rounding up her 7 links. She was so gracious and kind to keep me informed through e-mail, to let me know that she is still on vacation in her homeland, Kerala, India, and that she will post it when she comes back. Now, she has let me know on my previous post, commenting that she posted her 7 Links. She chose this gorgeous Strawberries and Cream Cake as her Most Beautiful Post...I do have to agree, and I'm sure you will too. Check out this amazing cake, and recipe, and her 7 links...you will be glad you did!
Strawberries and Cream Cake


Lemon-Glazed Zucchini Bread...and More Tomatoes!

I have not made zucchini bread for years, maybe since my children were little, and they actually loved it!...why not now?...I really don't know!

I used to have a fantastic recipe from Bon Appetit, but that was from the seventies, or eighties and those recipes almost, always called for at least 1 cup of vegetable oil, and 2 cups of sugar...yikes!!! there goes your cholesterol level, and killing you with sugar!...no thank you! At any rate, this recipe, I assure you has very little oil (1/4 cup) and lot less sugar (1/2 to 3/4 cup)...so, no wonder I didn't make it until now, although I've always been relying on my banana breads with excess ripe bananas always at hand. ...also having zucchini on hand, but using it in savory dishes!
Whatever you do, just don't tell your 5yr. old child that this is zucchini, the green vegetable that they are being served, tucked away, inside this wonderful lemon-sugar glazed bread. I made that mistake, and my 5yr. old granddaughter would not touch it with a 10ft pole! I posted this photo, because I wanted to show off the glaze on the top, and also the photo itself. Both was done by Sophia, my 10yr old granddaughter. She certainly loved the bread, and even had seconds. What a difference 5year makes! If you really want to camouflage the zucchini, all you have to do, is to peel it first, then grade it, the way my daughter Lora made it, with the same recipe. I, of course left the little green specks in it...which is the "beauty" of this delicious and moist zucchini bread!
See the little specks of green?...that's what real zucchini bread is all about...seeing the actual specks of the beautiful shredded fresh zucchini.

Cleveland Winter 2017

Hello my friends, I hope you all had a great holiday. I just got back from Ohio and I thought it would be nice to put together a post to s...