Showing posts with label Flour. Show all posts

Very Berry...oh, so Good Shortcakes


I am so way behind with commenting, and even my posting. Here it is, Wednesday, and I missed my Monday's post due to the holidays, and all the catching up to do in my household. I also downsized so much, donating at least 20 cookbooks that I have not looked into, just sitting around my bookshelf. Lately, food magazines and my older collection in neatly organized binder notebook with their plastic jackets, where I have tucked away recipes.
With all the abundance of berries available at this time of the year in South Florida, why not just enjoy the beautiful fresh and bright berries...especially the strawberries that are so affordable right now, and they are absolutely perfectly ripe, and flawless, so delicious, and so full of vitamin C that is so good for you. I hope you all had a wonderful Eater holiday, and are back into the normal routine of your daily lives.

First, and foremost, I do want to share with you as I have promised; my Flourless Chocolate Mousse Cake recipe which I have just recently found, tucked away in my binders notebook in a plastic jacket, behind some other recipes.
It seems, like every recipe of mine brings back special memories of places I've worked at, making  something special for the occasion, or holiday.
I'm not trying to take a short-cut, but I do have to, so this is the best way to post the recipe! Obviously, I don't have the source where this recipe originated from, I do know that I typed it myself, and this is how I used it.
Instead of the 2 ounces of the unsweetened chocolate, I used 2 ounces=which equals to 1/4 cup of dark cocoa powder. As for the cake pan, I used a 9 inch spring form pan...just spray the pan with cooking spray first. Everything else is just perfect...right down to a "science". Make sure you beat the egg whites, and egg yolks real well, and fold in the melted chocolate into the egg yolks first...then add the whites carefully in 2 additions, gently folding it in.

For the glaze: I used 1 cup of orange marmalade, 1/4 cup water mixed together (you can use other flavors such as apricot, or peach) follow the same way; heat up in a medium saucepan, bring to boil. slice strawberries, or leave them whole. Decorate the cake with the berries after it has been cooled, and removed from the pan, and take a medium mesh colander to spoon over on top of the berries. Place in the fridge, and let it set for about 2hrs. before serving.
Now, continuing the recipe for the Shortcake and strawberries!


Fresh Strawberry Shortcake
adapted from unknown source

for the shortcake:

6 cups all-purpose flour
1/2 cup sugar
1 Tbsp baking powder
1 Tbsp grated orange peel
1/2 teaspoon salt
1/2 cup col butter, cubed
1 cup heavy whipping cream
1/2 cup sour cream
1 egg
1 egg yolk
1 tsp. vanilla extract
Coarse sugar, for topping

Combine flour, the flour, 1/2 cup sugar, baking powder, orange peel and salt; cut in butter until mixture resembles coarse crumbs.
Whisk together 1 cup cream, egg, egg yolk sour cream, and vanilla, add to flour mixture, stirring just until moistened. Turn onto a lightly floured surface, gently knead 8 to 10 times.

Roll out to 1 inch thickness.


Cut with floured, 3 inch scalloped or round biscuit cutter, place on a parchment paper line- baking dish about 2 inches apart.Brush tops with 1 Tbsp. cream, sprinkle with coarse sugar, if desired.


Bake at 400 degrees F. for 15 to 18 minutes.


Cool on wire rack for 5 minutes. Just before serving, cut shortcakes in half, horizontally. Place bottoms on dessert plates, top with strawberry mixture. Replace tops.


Replace tops, and spoon over the top with whipped cream, and serve extra strawberries on the side, if you like.
This is the best shortcake recipe that I can suggest. So light, crispy on the outside, soft, and fluffy on the inside.


For the strawberries:

6 cups of strawberries, sliced
1/2 cup sugar
1/4 cup orange juice

In a small bowl, combine the strawberries, sugar, and orange juice, set aside, till ready to assemble, the shortcakes.

For the whipped cream:

2 cups of heavy whipping cream
1/4 cup confectioners' sugar
1/2 teaspoon vanilla

Beat cream in a large bowl until it begins to thicken. Add confectioners' sugar and vanilla; beat until soft peaks form.
Enhanced by Zemanta

Almond Cookies

I've been down-and-out with the flu for at least one month now, which seemed to have gone after finally 3 weeks, and I was so glad that I finally got a little relief from the sneezing and coughing...then one week ago, I woke up with my throat on fire, sneezing and coughing once more again, this time even worse. I finally gave in and went to see my doctor, and he prescribed antibiotic this time. Finally, I'm getting better now...well enough, that I just had to make something sweet, but not too sweet, so my perfect stand-by Almond Cookies always come to my rescue!
I practically have this simple recipe memorized, but could not find my handwritten recipe from over 20yrs ago, so I had to consult online, only to find the exact recipe that I used to have. Funny...even if I would have found my recipe, there wouldn't be a source on it, which we did not include in the past when we copied recipes by hand.
These lovely light as a "feather" cookies, do not even need baking powder, or baking soda, a light crispiness on the outside, and soft as a "pillow" on the inside. You really do not need to buy a large bag of whole almonds, just get the sliced ones which you can grind in a small processor, and use some sliced ones...I generously sprinkled the top of my cookies just before I baked them.

Almond Cookies
adapted from all recipes.com

1/2 cup unsalted butter softened
1/2 cup granulated sugar
1 egg
1 1/4 cups all-purpose flour
1 cup ground almonds
1 teaspoon pure vanilla extract
1 teaspoon pure almond extract
(you can use 2 teaspoons Amaretto liqueur
 instead of the vanilla, and the almond extract)

Preheat oven to 400 degrees F (200 degrees C)

In a large bowl, cream together the butter and sugar. Beat in the extracts, or if you're using Amaretto beat that into the mixture. Beat in half the amount of the ground almond. Gradually mix in the flour and the rest of the ground almonds.

Drop by teaspoonfuls 2 inches apart, on parchment lined baking pan. Bake 5-8 minutes in the preheated oven, or until cookies are lightly colored. Do not bake longer than 8 minutes...they brown very quickly.
Point value: 2 pr. cookie


Serves about 24 cookies. An extremely easy recipe...if you love almonds, you will love these perfect little cookies!
Enhanced by Zemanta

My Haphazard Weight Watchers Challah


My attempt at making Challah bread would be best if I could call out for my deceased female members of my family on my mother's side. Each and every member of my family made the best Challah bread, not just for the Sabbath on Friday...which was never really explained to me when I was a young child, but for other Jewish holiday traditions as well.


I never had to make my own Challah bread all theses years, up until the late nineties after my last aunt passed away...then, the tradition was broken. I was way too busy working days, at an affluent Jewish Country Club and 3 nights a week working for a mega wealthy household in Palm Beach as a Private Chef. Good thing I didn't have to do any bread baking...that would require a "separate position!"...end of that story!
If any one should doubt what this bread is all about, here's a little history behind it!

The braided challah, which is made with eggs, is the Jewish Sabbath‑and‑holiday bread. It is surrounded by folklore and tradition and loaded with symbolism. On festive occasions a blessing is said over two loaves, symbolizing the two portions of the manna that was distributed on Fridays to the children of Israel during their Exodus from Egypt. The breads are covered on the table by a decorative challah cover or a white napkin, which represents the dew that collected on the manna in the morning. Poppy and sesame seeds sprinkled on the bread also symbolize the manna that fell from heaven. 

Challah is made in various sizes and shapes, all of which have a meaning.
 
Braided ones, which may have three, four, or six strands, are the most common, and because they look like arms intertwined, symbolize love.

 Three braids symbolize truth, peace, and justice.

 Twelve humps from two small or one large braided bread recall the miracle of the 12 loaves for the 12 tribes of Israel. Round loaves, “where there is no beginning and no end,” are baked for Rosh Hashanah to symbolize continuity. Ladder and hand shapes are served at the meal before the fast of Yom Kippur—the ladder signifying that we should ascend to great heights, the hand that we may be inscribed for a good year. On Purim, small triangular loaves symbolize Haman’s ears; at Shavuot, two oblongs side by side represent the Tablets of the Law. The bulkah is a segmented rectangular challah.

Sweet challahs with honey or raisins are baked during the festive season to bring joy and happiness.

The name “challah” is derived from the Hebrew word used for “portion” in the Biblical commandment “of the first of your dough you shall give unto the Lord a portion for a gift throughout your generations.

Linking to: Full Plate Thursday @ Miz Helen's Country Cottage 

Challah
from the Weight Watchers New Complete Cookbook


1/2 cup lukewarm water
1 1/2 cups + 2 Tbsp. all-purpose flour
1 envelope active dry yeast
1 large egg, beaten
2 teaspoon corn oil
2 teaspoon sugar
3/4 teaspoon salt
1 egg white, beaten with 1 Tbsp. water
(I used one whole egg, beaten with ! Tbsp. water)
1/2 teaspoon poppy seeds

In a small bowl, combine the water and 1 Tbsp. of the flour; sprinkle with the yeast. Let stand until foamy, about 10 minutes. Stir in the egg and oil.

In a food processor, combine the remaining flour, the sugar, and salt. With the machine running, scrape the yeast mixture through the feed tube until the dough just forms a ball. Knead the dough by pulsing until it is smooth and elastic, about 30 times.

Spray a large bow with nonstick spray: place dough in the bowl. Cover loosely with plastic wrap or a damp towel and let the dough rise in a warm draft free place
until it double in volume, about 1 hour. Punch down the
dough; lightly sprinkle a work surface with flour.


 Divide into 3 equal pieces. Roll each piece between your palms.


Roll into an 18-inch rope between the palm of your hands.


Pinch ropes together at one end, and braid loosely.


Be sure to braid the three ropes loosely to allow room for the dough to rise the second time.
Cover loosely with a plastic wrap and let it rise in a warm, draft-free place until double in volume, about 1 hour.


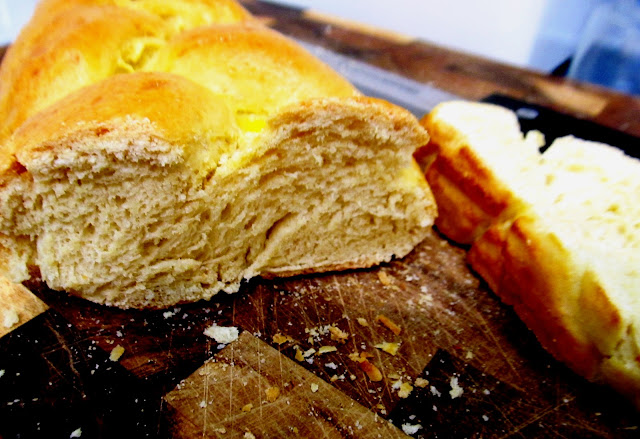
Preheat oven to 350 degrees F. 175 C. Brush the loaf with half of the egg white. Bake about 20 minutes...as seen in the photo...after 20 minutes. Brush with remaining egg white, and sprinkle with the poppy seeds, if you're using poppy seeds.


Bake until loaf sounds hollow when tapped on the bottom 10-15 minutes longer. Remove fro the baking sheet and cool completely on a rack.
Points value: 2

Note: this is an excellent small loaf of bread to bake, if you're not planning to make 2 loaves. 1 1/2 cups of flour, is such a small amount, compared to 3 to 5 cups used when baking breads. Simple and easy, just need practice with the braiding!


Not much to say about my weekend indulges...I practically ate the entire little loaf of bread by myself, before I got to share it with my family. Although, I did manage to lose 1 more pound...Total: 14lbs, and still going!

Enhanced by Zemanta

Paula Deen's Banana Nut Bread...and Awards

If you're feeling sluggish in the mid-afternoon, here's a very nice "pick me up" ...a slice of Banana Nut Bread, and a cold glass of organic low-fat milk. Of course, you can substitute it for a nice steaming cup of tea, or coffee...the choice is yours!
You"re probably wondering why I chose Paula Deen...the "queen of fatty foods" ...
Is it because it's FAT TUESDAY?...would that be appropriate for someone who is still on the Weight Watchers program?...or just recently finding out that she has type 2 diabetes, that she had for three years already, and we just found out!

It's really true, that we don't have to cook like that, with all the butter and fat, she is not encouraging us to cook that way, but it certainly is very tempting to try those recipes. I have found an easier method...just cut down on the fat, and make it a lighter version!
I found a super great thrift find, recently, at Goodwill. Paula Deen's first cookbook, before she became a famous food network star. It was copyrighted in 1997. The price, as you can see it was $1.29 soft cover book, filled with her early famous recipes. She owned a small restaurant at the time, in Savannah Georgia, with her two sons working there. Very cozy, simple, and down-home good Southern foods. I was really impressed with the Banana Bread recipe, and would like to share it with you. As far as for points value...it has to be at least 3 points pr slice...compared to 2 points with the WW Banana Bread, which I will also make soon. I lightened it up a bit, but I must admit, this was an incredible Banana Bread, enjoyed by all!

Linking to: Full Plate Thursday, @Miz Helen's Country Cottage
                Thursday Favorite Things Blog Hop, @Katherines Corner
                Food Photography @Crisp Photoworks

Banana Nut Bread
The Lady and Sons, by Paula Deen

1/2 cup Crisco shortening
(I used 1/3 cup vegetable oil)
1 cup sugar (I used 3/4 cup)
2 cups all-purpose flour
1 teaspoon salt (I used 1/2 teaspoon)
2 teaspoons baking powder
1/2 teaspoon baking soda
2 eggs beaten
3 ripe bananas mashed
1/3 cup buttermilk
1/2 cup chopped walnuts or pecans

Preheat oven to 350 degrees F. Cream shortening and sugar. (whisk oil, and sugar, if you're using oil.) Stir together flour, salt, baking powder, and baking soda and add to creamed mixture.


Add remaining ingredients; mix well.


Pour into a well greased pan. Bake for 40 to 45 minutes.
( I baked mine for 30 minutes on 350 degrees, and lowered the temperature to 325, for an additional 25 minutes.)


Rajma...and WW Corn Bread


Just recently, I was browsing through some food blogs of friends that I haven't visited for a while, and my eyes
got caught on a simple spicy bean dish...an Indian spicy vegetarian chili that inspired me so much...
knowing that I had all the spices, and it's a Weight Watchers approved dish, as well, plus the fact that I truly love, spicy foods!
When something really inspires me that someone makes, I usually leave a comment saying that "I would love to try this"..."I'm going to make this"..."I'm bookmarking it to print and copy the recipe"...how many of us say these over and over again?...only to just put it aside and forget about it! Nancy, and her husband Veejay are the authors of the Kitchen Gypsies, and I mentioned to my friend Nancy, that I would like to make this dish, and I actually did, in my slow cooker...a huge pot of it! So thanks for the inspiration, Nancy!

 Do visit their blog for the recipe, and browse through for some amazing authentic Indian, and American cuisine, that they have to offer.
Points per serving with rice: 10

Linking to: Cookbook Sundays @ Couscous-Consciosness

When I get inspired about a recipe...especially if I have the ingredients on hand, I could hardly wait to "jump" on it to make it, especially when it doesn't require an electric mixer, or a long time for preparation, and baking time. I can honestly say that this Weight Watchers Corn Bread recipe is the BEST by far, and guilt free light, super moist, and delicious of any corn bread or corn muffins I have made. It's pure, and simple...no butter, no fat, or oil added, just pure buttermilk!
Just look at the beautiful color, texture, and natural thickness of these healthy and delicious red kidney beans, soaked, and then cooked for several hours in the slow cooker! I served them over Thai Jasmin rice...amazing, spicy, and totally comforting and satisfying!


You can see the lines on the slow-cooker crock pot where it started to cook, cooking down and getting thicker.


The next day, I served it with my cornbread, which is a Weight Watchers recipe, that I will share with you.
I topped the Rajma with a generous spoonful of Lebni, which is a thick Middle Eastern Kefir, that can only be purchased in a Middle Eastern market, which we have here, locally, in West Palm Beach.


Recipe for the WW Cornbread...click on!

Rye Bread...and Awards

If you can believe it, this is my first rye bread that I have ever made...(I have made white, and whole wheat in a simple loaf pan, but not rye...and not free-form.)...thanks to finding rye flour at Whole Foods Market. They have everything there, that are healthy, organic, and totally good for you. I can spend hours there, when I shop, going down on each and every isle, and have a nice and healthy self-serve lunch there, as well.
The crust of this Rustic Rye Bread is so incredibly crunchy, and the flavor just blows you away! I made a long loaf and a round loaf with the recipe, it was really such a pleasure to get your hands on these loaves, and let the bread machine do the heavy kneading, but I did get help from my little grandson Luca. He volunteered to help, and both of us loved every minute of this fabulous bread making.

The recipe comes from a 1987 Fanny Farmer Cookbook, nothing fancy, no photos, just drawing illustrations.The ever famous James Beard has a great introduction about the book. Fanny Farmer...actually, that was her real name, had a cooking school in Boston, in the early 1900, and her first cookbook was published in 1896, the Boston Cooking-School Cookbook. She died in 1915, but her legacy has been carried on for over a century, and copies have been coming out, each time with new revised editions. This edition is also a revised edition, and the latest edition is a 2010 edition. Every cook in America should know about Fanny Farmer, and her contribution to the American Cuisine! Just a little history, to get you acquainted with!...Now, let's get on to the recipe!

Rye Bread
from the Fannie Farmer Cookbook

1 cup (1/4 L) milk
2 Tablespoon shortening
2 Tablespoon dark-brown sugar
1 Tablespoon salt
2 packages dry yeast
3 cups (420 g.) rye flour
3 cups (420 g.) white flour

Bring 1 cup water to a boil, mix it with the milk, shortening, sugar and salt in a large bowl, and let cool to lukewarm. Measure 1/2 cup warm water in a separate container, stir in yeast, and let it stand for 5 minutes to dissolve. Add the dissolved yeast to the rye flour to the first mixture, and combine thoroughly. . Add enough of the white flour, so that you can handle the dough. Turn out onto a lightly floured board, knead for a minute or two, then let rest, for 10 minutes. Resume kneading for about 10 minutes, adding the remaining flour as necessary.

(I did all the previous steps, by adding everything into the bread machine container, and set the dial on to the "dough setting" to do the kneading.)

Put the dough in a greased bowl, cover, and let rise in a warm place, until almost double in bulk.


(Now here's the fun part, my little helper waiting, in the sidelines on his favorite stool... and ready to punch down the dough)


Punch down and shape into two loaves. Place in greased loaf pans, ( I made two free-form loaves) and let rise until double in bulk. Preheat oven to 375 F. degrees
(190 C.)

Bake bread for 45-50 minutes. Remove from pans and cool on rack.


For a free-form shaped bread, fold over each side, as in making the dough for flaky biscuits.


Priceless little "angelic" helping hands folding over both sides of the dough!


Shaping the dough into a round loaf...making sure the ends are tucked in and sealed, so bread will not open up and fall apart when baking.


Such happy memories will result from bread making with little ones. (both of us shaping, and sealing the bottom of the dough)


One rectangle, and one round loaf. Place on parchment lined baking sheet, and let it rise again, until larger (not necessarily doubled)


Now, you can rub a little more flour on top, and slash the tops lightly with a sharp knife, to give it a rustic design, and follow the direction for baking.


...and the finished result! My grandchildren ate at least 2 slices of this amazing bread, while it was still warm. My grandson was so proud of himself for helping, he even had another slice for breakfast, the following morning!

Get your kids help you in the kitchen with baking, whenever they get interested...which might be more often than you think. So much fun, so many fond memories:DDD


For points value, I did the math on my little handy WW points tracker. 3 points for 1 slice of bread.
(I ate 2 slices)

Linking to: Full Plate Thursday, @ Miz Helen's Country Cottage
                Thursday Favorite Things Blog Hop, @ Katherines Corner

Cleveland Winter 2017

Hello my friends, I hope you all had a great holiday. I just got back from Ohio and I thought it would be nice to put together a post to s...