Showing posts with label Recipe. Show all posts

Palacsinta {crepes}...and a big 'flop'

Hungarian palacsinta, {crepes} filled with homemade mango jam
At the rate that I'm going...looks like I could go from 'Silent Sunday'...right into 'Silent Wednesday'. Actually, I was hoping to post a cheddar cheese bread for Lora's '#Twelve Loaves'...for the month of September, but my bread just did not rise...it refused to rise...waiting for over 2hrs (recipe called for 2hrs of rising)...waited for 3hrs, and still not much luck, but I persevered and was determined to shape the bread, and make it any way!

linking to: Hearth and Soul Blog Hop @ Zesty South Indian Kitchen


For Labor Day, which I hope you all had an enjoyable time with family and friends...as for me, I opted to stay home-alone, which did not happen.

I was so thrilled the my son came by with my two sweet granddaughters but then...I did not have a plan for lunch, but certainly had the right ingredients for a quick mac n' cheese (from scratch)...little burger sliders, on my grill pan, and for dessert, palacsintas filled with my mango jam.  Not so bad after all...and for the latter part of the day, I went by my daughter's neighbors' for a BBQ. Great day, after all!


Please excuse the not so great presentation of my photo but really good crepes)... and the scribbled recipe...I really wasn't going to bother posting this (I had my heart set on posting my bread, which unfortunately flopped...sigh!)

I hope you can make the chicken scribble out, I saved this recipe for the past 20 years now, tucked away in my little red box along with my other index cards, and hand written recipes. Recipe makes at least 12 crepes (pancakes is not the right term) copied it from 'word to word'...from a Hungarian cookbook written in English.


Here's the most amazing grill pan I found at Goodwill last weekend...brand new, heavy, I mean super heavy weight cast iron grill plan from IKEA for $9.99. I just had to have it, could not pass up this great grill pan. I tried it out to make my little mini burgers...of course, the pan has to be sprayed first with the vegetable cooking spray, and pre-heated, but just look at those grill marks on the burgers...a great 'thrift find' for sure!


Another amazing 'thrift find'...this awesome mini cake pan with 4 compartments to make the same banana bread recipe that you would make in one loaf pan. The time that it takes to bake, is totally half the time then the one pan makes. This was done in 35 minutes, moist delicious and yummy. Cost for the cake pan, $4.99.


Plum Upside-Down Cake


Since I've been food blogging for the last two years...I have not been thinking about that I would actually say,
"I have to bake something for my food blog"...hmm! wonder why did I say that to my daughter Lora, yesterday morning?
She told me the other day that her food blog is getting to be expensive...well, the reason for that is: She bakes every single day...really! There isn't a day that goes by when she does not bake...if nothing else, but the 'staple' banana bread, or homemade pancakes!
I was hoping to get this post up by yesterday...Friday, knowing that I did not have anything else worthwhile to post and that I don't do much baking cakes...although I love to put simple and yummy quick and easy desserts together!
We have such an abundance of plums...not the deep purple Italian ones, but the round ones which are so perfect just by themselves to snack on (which I did eat 3 yesterday)...and decide to make something with it. No time to start browsing through my cookbooks, old recipes, or favorite food bloggers' recipes...so what do you do first, if you don't have the basic recipe on hand?...The Internet...yes, that's the fastest way to google a recipe and do some adaptations of your own, which I did a little on my cake. Since I made this for my blog...still smiling to myself
about that one, I only kept one large piece for myself and shared the rest with my family.

Yesterday was such a stormy day on-and-off, with tropical storm Isaac on our heels by Sunday night...hopefully it's not turning into a hurricane!

Good day to be cooking and baking when you're stuck inside. I did go out on my balcony to take some photos of the beach, the clouds, and no less than 30 minutes wind, and a storm, but the worst is yet to come! We'll just have to be prepaired and be safe.

As you see, for my baking, I like to chose a comfy-cozy home type of dessert. For me they are super easy to make, and I do believe it will be easy for you, if you follow my easy and handy little tips. Don't let the layering of this beautiful upside-down all American simple cake intimidate you...and I DO recommend that you make this from 'scratch' and not from a mix, although I do use cake mixes, only to 'doctor' them up!
Here's the link to this awesome and easy cake!

Plum Upside-Down Cake 

End of the Mango Season in S. Florida

I'm not trying to bore you with more mangoes...but this time, I just want to share with you the last of our mangoes and the  Mango Jam recipe that my daughter Lora and I share. My recipe calls for lemon juice, which her Italian recipe does not, but from the last batch that I made she like the slight tangy lemon taste...this time, I used the juice of fresh lime, and that even made it taste better!
I'm going to share my little secret of how to can jams perfectly and to make sure they stay sealed, tight. You have to hear that 'pop sound' when you twist the jar to open...otherwise its not sealed right! I could never do this kind of work in my tiny beach condo kitchen, now you can understand why I spend just about every day at my daughter's house...not so much because she has a much larger kitchen, but because they have plenty of counter space and the kitchen is open and well lit! Also, the patio has ample natural lighting as well. I made this batch last week, and hoped I would catch a little sunlight that was 'sneaking around' for a short time...then the rain came!

I will guide you through the easy process...although a little time consuming, but I promise you that you can make this with the half of the amount from the full recipe!

This is what 1 kilo (2.2 lbs) of fruit will allow you to make. These are 12 oz canning jars with lids, that have to be sterilized (just run it through the dishwasher cycle lid too) or boil in a large pot of water, and let it cool to the touch.

You can make this with other fruits...peaches is what I would love to make it with, hoping that the price will come down from $1.99 a pound, we will probably get it less at our local produce market. Plums would work well also, for this recipe.

I used Sure-Jell pectin for my previous batch, but this time I use my daughter's Italian pectin that comes in a big pouch, so I counted out how many Tablespoons it requires, and marked down everything on paper to be saved, so good thing that I'm actually typing up this recipe and method to save for myself too!

With a jar of leftover mango jam, I also made cream cheese bars filled with mango jam

Mango Jam
adapted from Italian basic jam recipe

2 kilo (4.4 lbs) mango, or other fruit
750 g.(about 2 1/2 cups sugar
juice of 2 lemons, or limes
5 Tablespoons pectin (I used Italian import)

note: you can cut the amount exactly in half if you
want to make less jam.

Wash, peel, and dice the mango, or other fruit, and put into a large bowl. With a potato masher mash it well, but leaving little chunks of fruit which is really very tasty.


Add the pulp of the fruit to a large heavy stainless steel, or other heavy duty pot. Add the sugar, the pectin and the juice of the lemon or lime, and simmer constantly, over med. high heat.


Make sure you keep stirring, constantly, until it comes to a bubble and a slow boil. You must take it off the heat as soon as it does that, and start getting your jars ready to be filled by the hot jam. Don't be alarmed that it looks liquidy, because it will start to jel, as soon as it starts to cool a little.


With a ladle, carefully spoon the jam up to about where the neck of the jar is, to assure it will not spill over...do not fill to the very top!


Just set them on a dish towel making sure the lids are well sealed, and here comes the tricky part that will assure double seal!


Turn the filled jars upside-down, and leave them sitting like that for about 10 minutes to assure safe sealing for the lids. You can also do a water bath in a large pot with water only up to half way, and simmer for 10 minutes, or just follow this method!

note: if you are planning to leave jams in a cool place in your cupboard, then you have to do the water bath method...otherwise just proceed with this method, but you must refrigerate after opening the jar...either way, when you open a jar of jam you must refrigerate it!

Jam is done...now you can go 'jamming along'...a cool song of Bob Marley...Jammin!

Enjoy the jam...and share, sparingly...it's that GOOD!

Linking to: Thursday Favorite Things @ Katherines Corner

Mango Mousse


I received so many ideas, suggestions,and recipes, for mangoes...plus researched some new ones online. I thank each and every one of you, and appreciate all of them so much . With all the mangoes still on the tree, there will be plenty of time this month to try out new recipes.

One recipe recipe and single perfect photo that I wanted to try out was my dear friend Ping's, @ping's pickings  in Malaysia... that called for agar powder, a replacement for gelatin, (which is animal based powder)...compared to agar that is pure vegetarian-vegan. I also had a small portion of agar powder, sent to me, as a gift...among a lot of other useful baking gifts, from my other dear friend, Amelia, @Amelia's De-ssert...also, from Malaysia. I'm so fortunate to have such amazing friends from all over the globe.

 Well, since I apparently have used up the agar powder from before, I did discover another powder, which will surprise my American friends. It is the ever so commonly used; PECTIN...which is also a vegetarian-vegan based thickening agent, mostly used for jams, and jellies. Let me tell you, it worked perfect. I did my homework, once again researching the Internet for replacing agar powder, and came up with pectin. It is really very nice, a light white powder; very affordable, and you only need to use a teaspoonful to slightly thicken your pudding, or mousse. Also, I created my own mango mousse, using the simple method, without the use of eggs, and just simple basic ingredients...it worked, and turned out amazing.

 Now, I have 2 amazing simple recipes for you, one is mine, and the second one is Ping's, which she featured in her June 25, 2012 post. Please visit her beautiful blog, and you will find other wonderful recipes from her, which are all her creative ideas (no source mentioned)...so I do believe they are all her secret recipes...sharing with you!

Mango Mousse
created by; Elisabeth

4 cups of  mango pulp
from 4 medium peeled, and diced mangoes
juice of 1 lemon
1 1/2 teaspoon pectin powder
2 Tbsp. cane sugar
1 pint heavy cream

In a blender, add the peeled, and cut up pieces of mangoes, along with the juice of 1 lemon, puree the  mangoes with the 2 Tbsp. sugar, and the  1 1/2 teaspoon pectin. In a medium saucepan, pour the mango pulp mixture and heat on medium-high, stirring, but not frequently; let it come to a slow bubble, take off the heat, to slightly cool. In the meantime whip up the heavy cream, and halfway through, add 1 or 2 Tbsp powdered sugar. Whip to a consistency, by testing with you finger to make sure that it has a "peak"...do NOT whip any further than that point, or it will become whipped butter!

Pour the cooled mango pulp into a large bow, and carefully fold the whipped cream incorporating it. Pour into dessert bowls, and place in fridge to cool, and set...about 2hrs, or overnight if you can wait that long. I will be very light, fluffy, not too "jelled"...but just the right consistency to enjoy as a beautiful and perfect summer dessert. Decorate according the way you like to, with pieces of mango, or whipped cream on top.

 
MANGO COCONUT CREAM AGAR

INGREDIENTS

200 ml milk
200 ml coconut milk
4 tbs sugar
1/2 tsp agar powder
1 medium-sized ripe mango (about 250 g uncut weight)

METHOD

Remove peel and seed of mango. Puree 3/4 of the flesh in a food processor with a little milk until smooth. (I had about 1/2 cup pureed flesh). Cut remaining flesh into slivers or cubes ... your preference. Set that aside.

Place milk, coconut milk, sugar and agar powder into a pot.
Stir over medium heat until sugar and agar have dissolved.
Stir in pureed mango and turn the heat off. Mix well.
Pour into moulds or cups.
Refrigerate until firm, about 1 - 2 hours, depending on how big your moulds are.
Serve with mango slivers or cubes.


Enhanced by Zemanta

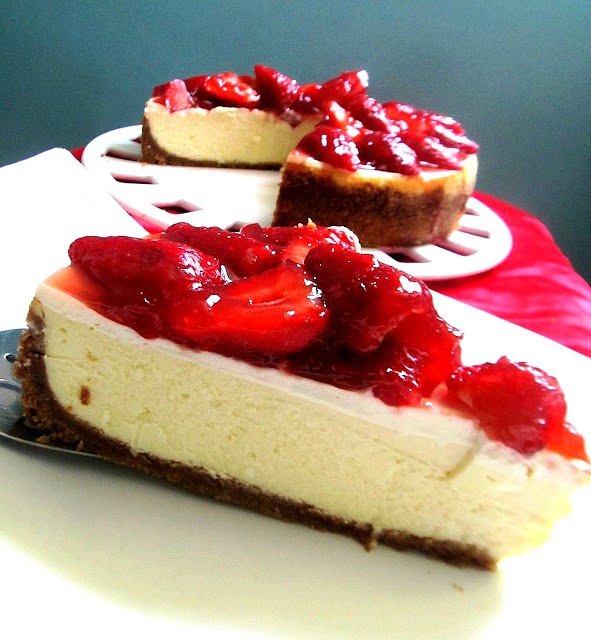
New York Style Cheesecake...and Guest Post!


I am honored to be guest posting for my dear friend... Veronica, of Quay Po Cooks food blog...which is a very diverse kind of a blog that you would want to see. It always starts with Veronica's stories from friends she has met, or of a fabulous restaurant and talented chef review, or her lessons with the famous chef's, making delicious cakes. She always speaks highly of everyone, has an abundance love for her family. A very lovely, and talented person. The "Lucy" version, is a little hard for me to get, because I don't think she messes things up, or get into trouble with her sweet Western husband...that would have to say..."Lucy, dju got some splaining to do!"...on the contrary, he puts Veronica on the "pedestal"...even when she gets her Lucy "moments"


At any rate, I honestly think she has a darn good sense, and always has everything in their proper order. I met Veronica, shortly after I started my blog, a few months later... and has kept in touch, since than. She always mentions how much I helped her with advice, which I appreciate so much but honestly, we all need advice, and occasional help from friends. That's what friends are for...( a line from a song, which I can't remember right now)

Thank you Veronica, for giving me the opportunity, to guest post...while you are vacationing in beautiful California, USA!


For the actual full recipe: link to my previous post when I posted it on my blog:
click on the title: New York Style Cheesecake

...and of course, check out my guest post at Veronica's Blog!

...there's more to come re: this post! ...right now, I'm having a "Lucy moment"...ask me why?


I want to share a 'Lucy' moment with you, since we're on the subject! You see this adorable 'thank you' card, (from Veronica) and the pretty Nyonya dress?  (I think that's what is called)...'a blend of Malay and Chinese influence' which is also in foods, or it could also be Peranakan. Big words?...I did my homework!

Anyway, make a long story short...when I accepted Veronica's invitation to guest post; later, she announced to me that she's sending me a gift and needs my address...OK,  I said, 'but you don't have to send me anything'...but of course, she insisted. 'I'm sending you a nyonya dress'...I'm thinking, 'ha...what?'...what's a 'nyonya?'...or even a dress?...why does she want to send me a dress...she doesn't even know my size, and what would I be doing with a traditional 'nyonya' dress...where would I wear it?...at that point I didn't even ask her, but in the next e-mail she told me, she is sending me a small gift which is a fridge magnet of a traditional DRESS!

OK, so who's the Lucy here...when I was about to tell her...(oh, I love this line from Lucy show)...from Ricki!
"Lucy, dju got some splainin to do!"...yes Lucy/Veronica, why didn't you tell me in the first place...letting me think you're sending me (maybe a promotional dress)...from one of your favorite sponsors, and I can keep it for 30 days FREE?...then after that I will have to purchase an additional dress for the next 6 months?...phewww! what a relief!
None of the above, and I can get to keep the pretty dress, adorned on my refrigerator...so Thank you Veronica, once again. If I get to meet you in person one day soon, I will take you up on your offer, for the real DRESS. (ha, ha, just kidding!
Big hugs, to you...I accept you 'just the way you are' xoxo
Enhanced by Zemanta

Spicy Red Bean Stew

Do you sometimes just browse through blogs, from other blogs, by just clicking over to a blog with s "shout-out?"...well, I do that quite a lot lately, and get so distracted with what I was originally set out to do.
I was recently commenting on a blog...trying to comment on a blog, that did not happen, and I got "sidetracked" to another blog, that caught my eye...such as this Spicy Red Bean Stew!

I'm linking the recipe to the blog, where I have spotted this wonderful spicy Israeli Red Bean Stew, that actually reminds me of chili...a vegetarian version...and oh, by the way, I just found this awesome small "bean crocks"...set of 2, at Goodwill for a ridiculous 79 cents each!
Without any further ado, please check out this blog for the recipe, all the way from Israel!
 Mimi, @ Israeli Kitchen
The only adaptation I made...was, that I chopped 1/2 of a green pepper, and used 2- 15 oz. cans of Red Gold diced tomatoes. I also thickened the bean stew, as I usually do, with removing 3/4 cup of the liquid from the stew, and adding 3Tbsp. of flour, mixing it smooth, and adding it back into the pot! I must say this is as "good as it gets"...
Do Not use canned beans, as Mimi suggested not to, as well. You don't want to miss out on the special nutrients, that only comes from the dried beans.
For the recipe; click here>>>Spicy Red Bean Stew
-----------------------------------------------------------------------------------------------------

Thank you for all your good wishes, about my hands injury...it's been about nearly one month now, and I'm just about all healed now. You all have been so kind and caring, and I do appreciate your thoughtfulness. No fun getting a nasty bite from your own pet (cat)...but you have to be understanding of the situation, and take care of the bite immediately, because infection sets in right away...which in my case it did, but it's all good now, and Prince is still around, 90% blind, from cataract, and almost deaf, but still is eating, and has not other issues other than being very, very frail and thin...still a trooper, still getting around, amazingly knowing where his food is, and his favorite lounging places (sometimes missing the jump to the bed, and sofa)...other than that he is still around, being guided by the younger little Persian kitty, that entertains him and sits by him when I'm not home! That's what I call a real "buddy!"

Happy Mother's Day!

To all mothers, grandmothers, step-mothers, and soon-to-be-mothers...may you have a lovely day full of sunshine, happiness, and much love... that you so, deserve!
Cheers!

My Mango Daiquiri recipe ...(with, or without the alcohol)
Enhanced by Zemanta

Raspberry Streusel Bars...and a Guest Post

First things first...I would like to thank all of you for your kind comforting, and encouraging words regarding my cat Prince, and my injured hands...which is a whole lot better now. It's healing very nicely, and as for Prince, we're taking one day at a time. As long as he is eating (even though, thin and frail)...his spirits are good, and he can pretty much get around  with minimal vision. He's alert, and sweet as he has always been, but we both know his time is nearing and I have to say good-by to him!
I am so blessed to have such nice friends that I met through blogging...truly caring, and loving dear friends. It's as if I've know them in person, already!
I am so thrilled to have my friend Lizzy from That Skinny Chick can bake...offering to help me out to guest post...oh, I did mention that my daughter Lora will do the guest post, and then Lizzy, but we had to switch it since Lora wasn't quite ready with hers yet!

Well, it turned out even better, not realizing at first that this is my very first guest post on my blog, and my blog is nearing two years soon!
So let's bring out the bubbly, and celebrate Lizzy for my very special honor for her first guest post on my blog!
Thank you Lizzy, I'm truly honored!
xoxo

Lizzy, is an amazing baker...every fabulous cake and dessert recipe is down to a "science," so precise, and accurate. She is a super kind, and wonderful person. She will be the first one to offer help when someone needs it. When you check her blog, every recipe is "tried and true"...just like one of those TEST KITCHENS where day test each recipe. You can feel rest assured that when you try out one of her recipes, that you will be so pleased and will always remember where the recipe came from. I told her in the past, that I already started a folder, just from her recipes.

She will tell you how we met for the first time, the two friends...one Lizzy, and the other Lizzie (that's me)


I am thrilled and honored to be guest posting here on Food and Thrift for one of my dearest blogger friends.
Lizzie joined Foodbuzz, a huge food blogger community, one month before I did…and was the first to befriend me and show me the ropes.  As my other Foodbuzz friends know, there is a huge learning curve….and Lizzie offered me tips and words of support and advice. Plus, she confided that she also had the same nickname, just spelled with an “IE” instead of a “Y.” We bonded immediately.

So when I heard that she had injured BOTH hands and was unable to cook (a food blogger’s nightmare!), I offered to guest post for her. I know she would do the same for me…she’s just that kind of gal. I baked these raspberry bars for a recent bridal shower and am delighted to share them all with all the Food and Thrift fans while Elisabeth recuperates.
Heal quickly, my friend! xoxo


When I prepare for a dessert buffet, I make sure certain categories are covered: chocolate, lemon, cheesecake AND something fruity. Cook's Illustrated does a wonderful job offering fool proof recipes...with detailed instructions...so when I came across these bars, I knew they would be perfect for the shower.

These were easy to whip up...and after finishing up a much more time consuming recipe for cheesecake pops, that was truly a blessing. I only had time to snap a couple quick photos, but I guarantee that raspberry fans will love these!


Raspberry Streusel Bars~

Adapted from Cook's Illustrated

2 1/2 cups flour
2/3 cup sugar

1/4 teaspoon salt
16 tablespoons (2 sticks plus 2 tablespoons butter 1/2-inch pieces, at room temperature
1/4 cup packed light brown sugar
1/2 cup quick oats
1/2 cup pecans, finely chopped
3/4 cup raspberry preserves
3/4 cup fresh raspberries
1 tablespoon fresh lemon juice

Preheat the oven to 375º. Line a 9 x 13-inch pan with non-stick foil so it hangs over the edges. Or use regular foil and spray with nonstick cooking spray.

Using mixer, combine the flour, sugar and salt at low speed to combine, about 5 seconds. With the machine on low, add 1 cup (2 sticks) of the butter, 1 piece at a time, then continue mixing on low for about 1 to 1 1/2 minutes.

Reserve 1 1/4 cups of the flour
sugar and salt at low speed to combine, about 5 seconds. With the machine on low, add 1 cup (2 sticks) of the butter, 1 piece at a time, then continue mixing on low for about 1 to 1 1/2 minutes.

Reserve 1 1/4 cups of the flour mixture and set aside.  Evenly pat the remaining flour mixture in the bottom of the prepared baking pan. Bake until the edges begin to brown, 14 to 18 minutes. Leave oven on.

While the crust is baking, add the brown sugar, oats and pecans to the reserved flour mixture and mix to combine. Using your fingers pinch the remaining 2 tablespoons of butter into the flour and oat mixture until the butter is fully incorporated. Pinch the mixture with fingers to create small clumps; set streusel aside.

Mix preserves, raspberries, and lemon juice in a small bowl, mashing the berries into small pieces.

Using a spatula, spread the filling evenly over the hot crust, then sprinkle the streusel topping evenly over the filling without pressing down on it. Bake 22 to 25 minutes till topping is lightly browned and filling is bubbling.. Cool to room temperature on a wire rack, 1 to 2 hours; remove from the baking pan by lifting the overhanging foil. Cut into squares and serve.

Enhanced by Zemanta

Very Berry...oh, so Good Shortcakes


I am so way behind with commenting, and even my posting. Here it is, Wednesday, and I missed my Monday's post due to the holidays, and all the catching up to do in my household. I also downsized so much, donating at least 20 cookbooks that I have not looked into, just sitting around my bookshelf. Lately, food magazines and my older collection in neatly organized binder notebook with their plastic jackets, where I have tucked away recipes.
With all the abundance of berries available at this time of the year in South Florida, why not just enjoy the beautiful fresh and bright berries...especially the strawberries that are so affordable right now, and they are absolutely perfectly ripe, and flawless, so delicious, and so full of vitamin C that is so good for you. I hope you all had a wonderful Eater holiday, and are back into the normal routine of your daily lives.

First, and foremost, I do want to share with you as I have promised; my Flourless Chocolate Mousse Cake recipe which I have just recently found, tucked away in my binders notebook in a plastic jacket, behind some other recipes.
It seems, like every recipe of mine brings back special memories of places I've worked at, making  something special for the occasion, or holiday.
I'm not trying to take a short-cut, but I do have to, so this is the best way to post the recipe! Obviously, I don't have the source where this recipe originated from, I do know that I typed it myself, and this is how I used it.
Instead of the 2 ounces of the unsweetened chocolate, I used 2 ounces=which equals to 1/4 cup of dark cocoa powder. As for the cake pan, I used a 9 inch spring form pan...just spray the pan with cooking spray first. Everything else is just perfect...right down to a "science". Make sure you beat the egg whites, and egg yolks real well, and fold in the melted chocolate into the egg yolks first...then add the whites carefully in 2 additions, gently folding it in.

For the glaze: I used 1 cup of orange marmalade, 1/4 cup water mixed together (you can use other flavors such as apricot, or peach) follow the same way; heat up in a medium saucepan, bring to boil. slice strawberries, or leave them whole. Decorate the cake with the berries after it has been cooled, and removed from the pan, and take a medium mesh colander to spoon over on top of the berries. Place in the fridge, and let it set for about 2hrs. before serving.
Now, continuing the recipe for the Shortcake and strawberries!


Fresh Strawberry Shortcake
adapted from unknown source

for the shortcake:

6 cups all-purpose flour
1/2 cup sugar
1 Tbsp baking powder
1 Tbsp grated orange peel
1/2 teaspoon salt
1/2 cup col butter, cubed
1 cup heavy whipping cream
1/2 cup sour cream
1 egg
1 egg yolk
1 tsp. vanilla extract
Coarse sugar, for topping

Combine flour, the flour, 1/2 cup sugar, baking powder, orange peel and salt; cut in butter until mixture resembles coarse crumbs.
Whisk together 1 cup cream, egg, egg yolk sour cream, and vanilla, add to flour mixture, stirring just until moistened. Turn onto a lightly floured surface, gently knead 8 to 10 times.

Roll out to 1 inch thickness.


Cut with floured, 3 inch scalloped or round biscuit cutter, place on a parchment paper line- baking dish about 2 inches apart.Brush tops with 1 Tbsp. cream, sprinkle with coarse sugar, if desired.


Bake at 400 degrees F. for 15 to 18 minutes.


Cool on wire rack for 5 minutes. Just before serving, cut shortcakes in half, horizontally. Place bottoms on dessert plates, top with strawberry mixture. Replace tops.


Replace tops, and spoon over the top with whipped cream, and serve extra strawberries on the side, if you like.
This is the best shortcake recipe that I can suggest. So light, crispy on the outside, soft, and fluffy on the inside.


For the strawberries:

6 cups of strawberries, sliced
1/2 cup sugar
1/4 cup orange juice

In a small bowl, combine the strawberries, sugar, and orange juice, set aside, till ready to assemble, the shortcakes.

For the whipped cream:

2 cups of heavy whipping cream
1/4 cup confectioners' sugar
1/2 teaspoon vanilla

Beat cream in a large bowl until it begins to thicken. Add confectioners' sugar and vanilla; beat until soft peaks form.
Enhanced by Zemanta

Almond Cookies

I've been down-and-out with the flu for at least one month now, which seemed to have gone after finally 3 weeks, and I was so glad that I finally got a little relief from the sneezing and coughing...then one week ago, I woke up with my throat on fire, sneezing and coughing once more again, this time even worse. I finally gave in and went to see my doctor, and he prescribed antibiotic this time. Finally, I'm getting better now...well enough, that I just had to make something sweet, but not too sweet, so my perfect stand-by Almond Cookies always come to my rescue!
I practically have this simple recipe memorized, but could not find my handwritten recipe from over 20yrs ago, so I had to consult online, only to find the exact recipe that I used to have. Funny...even if I would have found my recipe, there wouldn't be a source on it, which we did not include in the past when we copied recipes by hand.
These lovely light as a "feather" cookies, do not even need baking powder, or baking soda, a light crispiness on the outside, and soft as a "pillow" on the inside. You really do not need to buy a large bag of whole almonds, just get the sliced ones which you can grind in a small processor, and use some sliced ones...I generously sprinkled the top of my cookies just before I baked them.

Almond Cookies
adapted from all recipes.com

1/2 cup unsalted butter softened
1/2 cup granulated sugar
1 egg
1 1/4 cups all-purpose flour
1 cup ground almonds
1 teaspoon pure vanilla extract
1 teaspoon pure almond extract
(you can use 2 teaspoons Amaretto liqueur
 instead of the vanilla, and the almond extract)

Preheat oven to 400 degrees F (200 degrees C)

In a large bowl, cream together the butter and sugar. Beat in the extracts, or if you're using Amaretto beat that into the mixture. Beat in half the amount of the ground almond. Gradually mix in the flour and the rest of the ground almonds.

Drop by teaspoonfuls 2 inches apart, on parchment lined baking pan. Bake 5-8 minutes in the preheated oven, or until cookies are lightly colored. Do not bake longer than 8 minutes...they brown very quickly.
Point value: 2 pr. cookie


Serves about 24 cookies. An extremely easy recipe...if you love almonds, you will love these perfect little cookies!
Enhanced by Zemanta

Cleveland Winter 2017

Hello my friends, I hope you all had a great holiday. I just got back from Ohio and I thought it would be nice to put together a post to s...