Chocolate-Peanut Butter Pudding...a Guest Post

It's beautiful spring, everywhere...although here, in South Florida we do not know the difference, because for us, as they say "spring has sprung"...and it sprung quite early which we consider a truly spring weather, was back in February, and March. Even April is very nice, but soon as May is around the corner, our summer has begun, just like for all you folks up north. I hear it's about in the upper 80's in Cleveland, my old home town...less than what we have here today, in the low 80's.

Enough, about the weather. What I really would like to mention is my guest post for my dear friend Ping! Would you believe that when I first met her and we started following each other's blogs, which is almost 2 years for me...I was calling her blog Ping's Picklings...as in pickle?...she graciously corrected me that it's PICKINGS, and not the pickle kind!


I am so thrilled and honored to guest post for my dear friend Ping, whom I had the pleasure of meeting since we both started our food blogs, nearly two years ago... and have been supporting each other throughout the entire time. Ping has a meticulous food blog, and is very specific about her photos...no more than one, or two, and always a specific size...unlike my photos, which vary in sizes, and step-by-step directions when time permits. Ping has an amazing sense of humor, and always has the right thing to say, on any subject given...only in a "lighthearted" way! Her photos are always perfect, and immaculate, her choice of dishes, desserts, and baked goods are "dropped dead" gorgeous, and makes you want to see, and get more! She is kind, and caring, and you will feel blessed to have her as a friend...a beautiful friend, indeed!

Thank you Ping for asking me to guest post..."the second time around!" 


For my recipe...just click over to  Ping's lovely blog @ Ping's Pickings

Enhanced by Zemanta

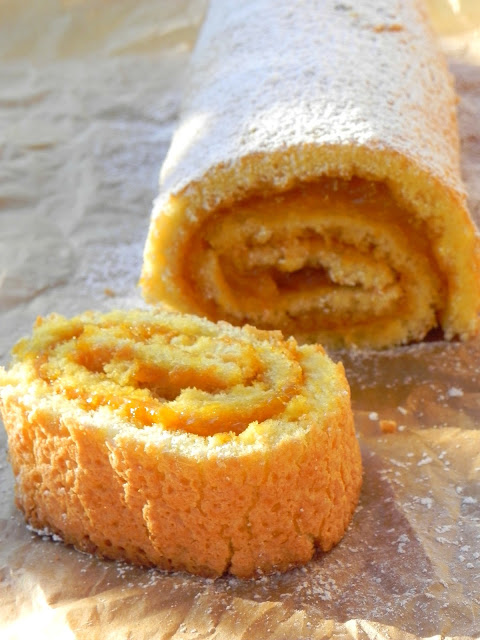
Mango Jelly Roll...a Guest Post

I finally have the privilege of introducing my sweet daughter, Lora @ Cake Duchess ...who is so kind to guest post for me, which I have already mentioned about 1 month ago when I had my hand injury. She already had this wonderful jelly roll ready for me but we just could not get together on the same day to post it. Be sure to check out Lora's lovely blog...and probably know her and follow her blog!

She is so very busy...like all young moms with work, kids, school, and all her own cooking and baking projects.
Lora, I'm so thrilled, and honored to have you guest post for me, and taking time out from your busy schedule and your amazing blog. I'm so proud to have you as my daughter!
xoxo

I have totally forgotten about my mango jam, that I make every summer, and it lasts for several months the way I carefully can it, and to make sure that it's properly sealed. Without further hesitation, here is Lora, and in her own words!


It’s such a pleasure to be guest posting on my mom’s blog. She’s an amazing woman and she was my first cooking inspiration.  She still inspires me every day with her creativity in cooking and in baking. I owe my love of cooking to my sweet mom. She’s taught me invaluable lessons in the kitchen that I am now teaching to my children.

The jelly roll is a recipe that brings back many memories for me. My mother’s aunt from Hungary used to make it very often. It was light as a feather and filled with her wonderful homemade jams. She was an expert at baking delicious Hungarian desserts. I have sweet memories of baking alongside my great-aunt with my mom.

Every summer my mom makes the most wonderful mango jam with the mangos from our tree. I thought it was about time to bake with some of it as our tree is filled again with more glorious mangos. You can fill the cake with your favorite jam or even some whipped cream and fresh berries.

Thank you very much for having me guest post today, mom. It’s a joy to be a part of your delicious blog.

Elisabeth's home made mango jam


Mango Jelly Roll:
 
This recipe makes enough for one 18″ x 13″ sheet  or one 9″ cake. Here’s the formula:
5 ounces (1 cup) all-purpose flour
4 tablespoons butter (preferably clarified)
½ teaspoon salt
6 eggs
7 ounces (1 cup) sugar
1 teaspoon vanilla extract 
Filling:
1 cup mango jam (or your favorite preserves)
Preheat your oven to 350. 
Set a saucepan big enough to hold your mixer bowl on the stove with an inch of water in it. Bring it to a simmer. Meanwhile, sift the flour and salt together into a medium bowl. Melt the butter in a small saucepan and set aside. 
Pour the sugar into the mixer bowl, add the eggs and whisk to combine. Set the mixer bowl over the pan of water and heat the mixture until it’s warm to the touch (no more than 120 degrees). What you’re trying to do is simply melt the sugar…don’t cook the eggs! It’ll only take a minute or so. 
Remove the bowl from the heat and, using the paddle attachment, beat the mixture on medium high until it’s very light and foamy, about triple its original volume (this will take up to ten minutes with a stand mixer). Add the vanilla and beat an additional 10-15 seconds. 
Pour a cup or so of the egg foam into the cooled melted butter and stir it until it’s completely incorporated, then gently pour the mixture back into the mixer bowl (this eases the incorporation of the butter into the batter). Next, sprinkle the flour mixture into the mixer bowl and carefully fold until the flour mixture and the butter mixture are completely incorporated. Gently pour the batter into the prepared pan.
Bake until the cake is a pale gold color and springs back lightly when touched. Bake cake until golden brown and springy to the touch, 6 to 7 minutes. Run a knife around sides of cake. Invert onto prepared towel, and remove parchment. 
While the sheet cake is still warm, gently roll, starting from one short side, into a log, incorporating the kitchen towel. Let the cake cool completely, rolled. (This will give the cake a "shape memory," so it will be easier to roll again with filling.)


Time to fill: Unroll cake.
Spread filling over cake leaving a 1/2-inch border all around. Carefully roll cake to enclose filling (without towel), starting at a short end. Refrigerate 30 minutes (or up to 3 hours). Dust with confectioners' sugar before serving.
Enhanced by Zemanta

Spicy Red Bean Stew

Do you sometimes just browse through blogs, from other blogs, by just clicking over to a blog with s "shout-out?"...well, I do that quite a lot lately, and get so distracted with what I was originally set out to do.
I was recently commenting on a blog...trying to comment on a blog, that did not happen, and I got "sidetracked" to another blog, that caught my eye...such as this Spicy Red Bean Stew!

I'm linking the recipe to the blog, where I have spotted this wonderful spicy Israeli Red Bean Stew, that actually reminds me of chili...a vegetarian version...and oh, by the way, I just found this awesome small "bean crocks"...set of 2, at Goodwill for a ridiculous 79 cents each!
Without any further ado, please check out this blog for the recipe, all the way from Israel!
 Mimi, @ Israeli Kitchen
The only adaptation I made...was, that I chopped 1/2 of a green pepper, and used 2- 15 oz. cans of Red Gold diced tomatoes. I also thickened the bean stew, as I usually do, with removing 3/4 cup of the liquid from the stew, and adding 3Tbsp. of flour, mixing it smooth, and adding it back into the pot! I must say this is as "good as it gets"...
Do Not use canned beans, as Mimi suggested not to, as well. You don't want to miss out on the special nutrients, that only comes from the dried beans.
For the recipe; click here>>>Spicy Red Bean Stew
-----------------------------------------------------------------------------------------------------

Thank you for all your good wishes, about my hands injury...it's been about nearly one month now, and I'm just about all healed now. You all have been so kind and caring, and I do appreciate your thoughtfulness. No fun getting a nasty bite from your own pet (cat)...but you have to be understanding of the situation, and take care of the bite immediately, because infection sets in right away...which in my case it did, but it's all good now, and Prince is still around, 90% blind, from cataract, and almost deaf, but still is eating, and has not other issues other than being very, very frail and thin...still a trooper, still getting around, amazingly knowing where his food is, and his favorite lounging places (sometimes missing the jump to the bed, and sofa)...other than that he is still around, being guided by the younger little Persian kitty, that entertains him and sits by him when I'm not home! That's what I call a real "buddy!"

Happy Mother's Day!

To all mothers, grandmothers, step-mothers, and soon-to-be-mothers...may you have a lovely day full of sunshine, happiness, and much love... that you so, deserve!
Cheers!

My Mango Daiquiri recipe ...(with, or without the alcohol)
Enhanced by Zemanta

Whole Wheat Focaccia...for #Breaking Bread

I love to bake a nice focaccia every now-and-then; but this time I was eager to bake an entirely different one than my usual simple rosemary focaccia. Just did not have my own recipe for a different focaccia, and I'm sure you are the same way as I am, that at that very moment, you are not going to go through all your cookbooks to look for a certain recipe...so in my case...just go to the "heart of the matter" which is get a trusty library book on the certain item you want to make. Internet is always helpful, but borrowing a beautiful book with pictures and plenty of recipes is much more helpful!
Linking to: Full Plate Thursday @ Miz Helen's Country Cottage 

Now that I finally baked this delicious and healthy whole wheat focaccia, Lora formed the group Breaking Bread Society with her friends Shulie, from Food Wanderings and Marnely from Cooking with Books. What a fun baking with yeast ventures! I'm proud and happy to link it to the
#Breaking Bread to Lora (daughter) @Cake Duchess who is this month's hostess.
Just look at this lovely coarsely chopped walnut, and caramelized onion infusion with fresh rosemary nestled in the little pockets along with the extra virgin olive oil, bake to a crispy-crunchy top, and a soft delicious texture on the inside!
As you know, focaccia is associate with Liguria, Italy and its capital city of Genoa. There are many ways to top focaccia, as there are to top pizza...but because focaccia takes (to bake than pizza, it is important to follow the topping guidelines to protect against burning.

Whole Wheat Focaccia
adapted from;Whole Grain Breads by: Peter Reinhart

4 cups (510g.) whole wheat flour (I used King Arthur)
1 1/4 teaspoons salt (I used 1 1/2)
1 1/4 teaspoons (4 g.) instant yeast (I used 1 envelope)
2 cups +2 Tbsp. (482 g) water. at room temperature
1 1/1 teaspoons honey, or agave nectar or brown sugar
(I used 2 teaspoons dark brown sugar)
1 1/2 Tbsp. olive oil  (I used 2 teaspoons)
extra whole wheat flour for adjustments


If using the stand mixer, use the paddle attachment.
Place all of the ingredients except the extra flour and the olive oil in the mixing bowl of your mixer, on low speed for 2 minutes. With the machine off, drizzle the olive oil over the dough for another 30 seconds.

Turn of mixer and let the dough rest for 5 minutes. Mix again, on medium speed for another 30 seconds. The dough will be smoother and stronger, but it will be sticky. If it is too wet and not enough structure, add a little flour.


This method is the standard method I used, rather than the overnight method that the book recommends.

In an oil lined glass bowl place the dough ball, turn over to get it oiled on the opposite side, cover with plastic wrap and a clean dish towel, and let it rise double for about 1 hr.- 1 1/2 hrs.


On a parchment lined baking sheet, carefully shape the dough to a rectangle. Cover loosely with a clean dishtowel, and let it rest for another 30-35 minutes.


In a large skillet, with 2 Tbsp olive oil, start sauteing one sweet onion, sliced. About halfway through, add 2 teaspoons light, or dark brown sugar, and keep sauteing until it gets nicely caramelized. Add about 1 cup of coarsely chopped walnuts and fold it in.


After about 45 minutes, you can start poking the dimples in the dough with your thumb. It's ready to top when you see the indentations stay down.


In a small bowl, pour about 1/2 of olive oil, and brush lightly with a pastry brush, making sure you fill the indentation, and you can add some fresh rosemary right into the holes. You can sprinkle coarse salt over the top, and also add the walnut-onion mixture into the indentations.


Bake in a preheated 450 degree F. (232 C.) oven bake for about 10 minutes, and lower the temperature to 425 degrees F. (200 C.) for another 20 minutes; being careful
not to burn the topping. (If any burns a little bit, you can just scrape the charred layers off. I added too much topping, but you don't have to!)


The result...a perfect crunchy, and golden brown top, ready to transfer to a cutting board, after cooling on a metal rack.


Now, you see what I mean? Look at the little pockets of the filled walnut-caramelized onion, the fresh rosemary, and the light sprinkling of the coarse sea salt I used!
Superb! Whole Wheat Focaccia that is amazingly healthy, and delicious. Using my method, I promise you will not go wrong!

Buon Appetito!


Last year's mangoes...star fruit is also home grown, as well!

Aren't these mangoes gorgeous?...from my daughter's mango tree! They will be fully ripe in another month for sure!
Hugs,
Enhanced by Zemanta

Kung Pao Chicken...and Cinco de Mayo!

What does a spicy Sechuan Chicken have to do with Cinco de Mayo?...absolutely nothing!

 The holiday of Cinco De Mayo, The 5th Of May, commemorates the victory of the Mexican militia over the French army at The Battle Of Puebla in 1862. It is primarily a regional holiday celebrated in the Mexican state capital city of Puebla and throughout the state of Puebla, with some limited recognition in other parts of Mexico, and especially in U.S. cities with a significant Mexican population. It is not, as many people think, Mexico's Independence Day, which is actually September 16. 
Kung Pao, also translated as Gong Bao Chicken, a spicy, stir fry made with chicken, peanuts, and snow peas. My version with the bone-in chicken thighs...a healthier Sechuan version baked, instead of stir fried!

Kung Pao Chicken 
adapted from; Cooking Light magazine
Dec, 2010 

2 Tbsp. dark sesame oil
1 medium chopped onion
2 garlic cloves, minced
1 lb. skinless, boneless chicken thighs, cut into 1-inch piece
I used 1 package-4 pieces chicken thighs, with bone-in
3/4 cup water
3 Tbsp lower-sodium soy sauce
2 teaspoons cornstarch
1 teaspoon brown sugar
1/2 teaspoon bottled minced ginger
I used 1 teaspoon chopped fresh ginger
1 to 1/2 teaspoons crushed red pepper
1 cup thinly sliced red bell pepper (about 1 large pepper)
I used 2 fresh red chile peppers thinly sliced
1 cup snow peas, trimmed
Tbsp chopped unsalted dry-roasted peanuts


Heat sesame oil in a large skillet over medium-high heat. Add onion to pan; saute 3 minutes or until softened. Add
garlic; saute 30 seconds, stirring constantly. Add chicken, saute 3 minutes until chicken begins to brown.

My method:
I baked my chicken pieces, bone-in in my toaster oven on a foil lined baked oven pan...you can bake in a conventional stove oven as well, 350 degrees F. for about 30-45 minutes. Just add 1 Tbsp vegetable oil, salt, pepper, to taste, and your favorite spices, such as paprika, cumin, cayenne pepper, garlic salt with parsley is what I added.

Combine 3/4 cup water and the next 5 ingredients on the list...up to the crushed red pepper...stirring with a whisk until sugar dissolves.
Add water mixture to pa; bring to a boil. Add bell pepper and snow peas to pan; cook for 2 minutes or until vegetables are crisp-tender and sauce thickens. Sprinkle with nuts
Yield 4 servings.
I added the peanuts with the chicken, at the last 10 minutes of baking!


Serve over Jasmine rice...cook according to directions!

Enhanced by Zemanta

Coconut Macaroons

To Guest Post? or not...That is the Question! Coconut Macaroons have been around for a long time; just don't confuse it with the Macarons...which is the French version of the beautiful egg whites, piped in a perfect circle, and sandwiched with another with so many different kinds of delicate and yummy fillings.
I remember well, making these easy amazing coconut cookies in the seventies, but flattening them down, and placing a bright red or green glazed cherry on each of the macaroons just for the Christmas holidays. Now, they are more fashionable, leaving them in their natural state, piled high, and just a light thin drizzle of melted down chocolate glaze.

Now, I've gotten away from the subject that I wanted to cover. I did not make these macaroons just now...not even recently. I made these just 2 days before I got my hands injured...exactly 2 weeks ago to use for a guest post...which took a different route. As you can see, this is my own guest post...and I'm the guest poster for myself!
In the nearly 2 years that I have been food blogging, I have made so many friends, through my blog, but mostly through the Foodbuzz community, which is so amazing! We all share the same mutual interest; which is FOOD!
Actually, even if it's not about food, but a different interest, we still end up celebrating an event with great food!

I do think it's a nice idea to guest post for a fellow blogger friend if the friend is in "need" ...in case of vacation, an illness, or some other reason, perhaps wanting to take a break, but whichever the reasons are, it's always an honor for both parties involved...sometimes things change, and you end up keeping your own guest post, so you might as well make the best of it...and honor "yourself"...after all, you deserve the honor!


Coconut Macaroons

adapted from Epicurious.com

1- 14 oz. package sweetened flaked coconut

2/3 cup sugar

6 Tbsp. all-purp flour

1/4 teaspoon salt

4 egg whites

1/2 teaspoon vanilla extract

1 cup semi-sweet chocolate chips

2 Tbsp. canola, or vegetable oil


Preheat oven to 325 degrees F. Line a large baking sheet with parchment paper.

In a large bowl, stir together coconut, sugar, flour and salt. In a medium bowl, beat the egg whites with

the vanilla extract, until soft peaks form. With a spatula, fold the egg whites into the coconut mixture, making

sure that all has been distributed into it, evenly.

With a small teaspoon drop cookies generously filling up the spoon, keeping them 2 inches apart. Mound cookies higher with your fingers so they don't look matted down.

Bake for 20 to 25 minutes till edges are golden and cookies are set. Top and sided of cookies should be slightly golden, as well.


Melt chocolate chips with oil, in a medium microwavable dish, for about 60 seconds. Take it out, and stir to make it smooth. (if not smooth enough, nuke for an additional 10 seconds longer)

Drizzle over cookies. Refrigerate 1 hour before serving.

Makes 24 cookies


Note: The best thing to use, and it's my tip a small, or medium plastic bottle with a small tip. (it's a clear plastic bottle used for sweet dessert decorations.) Use a funnel to spoon chocolate into it.

You can also use a small teaspoon to drizzle, or cut a tip on a corner of a plastic baggie (but in this case, it's a bit messy, and bag collapses)


Enhanced by Zemanta

Stracciatella=Italian Egg Drop Soup

Don't you agree about the pretty gold and brown colors on that pretty soup, or caffe latte mug?...well, it's a thrift find! I purchased a set of two @ Goodwill, for a $1.49 each. The bottom matching gold plate is a dinner plate...also a "thrift find" (made in Portugal)... from several months ago, is a perfect match for the mug. Definitely a "decco" mug, from the 1950's perhaps; judging from the design.
I'm still not back into full action; as far as cooking or baking, but I could not resist making this super-easy soup, since I have so much eggs left over that has to be used up before the expiration date...but even after the date on the egg carton expires, you can still use it for at least 1 week!
I'm feeling much better now; and Prince is still around...not wanting to leave my side. Infection is almost all cleared up now. I am so grateful to all of you who commented, wishing me a speedy recovery, and expressing your concern for my sweet kittty Prince, who is going to leave soon...on to "kitty heaven"
A huge thanks for my dear friend Lizzy, and also to daughter Lora, who is so caught up with her work, the children, and her own food blogging...now, perfecting her focaccias! (still waiting for her guest post...end of the week.)
The recipe for the Stracciatella, is a very easy one, and it works really well when you need a light but super easy comfort soup, especially good curing a cold, as well! I just have this memorized, but you can change this around for the way you would like it!


Stracciatella=Italian Egg Drop Soup
my adaptation from the original source

1- 32 oz carton of chicken, or vegetable broth
or 2-15 oz. cans of chicken, or vegetable broth
1 Tbsp. of chicken, or vegetable bullion paste,
added to 1 cup of hot water
1 bunch of fresh parsley, chopped, and divided in half
a dash of chile pepper flakes
2 to 4 eggs, beaten, with half of the chopped parsley
1/2 cup finely grated Parmigiano-Reggiano chees, grated

In a medium saucepan, heat the chicken broth, add the 1 cup of the water with the bullion paste, and heat to a boil. When it comes to a boil, whisk in the eggs, with a fork in a streamline, slowly, so that the eggs fall down into the broth  and form strands. (do not add the eggs all at once)...it's important to use a fork, that is easier to stream into the liquid. Add half of the grated Parmigiano-Reggiano cheese, the chile pepper flakes (optional)...and add the other half of the chopped parsley, and it's ready within a few minutes of simmering, slowly.
Serve with the additional half of the grated Parmigiano-Reggiano cheese and add a little more chopped parsley, for garnish.

Note: you can also add fresh spinach into the simmering broth, for color, and flavor...then, you can omit the parsley!


Have a wonderful weekend, and thanks again for your kindness and support!
Hugs,
Elisabeth...a.k.a. Lizzie


Enhanced by Zemanta

Raspberry Streusel Bars...and a Guest Post

First things first...I would like to thank all of you for your kind comforting, and encouraging words regarding my cat Prince, and my injured hands...which is a whole lot better now. It's healing very nicely, and as for Prince, we're taking one day at a time. As long as he is eating (even though, thin and frail)...his spirits are good, and he can pretty much get around  with minimal vision. He's alert, and sweet as he has always been, but we both know his time is nearing and I have to say good-by to him!
I am so blessed to have such nice friends that I met through blogging...truly caring, and loving dear friends. It's as if I've know them in person, already!
I am so thrilled to have my friend Lizzy from That Skinny Chick can bake...offering to help me out to guest post...oh, I did mention that my daughter Lora will do the guest post, and then Lizzy, but we had to switch it since Lora wasn't quite ready with hers yet!

Well, it turned out even better, not realizing at first that this is my very first guest post on my blog, and my blog is nearing two years soon!
So let's bring out the bubbly, and celebrate Lizzy for my very special honor for her first guest post on my blog!
Thank you Lizzy, I'm truly honored!
xoxo

Lizzy, is an amazing baker...every fabulous cake and dessert recipe is down to a "science," so precise, and accurate. She is a super kind, and wonderful person. She will be the first one to offer help when someone needs it. When you check her blog, every recipe is "tried and true"...just like one of those TEST KITCHENS where day test each recipe. You can feel rest assured that when you try out one of her recipes, that you will be so pleased and will always remember where the recipe came from. I told her in the past, that I already started a folder, just from her recipes.

She will tell you how we met for the first time, the two friends...one Lizzy, and the other Lizzie (that's me)


I am thrilled and honored to be guest posting here on Food and Thrift for one of my dearest blogger friends.
Lizzie joined Foodbuzz, a huge food blogger community, one month before I did…and was the first to befriend me and show me the ropes.  As my other Foodbuzz friends know, there is a huge learning curve….and Lizzie offered me tips and words of support and advice. Plus, she confided that she also had the same nickname, just spelled with an “IE” instead of a “Y.” We bonded immediately.

So when I heard that she had injured BOTH hands and was unable to cook (a food blogger’s nightmare!), I offered to guest post for her. I know she would do the same for me…she’s just that kind of gal. I baked these raspberry bars for a recent bridal shower and am delighted to share them all with all the Food and Thrift fans while Elisabeth recuperates.
Heal quickly, my friend! xoxo


When I prepare for a dessert buffet, I make sure certain categories are covered: chocolate, lemon, cheesecake AND something fruity. Cook's Illustrated does a wonderful job offering fool proof recipes...with detailed instructions...so when I came across these bars, I knew they would be perfect for the shower.

These were easy to whip up...and after finishing up a much more time consuming recipe for cheesecake pops, that was truly a blessing. I only had time to snap a couple quick photos, but I guarantee that raspberry fans will love these!


Raspberry Streusel Bars~

Adapted from Cook's Illustrated

2 1/2 cups flour
2/3 cup sugar

1/4 teaspoon salt
16 tablespoons (2 sticks plus 2 tablespoons butter 1/2-inch pieces, at room temperature
1/4 cup packed light brown sugar
1/2 cup quick oats
1/2 cup pecans, finely chopped
3/4 cup raspberry preserves
3/4 cup fresh raspberries
1 tablespoon fresh lemon juice

Preheat the oven to 375º. Line a 9 x 13-inch pan with non-stick foil so it hangs over the edges. Or use regular foil and spray with nonstick cooking spray.

Using mixer, combine the flour, sugar and salt at low speed to combine, about 5 seconds. With the machine on low, add 1 cup (2 sticks) of the butter, 1 piece at a time, then continue mixing on low for about 1 to 1 1/2 minutes.

Reserve 1 1/4 cups of the flour
sugar and salt at low speed to combine, about 5 seconds. With the machine on low, add 1 cup (2 sticks) of the butter, 1 piece at a time, then continue mixing on low for about 1 to 1 1/2 minutes.

Reserve 1 1/4 cups of the flour mixture and set aside.  Evenly pat the remaining flour mixture in the bottom of the prepared baking pan. Bake until the edges begin to brown, 14 to 18 minutes. Leave oven on.

While the crust is baking, add the brown sugar, oats and pecans to the reserved flour mixture and mix to combine. Using your fingers pinch the remaining 2 tablespoons of butter into the flour and oat mixture until the butter is fully incorporated. Pinch the mixture with fingers to create small clumps; set streusel aside.

Mix preserves, raspberries, and lemon juice in a small bowl, mashing the berries into small pieces.

Using a spatula, spread the filling evenly over the hot crust, then sprinkle the streusel topping evenly over the filling without pressing down on it. Bake 22 to 25 minutes till topping is lightly browned and filling is bubbling.. Cool to room temperature on a wire rack, 1 to 2 hours; remove from the baking pan by lifting the overhanging foil. Cut into squares and serve.

Enhanced by Zemanta

Cleveland Winter 2017

Hello my friends, I hope you all had a great holiday. I just got back from Ohio and I thought it would be nice to put together a post to s...