Plum Upside-Down Cake


Since I've been food blogging for the last two years...I have not been thinking about that I would actually say,
"I have to bake something for my food blog"...hmm! wonder why did I say that to my daughter Lora, yesterday morning?
She told me the other day that her food blog is getting to be expensive...well, the reason for that is: She bakes every single day...really! There isn't a day that goes by when she does not bake...if nothing else, but the 'staple' banana bread, or homemade pancakes!
I was hoping to get this post up by yesterday...Friday, knowing that I did not have anything else worthwhile to post and that I don't do much baking cakes...although I love to put simple and yummy quick and easy desserts together!
We have such an abundance of plums...not the deep purple Italian ones, but the round ones which are so perfect just by themselves to snack on (which I did eat 3 yesterday)...and decide to make something with it. No time to start browsing through my cookbooks, old recipes, or favorite food bloggers' recipes...so what do you do first, if you don't have the basic recipe on hand?...The Internet...yes, that's the fastest way to google a recipe and do some adaptations of your own, which I did a little on my cake. Since I made this for my blog...still smiling to myself
about that one, I only kept one large piece for myself and shared the rest with my family.

Yesterday was such a stormy day on-and-off, with tropical storm Isaac on our heels by Sunday night...hopefully it's not turning into a hurricane!

Good day to be cooking and baking when you're stuck inside. I did go out on my balcony to take some photos of the beach, the clouds, and no less than 30 minutes wind, and a storm, but the worst is yet to come! We'll just have to be prepaired and be safe.

As you see, for my baking, I like to chose a comfy-cozy home type of dessert. For me they are super easy to make, and I do believe it will be easy for you, if you follow my easy and handy little tips. Don't let the layering of this beautiful upside-down all American simple cake intimidate you...and I DO recommend that you make this from 'scratch' and not from a mix, although I do use cake mixes, only to 'doctor' them up!
Here's the link to this awesome and easy cake!

Plum Upside-Down Cake 

Mango-Strawberry Cobbler

Some cobbler have toppings that are actually as thick as biscuits, but to me it's patches of a crusty dough that has a cake-like flavor on the inside. I've been making all kinds of cobblers that is so easy, and so nice with fresh fruit that you want to use up.
Although, I did just state in my previous recent post that mango season is over in S. Florida...it really is over! This was the best mango season for us in years, and we were so blessed with all the abundance of these lovely tropical fruit, that we just had to use it in so many ways.

Last week, the final 4 mangoes fell down from the top of the tree and they were almost too ripe. Didn't want to use them for smoothies...it would be so selfish when we had smoothies just about every day for one month. I have not made a cobbler, since about one year ago, and it's time that I make one.

I made the cobbler this afternoon, and I was so very happy that we had beautiful sunshine today, but very, very, hot. Today was the first day of school for most of the kids in our area, and both my grandchildren started back! The weekend also went so nice with perfect Florida weather...rain again, in the late afternoon, but during the day was gorgeous and sunny!

Cobbler has got to be the easiest and fastest dessert to make...you just have to remember, that it starts out with 1 cup of flour, a little sugar, dash of salt, and don't forget the baking powder, and of course, a little butter, moisten it with either a little bit of milk to form a dough, or a little over 1 cup to be able to drop the dough on the fruit, and bake for 35 minutes...Let me tell you, the best way to eat this amazing cobbler; while it's still warm. This was gone so fast that I must say I will be making it more often now, with different fruits!
 I wanted to show you close up how juicy the fruits are (I have a little secret for that)...and for the cobbler, you can see the thickness, which is just right, and see how moist it is, yet has a crusty top!
This is my favorite photo...Gabby enjoying her cobbler, for an afternoon snack. She had her first day of school, 6th grade, and she came home so happy...all smiles, and such positive energy and lots of stories.If you want to make your family happy, with the most perfect, easy, afternoon snack...make them a fresh fruit cobbler...they will love it, and 'thank you' for it!  Now, on to the recipe...click on read more...(as if you didn't know it!?)

linking to: Hearth and Soul @ Zesty South Indian Kitchen

Chocolate Balsamic Strawberries

Another TGIF...and I feel I've been so neglectful in cooking, or baking something for a new post this week. Too busy eating lunches and dinners at my daughter Lora's.

 For instance, her amazing sourdough pizza that she made yesterday and just posted it...you gotta check out her Sourdough Pizza Margherita...as for me, all I could come up with for today, is a fabulous quick and light strawberry dessert that I made, and photographed at her house...playing 'tag' with the sun coming in and out!
It's been over a year now, that I have received an amazing giveaway gift set of fantastic walnut olive oil, chocolate balsamic vinegar, seasonings, and spice rubs. from ARTISANO'S  via my dear friend Lizzy! I have not opened the chocolate balsamic vinegar...until now, even though I know how amazing it is on strawberries. I did make balsamic soaked strawberries before, but nothing like this particular one!
I've been reading  quite a few recipes from my Hungarian food blogger friends...especially GIZI who happens to make a lot of desserts with mascarpone and whipped cream...'hmm'...I thought to myself; why is it that I have not seen a whipped cream incorporated with mascarpone?...what's so hard about it?...it's done the same way as if you are whipping cream, adding a little sugar and vanilla, to the mascarpone, and the cream...I'll tell you, it is pure HEAVEN! My 6yr. old grandson, took a soup spoon and was totally eating the cream...like 'no tomorrow'...I had to remind him that we need to save it for the dessert!

End of the Mango Season in S. Florida

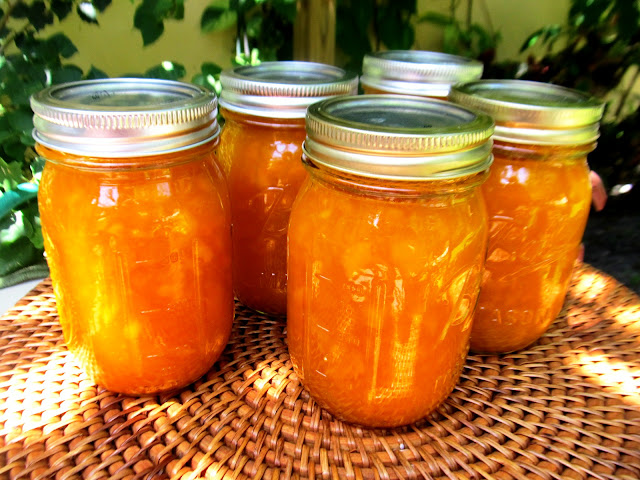
I'm not trying to bore you with more mangoes...but this time, I just want to share with you the last of our mangoes and the  Mango Jam recipe that my daughter Lora and I share. My recipe calls for lemon juice, which her Italian recipe does not, but from the last batch that I made she like the slight tangy lemon taste...this time, I used the juice of fresh lime, and that even made it taste better!
I'm going to share my little secret of how to can jams perfectly and to make sure they stay sealed, tight. You have to hear that 'pop sound' when you twist the jar to open...otherwise its not sealed right! I could never do this kind of work in my tiny beach condo kitchen, now you can understand why I spend just about every day at my daughter's house...not so much because she has a much larger kitchen, but because they have plenty of counter space and the kitchen is open and well lit! Also, the patio has ample natural lighting as well. I made this batch last week, and hoped I would catch a little sunlight that was 'sneaking around' for a short time...then the rain came!

I will guide you through the easy process...although a little time consuming, but I promise you that you can make this with the half of the amount from the full recipe!

This is what 1 kilo (2.2 lbs) of fruit will allow you to make. These are 12 oz canning jars with lids, that have to be sterilized (just run it through the dishwasher cycle lid too) or boil in a large pot of water, and let it cool to the touch.

You can make this with other fruits...peaches is what I would love to make it with, hoping that the price will come down from $1.99 a pound, we will probably get it less at our local produce market. Plums would work well also, for this recipe.

I used Sure-Jell pectin for my previous batch, but this time I use my daughter's Italian pectin that comes in a big pouch, so I counted out how many Tablespoons it requires, and marked down everything on paper to be saved, so good thing that I'm actually typing up this recipe and method to save for myself too!

With a jar of leftover mango jam, I also made cream cheese bars filled with mango jam

Mango Jam
adapted from Italian basic jam recipe

2 kilo (4.4 lbs) mango, or other fruit
750 g.(about 2 1/2 cups sugar
juice of 2 lemons, or limes
5 Tablespoons pectin (I used Italian import)

note: you can cut the amount exactly in half if you
want to make less jam.

Wash, peel, and dice the mango, or other fruit, and put into a large bowl. With a potato masher mash it well, but leaving little chunks of fruit which is really very tasty.


Add the pulp of the fruit to a large heavy stainless steel, or other heavy duty pot. Add the sugar, the pectin and the juice of the lemon or lime, and simmer constantly, over med. high heat.


Make sure you keep stirring, constantly, until it comes to a bubble and a slow boil. You must take it off the heat as soon as it does that, and start getting your jars ready to be filled by the hot jam. Don't be alarmed that it looks liquidy, because it will start to jel, as soon as it starts to cool a little.


With a ladle, carefully spoon the jam up to about where the neck of the jar is, to assure it will not spill over...do not fill to the very top!


Just set them on a dish towel making sure the lids are well sealed, and here comes the tricky part that will assure double seal!


Turn the filled jars upside-down, and leave them sitting like that for about 10 minutes to assure safe sealing for the lids. You can also do a water bath in a large pot with water only up to half way, and simmer for 10 minutes, or just follow this method!

note: if you are planning to leave jams in a cool place in your cupboard, then you have to do the water bath method...otherwise just proceed with this method, but you must refrigerate after opening the jar...either way, when you open a jar of jam you must refrigerate it!

Jam is done...now you can go 'jamming along'...a cool song of Bob Marley...Jammin!

Enjoy the jam...and share, sparingly...it's that GOOD!

Linking to: Thursday Favorite Things @ Katherines Corner

Jamaican Jerk Chicken Legs

TGIF-where has the week gone by?...pretty soon, the kids will be going back to school at the end of this month, and the end of summer vacation for most people, as well! Living in South Florida most of my life, and my children, 'native Floridians'...grandchildren not even knowing what cold winter, and snow is all about...glad that we are here in the 'land of sunshine'...not so much of it for the last couple months. Although we get a 'sneak preview' of it just about every single day, even if its for an hour, S. Florida is still the SUNSHINE STATE!
Often, I have a dilemma about what to make for 1 person (myself) for dinner, when I'm not at my daughter's which is just about every day. We cook together, or I cook (she does most of the baking)...but when I eat alone, about twice a week, I just don't want to heat up my little kitchen and waste electricity, so I use my George Foreman grill, or my toaster over to make a small portion, for (2) ...yes, 2...either for one, and have another portion fore leftover lunch, or invite a friend!
Have you ever tried cooking a gourmet meal in the toaster oven?...well, you can, you know, it's as easy, if not easier than in your big conventional oven! I've been doing this for a long time now, and my best friend suggested that I write a 'toaster oven cookbook'...which of course, I haven't but then, they already have them and she gave me a cute little toaster oven cookbook!

You have to have at least a large enough tray for the toaster oven to be able to fit at least 6 pieces of chicken comfortably, or for roasting a few pieces of vegetable, fish, or even baking cookies...seriously!

I'm gonna share 3 different recipes...one for the Jerk seasoning, 1 for the Basmati rice which is a cilantro-lime scented, and a fabulous Cuban , authentic Havana based black beans, which you can mix with the rice, or serve it separately! So, are you ready?...because I will guide step-by-step for this semi-spicy delicious Caribbean dish, that will take you away to the island of Jamaica...or the Havana black beans to the 'forbidden island'...which I will not go into a long explanation but just that; it was referred to as the 'jewel of the Caribbean'...the largest of the Caribbean islands...frozen in time, from the 1950's!... see link-Caribbean, Havana!
We have a huge population of Cubans here, in S. Florida, as we also have a large population of Jamaicans, and Haitians. We have so much 'island influences' that you do not have to venture far to authentic cuisines of these colorful, tasty, spicy, Caribbean influences of their culture!

Mango-Lime Sorbet

'Rainy Days, and Mondays'...is precisely what is happening here, in S. Florida at this very time! It is a lazy day...or I should say morning. I'm watching the Olympics as I'm typing my post...barely able to take my eyes off the T.V...watching the water polo with U.S. and Hungary...with a 4 - 0 ...Hungary leading! (ending with 11-6, Hungary winning!)

Very strong defense from Hungary! ...last night I watched the women's volleyball...U.S. against Italy, with U.S. pummeling the Italian team, wow!
Mango season is just about over now...I saw 3 lonely mangoes leftover on the mango tree, but we did get quite a few even towards the end to make some more mango creations. Nothing compares to fresh fruit sorbet...I love sorbet, more than ice cream...because of the light texture and pure fruit flavors along with the citrus fruit, such as lime! You really just have to know the formula, in making sorbet. It has to be equal amount of sugar and water for the simple syrup, which you just bring to a boil, and cool down, even best to chill several hours, or overnight!
Just add the chilled fruit puree with the cold simple syrup, and the lime juice, and you're good to go, mixing it in your ice cream maker.

Mango-Lime Sorbet
recipe by; Elisabeth

1 1/2 cups granulated sugar
1 1/2 cups water
4 cups mango puree
juice of 3 limes
a pinch of salt

In a medium saucepan, bring water and sugar to boil.
Stir frequently, just until sugar melts, and water comes to a full boil. Set aside to cool.
Peel and dice about 4  mangoes...more if needed to make 4 cups of puree. Add the juice of the 3 limes to the puree. Cool the the simple syrup in the fridge for several hours, ore overnight, before adding to the puree.


Combine the simple syrup and the mango puree in in the ice cream maker, and mix for about 20-40 minutes. Next...with the mango sorbet in the ice cream maker cylinder, put into freezer...no more than 40 minutes.


Spoon sorbet into a quart size plastic container, and freeze until firm! It is the best sorbet, that you can make homemade with other fruits as well. I would love to make a strawberry, or blueberry sorbet. Next, on my list!

Speaking of which, I totally wiped out my blog list by mistake...always messing around, fixing things. Now, I have to add my favorites...one-by-one. I did not intentionally wipe your blog out, will get my list back up soon, since I rely so much on my regular commenter friends.


Linking to: Full Plate Thrusday, @ Miz Helen's Country Cottage

                Thursday Favorite Things @ Katherines Corner

Enhanced by Zemanta

Blueberry-Peach Bread...for "Twelve Loaves"

I decided to make some fruit filled bread, since we are in the midst of the summer season, with plenty of summer fruits available and at such cheap price. Blueberry happens to be one of my all-time favorite berries, and to combine it with juicy ripe peaches, is the first time for me...although I have seen it on other food
bloggers site.

Zucchini Quiche...made easy!

A new and fresh  BISCUIT MIX...so versatile, that you can make your own homemade BISQUICK. If you live in the U.S. you must be familiar with the famous Bisquick biscuit mix that you can make pancakes, coffee cakes, biscuits, pies, and quiches with? Well there's a solution to making your own mix, without the preservatives, and you can keep the mix in you fridge for weeks...so easy to make all the familiar and delicious things...and extremely handy!
I found my original recipe made with Bisquick which I've been saving since 1992. Instead of the 1 cup of Bisquick, substitute 1 cup of your homemade Biscuit Mix.I already lightened up the recipe, even then; by reducing the oil from 1 cup, down to half a cup!

This is a crustless quiche...or pie, whichever you prefer to call it! It is so easy to make, once you have your Biscuit Mix made. Your family will love it, and thank you for it!


Recipe; for Easy Baking Mix...Mix 5 cups of all-purpose flour, 1/4 cup of baking powder and 1 teaspoon salt. Cut in 1 cup of shortening until mixture resembles coarse crumbs. Store in airtight container, in your fridge, or a cool dry place. Makes 6 cups.

Linking to: Hearth and Soul Blog Hop @ Zesty South Indian Kitchen
Enhanced by Zemanta

Mango Jam... Sweet Mango Chutney

With all the cloudy days we've been having, I haven't been able to take a descent outdoor/indoor 'natural light' photo in all last week. Don't you agree that this is a nice outdoor 'last minute'...photo of my amazing mango jam, and sweet mango chutney?
If I want to take descent natural light photos, I have to take them at my daughter Lora's house in her lovely kitchen with plenty of natural lights or on the patio. As for my little condo, I have only one spot for photos, but I DO have GREAT lighting in my tiny kitchen, 3 different types which are very helpful for photos!

Enough of the photos...still up to our 'eyeballs' with the mangoes, as you can see in Lora's recent post as well!

Since she came back from Italy, we've been busy making all kinds of things with mangoes...but she's the one that made the majority of the jams.

See what I mean? ...natural lighting is 'everything'...same mango chutney inside, by the glass door...can't even correct the color...and the same one, in the jar.

BTW-this pretty dish is an American antique from the 1930's 'thrift find' for $2.99 that I gave to Lora. I just love the ruffled details and the 18 carat gold...if that's not an amazing treasure, than I don't know what is!

Although Lora brought back with her Italian pectin and has used the metric system measure with her little scale to weigh the fruit, the sugar, and use the pectin accordingly, I am satisfied with our 'good old' American made by KRAFT FOODS, which I'm happy to say, I also used for the Sweet Mango Chutney, which I will give you a full recipe for the 'spicy' version, but you can eliminate the spicy peppers, onion, and garlic for the sweet version that I used, because the little ones love this even as a thick jam!
Just to let you know how much I love this product, I did buy a double VALUE PACK just the other day, to use it for a GIVEAWAY gift for any one, that would be interested of using that great pectin, made in the U.S. by KRAFT FOODS!
It is a double pack, sealed in plastic, with instructions on the box, and inside with a packing slip, as well for other suggestions of uses. It is 100% natural, and no 'animal' products added. If you are interested in receiving this amazing product, which takes the place of AGAR...that is a lot more expensive...than by all means let me know, and mention what you wold like to use it for! I will use the RANDOM.org calculation, to determine the winner, by Friday @ 11:00PM Eastern Standard time.

On another serious note:
Did you know that on Aug. 1, 2012, Foodbuzz will no longer exist?...or is it joining Daily Buzz Food? As a Foodbuzz Publisher, I don't recall getting any notice in my e-mail...but I do know that for several months now, I have not been getting paid for ads into my Pay Pal account. I have close to 3,000 friends on Foodbuzz that I have been so fortunate to befriend in the nearly last two years on Foodbuzz, among them my dear friend Lizzy, Gina, Chef Dennis, and Jo...from day #1 we've been supporting one-another all this time, and I've had the pleasure of meeting them (except Lizzy)...at last year's fantastic Foodbuzz Food Festival, in San Francisco...another question?
What is happening this year with the Food Festival? I've gotten the invite, but have not responded...and now, THIS?...I am totally perplexed!

I've submitted an application to be a content contributor for DailyBuzz Food, and given you my RSS feed. Why don't I see my content yet?


Diane
posted this on Jul 23 12:16
Our system soon will push your RSS content onto appropriate channels automatically, but for the time being we're manually processing posts. They'll show up as soon as we can mark them active. Thanks for your patience!

This was just one of the questions posted re: the new Daily Buzz Food...if anyone knows more info regarding the change on Foodbuzz, please let us hear about it...I'm in the 'dark'...and have no answers other than what you may all know!

For the Mango recipe:
Follow the instructions of the Sure-Jell, or other pectin of your choice, package instructions. You can make any kind of jam easy, as long as you have a sterilized jar, and lid...make sure you refrigerate it, otherwise you would have immerse the jars with the jams in boiling water for 10 minutes, and let it cool completely. before storing it in a cool place in your cupboard. (Personally, I prefer the fridge method)

Mango Chutney
adapted from Cooking Light

2 medium ripe mangoes
peeled and cut into chunks
1/2 sweet onion chopped
1/2 red bell pepper chopped
1 jalapeno pepper diced
1/2 cup golden raisins
3 Tbsp brown sugar
Juice of 1 lime
1 teaspoon white vinegar
1 teaspoon balsamic vinegar
1 teaspoon chopped fresh ginger
1 teaspoon of pectin
(you can use powdered instead)
dash of salt
dash of black pepper
1 garlic clove minced

Combine all ingredients in a medium saucepan Cook over medium heat for 20 to 30 minutes or until thick. Stir occasionally. Remove from heat, Cool completely. If too chunky, mash with potato masher. Spoon carefully into sterilized jars with sterilized lids, and refrigerate. It will keep fresh for up to 3 weeks (if it stays that long)

For the sweet version:
Just omit the hot peppers, including the black pepper, and also the onion and garlic...otherwise, follow as in the original method. (the original version did not use pectin; but it really does make a great difference in texture and flavor, so I added it)

note: either one is great as a condiment on burgers, fish tacos, or as a side sauce, heated up and thinned out a little, or even as a jam on toast!

Enhanced by Zemanta

Pizza Margherita...{semi- homemade}

No matter what I try to do to this photo, to make it look better, its just not working! Its one of those photos that you have no choice at night, under a light that is just not gonna do justice to the photo. I made this semi-homemade pizza for myself, just the day before my family arrived back from their vacation, in Italy.

It was the easiest pizza...ever, and I must admit; the TASTIEST!...you know why?...because all you have to do is buy a fresh pizza dough from your local favorite supermarket, that's already in a plastic bag, and it weight 1 lb. and the dough is already risen. Costs about $2.50...and you don't have to do anything else, just spread the dough out on a pizza pan, and I will show you how I made it...and devoured almost the entire pizza by myself.

For the last time...alone in my daughter's house, I decided to go out on the patio with my glass, or two of my favorite Chardonnay wine, and just enjoyed the beautiful night...not exactly standing in this spot...where I took the photo of my son-in-law's creative 'trellis' design, where the beautiful bougainvilleas grow, but no flower at this time!

I am not having much luck with my computer today...or is it with Blogger? Thanks to my dear friend Angie...she wrote me an e-mail, just about an hour ago, which showed that she could not open my blog..."by invitation only"...what's up with that? I corrected it right away...so now its working, again.

Also, I cannot open my new photos that I intended to post for today's post. Lora took the photos at her house yesterday; of the Zucchini Quiche that I made, since I didn't have my camera with me, and I cannot upload it!
Will post it next week! ...so here's my super easy pizza with the 'ready dough'...BTW, I learned this method of actually getting a 'hands on' tutoring from a friend from Naples who was an expert 'pizza guy'...at my workplace at the famous caffe Luna Rosa, on the beach in Delray Beach, Florida. Now, its a chic and trendy caffe, but back in the late mid to late nineties, it was more of a small pizza, and panini place!

Pizza Margherita  
 recipe by; Elisabeth

1 lb.fresh, (not frozen) bread/pizza dough
or your favorite homemade dough
3 or 4 ripe plum (Roma) tomatoes sliced fairly thin
Kosher, or sea salt, freshly ground pepper,
1/4 cup extra virgin olive oil
3 cloves of fresh garlic, chopped
crushed red pepper flakes
dried oregano, dried basil
fresh basil leaves for garnish

1/2 to 1 cup shredded mozzarella cheese

First step: get your pizza pan ready, spray with cooking spray, take dough out of the plastic bag, and place it on the pizza pan...punch the dough down, and spread as much as it allows, leaving a border at the edge of the dough. In a small bowl, add the oil, garlic, the salt, pepper, the dry spices, and brush the dough lightly, with a pastry brush! Let the dough rest for about 30 minutes, and stretch again, leaving a border.

Preheat the oven to 525 degrees F. Also, brush the top of the tomato slices with additional oil, mixed with herbs, or if you prefer, just drizzle plain extra virgin olive oil on top. Place the pizza with the baking rim on a 'pizza stone'...if you have it, if not; it will still work fine. Bake for about 5 minutes...just to get the rawness out of the dough. Take the pizza out carefully; just don't burn your hands. Sprinkle the cheese on top of the dough, carefully put the fresh tomatoes on top of the cheese topped pizza, put back in the oven...lower the temp. to 450 degrees F. and bake for an additional 15 minutes longer, until the tomato gets slightly wilted, and cheese bubbles. The rim will get nicely golden brown, and crunchy!
Slice with a pizza cutter, and enjoy!...perfect pizza...and it really is homemade, because you made the entire pizza by yourself, and just used a 'little shortcut' dough, which saves you time, and waiting for the dough to rise!

You can top your pizza with whatever you have on hand, just a suggestion: which will help you each and every time. Brush your dough with the herb-based olive oil, and pre-bake for about 5 to even 10 minutes, depending on the topping you will use. You will never get a slimey, soggy top, underneath the topping, and will be sure to get a nice crunchy bottom, as well!
Mangia, mangia...Buon Appetito! xo


Enhanced by Zemanta

Cleveland Winter 2017

Hello my friends, I hope you all had a great holiday. I just got back from Ohio and I thought it would be nice to put together a post to s...