"Stop and Smell the Roses"

 I arrived back late Sunday night, but not a very successful way. The worst summer flu, with a throat infection...a slightly sprained ankle two days before leaving (same ankle that I sprained 2yrs ago) this time missing a step down from stairway ...otherwise, I had the most relaxing and wonderful  amazing time...ever!

I actually do have a recipe for you...Lemon Bars that I made there for my Italian (extended) family and it turned out super luscious and perfect...thanks to the best and natural 'farmer butter' so fresh and sweet.

I took two great soft covered novels with me...which I read in less than one week...took long walks, ate amazing homemade foods. One thing that I took time to notice...take time to 'smell the roses' which are all around Como, and in Aosta (located very, far up northern Italy, abt. 3hrs from Como; surrounded by high mountains that some still have snow on them even in the summer...about 1 hr. drive to Switzerland, and part of France!

I will keep you posted, as soon as I feel better! xoxo


'Stop and smell the roses'... is a cliché that is widely used in the United States. We are all familiar with its meaning, which is, to take time to appreciate a situation or slow down and pay attention to what is going on around you.
'Stop and smell the roses' is commonly used when talking to someone who seems too busy to enjoy life.

Most often, this phrase is used by a well-meaning friend or family member when they become concerned that you are over-worked, or are not taking time to enjoy the pleasures of life.

This phrase can also be used just as a gentle reminder to take a few minutes for yourself each day.


Flaky Buttery Biscuits...and Italy, vacation!

So, this is Lake Como, where I will be staying...in  Italy. Leaving tomorrow morning, but did not want to leave without saying 'goodbye' to you my dear friends!
 
I still can't believe that I'm going to Italy, but I did want to share a last minute recipe, and a 'goodbye'!
I got this recipe from a library book which I can't remember the name, but it is really good, flaky, and buttery goodness!

Flaky Buttery Biscuits
makes 12 small, or 6 large biscuits

1 3/4 cups all-purpose flour
2 1/2 teaspoons baking powder
1 teaspoon coarse salt
6 Tbsp.  (3/4 stick chilled unsalted butter)
cut into small pieces
3/4 cups whole milk

Preheat oven to 450 degrees F. Butter or line a baking sheet.

In a medium bowl, whisk together the flour, baking powder, and salt. Using a fork or 2 table knives, combine the butter and flour mixture until they resemble a coarse meal slowly add the milk, stirring with a fork, to the desired consistency.

For softer biscuits, drop 2 tablespoon of the dough onto the lined baking sheet. For firmer biscuits, turn the dough out onto a clean, lightly floured surface, and gently knead just to bring the dough together,  Carefully roll out the dough about 3/4 inch thick, cut about 12 biscuits, re rolling any scraps,. Place on the lined baking sheet.

The biscuits can be frozen at this point. Freeze on the baking sheet, then remove to a resealable container or plastic bag for easier storage. Bake the biscuits for 13 to 15 minutes...add 3 to 4 additional minutes for frozen ones...until brown.. Cool slightly, and serve warm.

 
.
See you in 2 weeks...take care, and love you guys! Ciao~xo


Bacon-and-Egg Muffins

Just think; you can make these fabulous muffins for breakfast...bacon, lightly scrambled eggs, and shredded cheddar cheese, all rolled into one!

There's about a dozen version of the Bacon-and-Eggs Muffins recipe online, but I found this to be the best, from Better Homes and Gardens Magazine. This is what I call a 'hearty' breakfast, or 'snack'
treat. Here's the recipe, just click to view and print it!


Have a wonderful and safe Memorial Day weekend! xo
Bacon-and-Egg Muffins

Madeleines

Madeleines cookies are usually on the 'pale side'...as in color; they are also dusted with powdered sugar most of the time. I purposely chose mine with light brown sugar to give it a golden color, and wanted to show of the beautiful 'groove' lines from this awesome nonstick Madeleines baking pan which I ordered from Amazon.com...seems like this online order store has become a very favorite store of mine....that's where I ordered my Nikon COOLPIX L810 camera from, as well.
Would you believe this camera even has a 'food app?'...I mean, seriously! How cool is that?! It automatically sets itself for you for great close-ups on the food, but most of the time you have to do the adjusting, how close you want it. 16.1 MP, and 26X Zoom is great!

Getting back to the Madeleines...they are so buttery, light, delicious, and so easy to make. I found the recipe on...Joy of Baking.com

Here are some series of photos I took this weekend from my condo complex... between 7:00-7:45PM


Love my new Nikon COOLPIX camera

It may seem that I'm giving up blogging...which in actual reality sure looks like it; but the 'truth of the matter' is, I'm going through so much issues with all the new technical stuff I acquired all at once...is a bit 'overwhelming'!

Not only am I dealing with technical issues, but planning a nice little trip to Como, Italy on the first week of June for 2 weeks.

I had to return my new Canon Power Shot to exchange for Nikon Cool Pix (love both)...but can only afford one...one, that you can easily install the software and upload your photos for Windows 8.

Hope all of you moms had a wonderful day on Sunday...as my daughter and I had, as well! xo

 
No...this is not laundry hanging on an indoor drying rack...its really pasta sheets... oh, the doggies' food dish on the floor in the background; Way to go, Elisabeth...you're doing a 'bang up' job with your new camera...LOL

my homemade pasta...made with the old fashioned 'cranker' kind of machine! 


Easy recipe for homemade pasta...for each 1 cup of  all purpose flour, add 1 egg. For a generous portion to serve 4, I used 3 cups=2 1/2 lbs of flour, 3 extra large eggs, 1/2 teaspoon Kosher salt, and 1 Tblsp. olive oil. You can add all these ingredients in your food processor, or mix by hand to make your dough. Divide in 3 or more portions and feed them through the machine to a desired thinness, and attach the cutter for spaghetti, or fettucine. Let the sheets dry for about 20 minutes before you start cutting the pasta. Cook in rapid boiling water, and drain pasta as soon as it comes to the surface.

Just to let you know...I did a little editing, cropping, and retouching in the original photos!
Can you tell what's been edited, and fixed?


Blueberry recipes

Still having plenty of issues with my new Windows 8...new camera, and now I purchased a new HP printer/scanner to be compatible with the new PC. Will just have to have patience in getting all the equipment together and will create a harmonious effect...as soon as it is all completed.

In the meantime, I will be posting a couple of old favorites from my blog, and a new one that I just discovered through Pinterest!

Click on the title to find this gorgeous Blueberry Mini Tart with  ... mascarpone cream filling!

I've been buying so much blueberries lately, just enjoying them sprinkled on my shredded wheat cereal in the morning, but will be making some nice desserts soon. I saved this gorgeous mini tart on my Pinterest board...the photos are amazing; professional photography...no doubt!
Always curious to find the actual source it came from, and I found it! Gladly sharing it with you!


Photo and recipe from a previous post of mine

LEMON BLUEBERRY BREAD
adapted  from The New Basic Cookbook

TOPPING (Streusel)
 1/2 cup sugar
1/3 cup un-bleached all purpose flour
4 Tbsp=1/2 stick unsalted butter, at room temperature
1 Tbsp grated lemon zest
1  teaspoon ground cinnamon

Stir the topping ingredients together in a small bowl, and set aside.

For the Bread/Tea Cake:

3/4 cup sugar
1/2 cup milk
1/3 cup sour cream
4 Tbsp=1/2 stick unsalted butter, at room temperature
2 eggs
2 cups unbleached all-purpose flour
2 teaspoons baking powder
1/4 teaspoon salt
2 cups fresh blueberris
Zest of 1 lemon
after zesting lemon, use the juice from it

Preheat oven to 375 degrees F. Spray a 9x5inch loaf pan with cooking spray
In a medium bowl, stir the sugar, sugar, milk, sour cream, butter, and eggs together, until smooth.
In a larger bowl, toss together,. the flour, baking powder, and salt. Stir the wet ingredients into it, and add the juice of the 1 lemon.
Carefully, fold in the blueberries, and the lemon zest, to combine.

Transfer the batter to the prepared loaf pan, and sprinkle with the topping, carefully patting it down a little.
Bake on 375 degrees for the first 30 minutes...lower the temperature to 325 degree F. and bake for an addition 25 minutes until topping is deep golden, and has formed a nice crunchy and thick crust.
Cool in the pan for about 10 minutes on a wire rack and transfer the loaf pan to continue cooling. Makes 1 loaf

 I would like to show off my new thrift find...a "fire king" oven proof blue glass loaf pan that I purchased at Goodwill, for $1.99. It's not as deep as your "pyrex" glass loafpans, but it really is pretty, and has a nice design on it. Besides the fact that it's such a bargain, this seems to be an antique from the sixties, or seventies. Have not seen one like that at all.


Sicilian Puttanesca Sauce 
my own recipe (recipe by Elisabeth)

(photo and recipe from a previous post of mine)


4 large ripe tomatoes
1/2 cup of white, or red wine ( I used white)
8 oil cured olives, or other black olives, pitted
4 Tablespoon extra virgin olive oil
also, extra for drizzling on top
3 cloves garlic, finely chopped
1/2 teaspoon crushed red pepper
6 anchovies, rolled in capers (optional)
a handful of white mushrooms, sliced (optional)
12 fresh basil leaves
a handful of Italian fresh parsley (optional)
1 lb. fusili lunghi, or spaghetti
salt and freshly ground pepper to taste
grated Parmesan cheese

First thing you must do, is to drop whole tomatoes in boiling water, to blanch them, just enough to see the skin loosening, and taking them out of the boiling water with a slotted spoon. Add more water to the large pot that the tomatoes were blanching in, to boil the pasta. Run tomatoes under cold water to remove the skin, easier. Chop the tomatoes into small chunks, removing the hard core.

Heat the garlic an the crushed red pepper in a large skillet, adding the olive oil, over medium-high heat. Add the wine, let it cook down a little, and add the mushrooms, and cook until it sweats, and liquids released. Add the  chopped tomatoes, and cook for a few minutes. Do not let the tomatoes get soft, leave them in chunks. Add the olives, and anchovies with the capers, stir and heat though until it comes to a boil. Turn off heat, and cover, until you are ready to incorporate with the pasta. Drain pasta, reserving a small amount of pasta water, to add to the sauce if needed. Serve pasta in a large pasta bowl, adding the sauce on top, and drizzle with additional olive oil, and snipped basil, and parsley. Pass the Parmesan cheese. Serves 4. Absolutely divine pasta, you will ever taste!


Sour Cream-Blueberry Muffins

Hi everyone!...this may be my last post for a while, as far as uploading photos from my computer; which is a total disaster!

I made these muffins a couple months ago, and had no intention of posting it because these are just so ordinary, cute little yummy muffins that really do not require to POST, or BOAST about...but now, I'm desperate for another post from my own files.
Not only did I end up buying a new Canon camera, but I I have the same 'communication error' blinking on this one as well, when I try to upload my new photos. After all this complication, I strongly believe that it's my computer that has the problem. the USB port plug-in is not connecting to the camera...so tomorrow, I will have to disconnect everything from my PC and physically take the computer to the 'Geek Squad' at our local BEST BUY to have them check it it and hopefully correct the problem!
Oh, and my old camera...which is just barely over one year old...well, that one is totally broken down now from all the stress of trying to fix the problem; but I still insisted on Canon again, since I've used Canon 35mm in the past over for over several years and that one is still working, but who wants to bother with getting film developed, when it's so convenient to just pop out the little memory card when it's filled and you can decide if you want to develop photos and choose how many you want.

Also, now I removed my old picture file from my previous camera which also was able to correct the photos the way you want them...now, I downloaded the Windows Live program which also has the photo gallery. Not sure if I like it.I have been trying to be this 'self-taught' computer technician...finding new and improved things, but cannot fix the actual problem. So bare with me and enjoy this simple muffin filled with fresh ripe blueberries,  topped with a comforting sugar topping...or streusel if you prefer. The recipe is so simple, I even found my old recipe online from Food and Wine.
Ingredients
U.S. Metric Conversion chart
  • 1/2 cup(s) light brown sugar
  • 1/3 cup(s) all-purpose flour
  • 2 tablespoon(s) unsalted butter, softened
  • 1 teaspoon(s) cinnamon
  • 1 1/2 cup(s) all-purpose flour
  • 1 tablespoon(s) all-purpose flour
  • 2 teaspoon(s) baking powder
  • 1/4 teaspoon(s) baking soda
  • 1/2 teaspoon(s) salt
  • 1 large egg
  • 3/4 cup(s) sugar
    localoffersIcon
  • 1 tablespoon(s) unsalted butter, melted
  • 1 cup(s) (rounded) sour cream
  • you can substitute Greek yoghurt  
  • 1 teaspoon(s) pure vanilla extract
  • 3/4 teaspoon(s) finely grated lemon zest
  • 1 cup(s) (rounded) frozen blueberries 

    Directions:
  • Make the topping: Preheat the oven to 375°. In a medium bowl, combine the brown sugar, flour, butter, and cinnamon. Rub with your fingers to form coarse crumbs. Refrigerate until ready to use.
  • Make the muffins: Butter a 12-cup muffin pan. In a medium bowl, whisk the 1 1/2 cups of flour with the baking powder, baking soda, and salt. In a large bowl, using a handheld mixer, beat the egg at medium speed until frothy. Add the sugar and melted butter and beat until pale yellow, 1 minute. Beat in the sour cream, vanilla, and lemon zest until blended. Add the dry ingredients and beat at low speed until almost blended. In a bowl, toss the blueberries with the remaining 1 tablespoon of flour. Using a rubber spatula, fold the blueberries into the batter.
  • Fill the muffin cups three-fourths full of batter and sprinkle with the topping. Bake for 25 minutes, or until a cake tester inserted in the center of a muffin comes out clean. Remove the muffins from the pan and let cool on a rack. Yields: 1 dozen


“If your eyes are blinded with your worries, you cannot see the beauty of the sunset.” ~Jiddu Krishnamurti

Enhanced by Zemanta

Paula Deen's Old Fashioned Baked Ham

Like I said...I don't have any way of uploading photos now, until I resolve this issue with my camera; which happens to take awesome pictures...just do not have the capability any longer to upload the photos to my file. I have to rely on my daughter to use my memory card to insert into her camera to upload...and she does not have the time, to bother with my photos...as you can see, I'm just catching up with some Easter food photos. Well, not so bad, a little behind...by this summer I will have caught up with all.

Old-Fashioned Holiday Glazed Ham

Cook Time: 30 minutes

Ingredients

1 spiral-sliced half ham (Paula prefers Smithfield)

(I used a whole regular ham, about 10 lbs.)
1 20-ounce can pineapple slices, juice
reserved
15 to 20 whole cloves (optional)
1 small jar maraschino cherries
3/4 cup packed light brown sugar
2 tablespoons yellow mustard
Directions

Preheat the oven as directed on the ham package and follow the instructions for baking the ham. Remove the ham from the oven about 30 minutes before the end of the warming time.

Decoratively arrange the pineapple slices on top of the ham, securing them with whole cloves, if using, or toothpicks. Place a cherry in the center of each pineapple ring and secure with a clove or toothpick.

In a small bowl, combine the brown sugar, mustard and just enough of the reserved pineapple juice to make a thick glaze. Spoon the glaze over the ham and bake for the remaining 30 minutes. Remove the ham from the oven, transfer to a cutting board and carve.


By next Easter, I will be way ahead of the game, and will include these photos and recipes for the Easter Menu Suggestions. These Deviled eggs are so, utterly simple...just wish I could have piped the filling with my @home basic piping bag and decorating tube, but unfortunately for this type of thicker filling a professional piping bag would be more suitable, which is on my list of things I need.

New Potato Salad With Dill

TOTAL TIME
2 hours (including cooling)

Ingredients

Preparation

1.
Place the potatoes in a saucepan, cover with cold water, bring to a boil, cover and reduce the heat to low. Cook until the potatoes are just tender, about 20 minutes. Drain and quarter the potatoes, taking care to keep the skins on.
2.
Place the potatoes in a bowl, season lightly with salt and pepper and gently toss with two tablespoons of the vinegar and one tablespoon of the oil. Set aside until cool.
3.
Mix the remaining vinegar with the mustard until well blended. Beat in the oil. Pour over the cooled potatoes and gently mix. Add the scallions and dill, season to taste with salt and pepper and serve.
YIELD
4 to 6 servings 
source: NEW YORK TIMES
I would like to share with you both recipes, the simple Deviled Eggs, and the Potato Salad, which does not use mayo, but a light vinaigrette with the yellow new potatoes.

Deviled Eggs Recipe 

  • Cook time: 30 minutes

Ingredients

  • 1 dozen eggs
  • 2 teaspoons dijon mustard
  • 1/3 cup mayonnaise
  • 1 Tbsp minced onion or shallot
  • 1/4 teaspoon tabasco
  • Salt and pepper
  • Paprika

Method

1 First hard boil the eggs. (See how to make hard boiled eggs.) Fill up a large saucepan half-way with water and gently add the eggs. Cover the eggs with at least an inch of water. Add a teaspoon of vinegar to the water (this will help contain egg whites from leaking out if any of the shells crack while cooking). Add a pinch of salt to the water. Bring the water to a boil. Cover, and remove from heat. Let sit covered for 12-15 minutes. Drain hot water from pan and run cold water over the eggs. (At this point if you crack the egg shells while the eggs are cooling, it will make it easier to peel the shells.) Let sit in the cool water a few minutes, changing the water if necessary to keep it cool.
2 Peel the eggs. Using a sharp knife, slice each egg in half, lengthwise. Gently remove the yolk halves and place in a small mixing bowl. Arrange the egg white halves on a serving platter.
deviled-eggs-1.jpgdeviled-eggs-2.jpg
3 Using a fork, mash up the yolks and add mustard, mayonnaise, onion, tabasco, and a sprinkling of salt and pepper. Spoon egg yolk mixture into the egg white halves. Sprinkle with paprika.
Yield: Makes 2 dozen deviled eggs
source: Simply Recipes
On my last post, I shared with you the beautiful sunrise...this post I will share with you the most awesome sunset, which is on the Intracoastal Waterway side, facing west. A beautiful water view, and a picturesque side-walk...not in photo, just across my condo apartment. Both sunrise, and sunset photos are on the water...my place is literally on the island of Palm Beach, divided by two bodies of waters, the Intracoastal Waterway, and the Atlantic Ocean.
You have to be ready to catch the sunset at the perfect time...otherwise you are going to miss out on the magical moment, just as it is setting!
Have a wonderful  weekend, my dear friends! xoxo
Enhanced by Zemanta

Irish Soda Bread

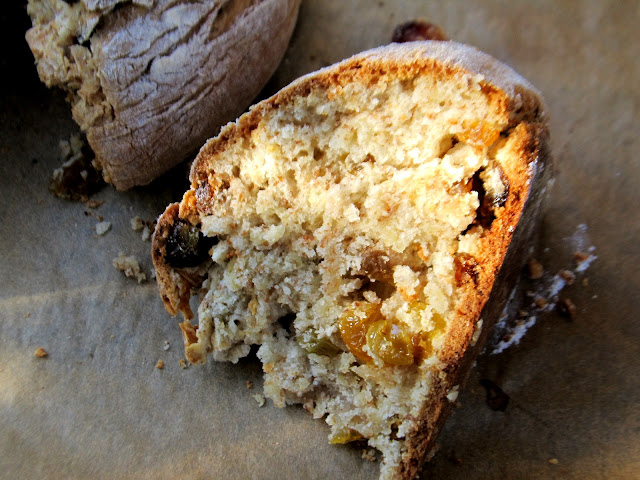
St. Patrick's Day, and Easter has already came and went, and I'm still trying to catch up with posts that have been waiting in my draft file. As I mentioned, Lora made this same exact bread, and she has my recipe for it from a 1994 Gourmet magazine, which I found at Goodwill for 49cents, just recently. I do miss Gourmet so much...it has been around for at least 40yrs and now, I just treasure each and every recipe, issue and of course books as well.

Click here for the recipe: Irish Soda Bread
 
I am unable to upload photos to my picture gallery, as I have mentioned before. I ordered a new cable adapter, and also a battery charger, but it is not helping, so obviously it's a problem with my camera. It take awesome photos, but cannot upload them to the computer. Not an easy choice to have to take the memory card out of the camera to have to upload photos from another camera, so now I'm stuck for a while until I get another camera. Oh, well...such as life!

I must admit that this is the BEST Irish soda bread recipe that I have tried, and will keep on making it, and not just on St. Patrick's Day. Even with the raisins...especially with the raisins, we love this easy bread so much.

I do hope you all had a wonderful Easter holiday! Thank you for all your kind and sweet comments and will try to catch up with all the replies and good wishes. xo


In the meantime...I was able to catch the sunrise at 7:15 AM in its glorious, and luminous beauty the other day, just by taking a quick look outside my terrace. An hour later, I decided to take a short walk on the beach with a brisk 58 degrees F. temperature. Just perfect for S. Florida at this time of the year, when everywhere else is still freezing.
Take care, and have a beautiful Sunday!


Cleveland Winter 2017

Hello my friends, I hope you all had a great holiday. I just got back from Ohio and I thought it would be nice to put together a post to s...