Chocolate Fudge Brownies... with Chocolate Ganache Frosting


Just when everyone in the U.S. is getting ready for Super Bowl Sunday...just who thinks about desserts?...well, I do know it's mostly chicken wings, sliders, pizza, chips, and dips that are the most popular party snacks for the big game, but who thinks about yummy, and easy to grab desserts?
We all love brownies...especially Fudge Brownies; and why not top it off with the most delicious
ooey-gooey Chocolate Ganache Frosting?...who says you can't have your cake...and 'eat it too?'...well, you sure can, with the cutest cupcake liners from William Sonoma! The recipe is super easy; got it from the Internet, and even if I didn't, I have it somewhere in one of my cookbooks, or recipe files. So much easier just one click to Google, and get what you need without searching in your own files!
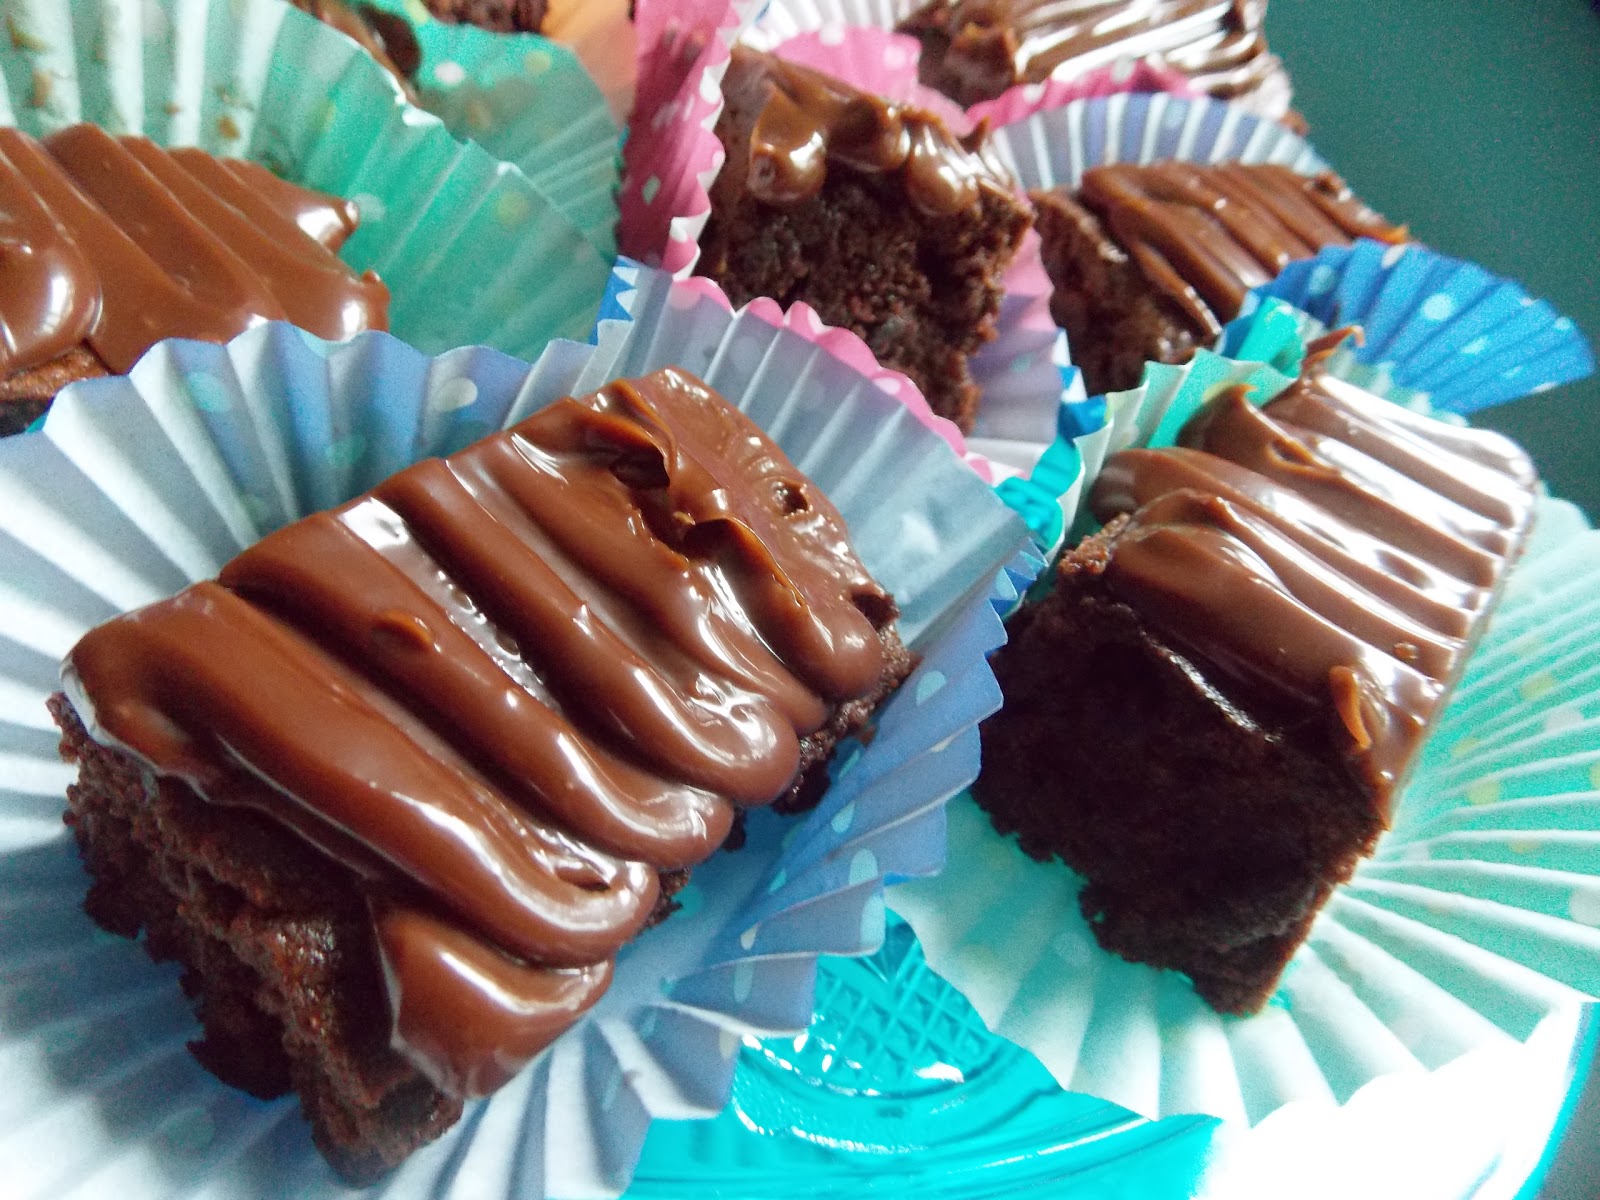
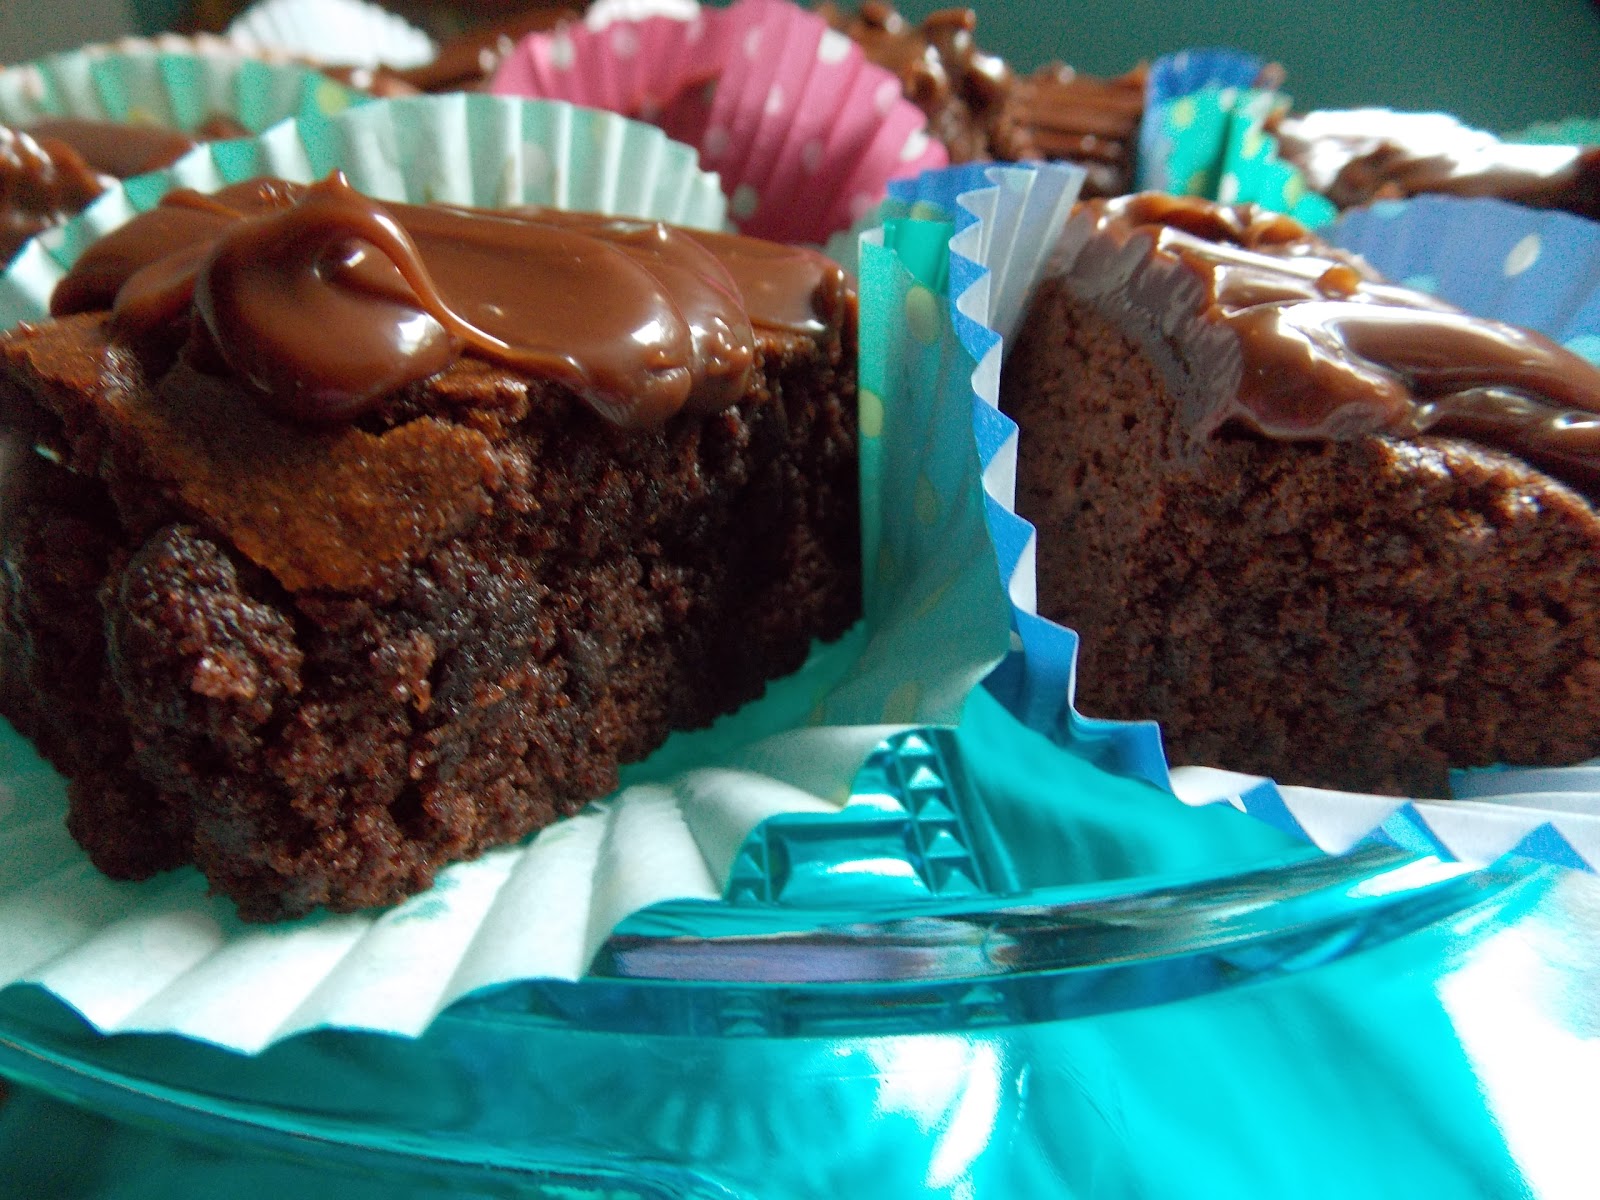
So easy to serve these yummy fudge brownies... once they are done, and frosted, all you have to do is to cut the usual square portions in half, and set them in cute cupcake liners. Just be sure to refrigerate them until serving time, and take them out about 30 minutes before serving, and you will see how the fudge frosting will 'glisten' and achieve the ooey-gooey look! Every 'chocolate lovers' dream!


Chocolate Fudge Brownies
source: King Arthur Flour
1) Preheat the oven to 350°F. Lightly grease a 9" x 13" pan
2) Crack the 4 eggs into a bowl, and beat them with the cocoa, salt, baking powder, espresso powder, and vanilla till smooth.
3) In a medium-sized microwave-safe bowl, or in a saucepan set over low heat, melt the butter, then add the sugar and stir to combine. Or simply combine the butter and sugar, and heat, stirring, until the butter is melted. Continue to heat (or microwave) briefly, just until the mixture is hot (about 110°F to 120°F), but not bubbling; it'll become shiny looking as you stir it. Heating the mixture to this point will dissolve more of the sugar, which will yield a shiny top crust on your brownies.
4) Add the hot butter/sugar mixture to the egg/cocoa mixture, stirring until smooth.
5) Add the flour and chips, again stirring until smooth. Note: If you want the chips to remain intact in the baked brownies, rather than melting in, let the batter cool in the bowl for about 20 minutes before stirring in the chips.
6) Spoon the batter into a lightly greased 9" x 13" pan.
7) Bake the brownies for about 30 minutes, until a cake tester inserted into the center comes out clean, or with just a few moist crumbs clinging to it. The brownies should feel set on the edges, and the center should look very moist, but not uncooked. Remove them from the oven and cool on a rack before cutting and serving.

Nutrition information

Serving Size: 1 brownie (63g) Servings Per Batch: 24 Amount Per Serving: Calories: 260 Calories

    For the Ganach Frosting:Basic Chocolate Ganache
    • 8 ounces semisweet chocolate, coarsely chopped
    • 1 cup heavy cream
    • 1 tablespoon unsalted butter, at room temperature
    INSTRUCTIONS
    1. Place chocolate in a medium heatproof bowl; set aside.
    2. Place cream in a small saucepan over medium heat and bring to a simmer. Pour over chocolate and let stand until chocolate has softened, about 5 minutes.
    3. Add butter and stir until smooth. Let cool slightly before using.
     
      Have a wonderful SUPER BOWL SUNDAY!
      eat plenty...drink responsibly! xo
 

WORDLESS WEDNESDAY...

photo taken by me, on our private beach, Palm Beach, Florida...1-28-2014
While the rest of our country...even in the deep South was in a 'frozen frenzy' yesterday, here in S. Florida we had the most beautiful sunny and pleasant day of 79 degrees F. Not so, today (dreary, raining, and damp-cold-windy-chilly-nasty day)
Linking to:
be there 2 day...Wordless Wednesday


Bistecca Alla Pizzaiola-{Steak Pizzaiola}

You're probably wondering what the heck is a Steak Pizzaiola...when pizza has nothing to do with this dish, paired with steak. A little history on this hearty and delicious dish that was so popular in Italian-American homes in the seventies and eighties. I've often made this dish as well, for my family, but have made the steak totally different, using a cheaper cut of beef, pounding the meat thin, sautéing  it, and braising it, smothering the steak with the cooked tomato sauce, along with the onions, garlic, and peppers. This was the only way that was prepared, not using the better cut of the beef...such as N.Y. strip or T-bone, that would also be smothered in the sauce at the end.
Actually there really wasn't a real recipe for the Steak Pizzaiola back then...we just cooked great foods from 'handy-me-down' word of mouth and wrote it down; but the basic ingredients are whole tomatoes, (I switched it to diced) pepperoncini (the Italian pickled peppers which I skipped)...and/or bell peppers red-yellow-orange, sweet onions sliced, and garlic sliced. You can also add sliced mushrooms which goes great with the addition of the other vegetables. In my opinions, of mozzarella cheese would be added...then I would think of it as a pizzaiola sauce.

The originality of this dish started out in Naples, Italy, just like the pizza originates from Naples, as far back as the late 1800's.
All you need with this hearty dish is a nice loaf of crusty bread to mop up the sauce and enjoy those perfectly sautéed vegetables. To me, having a more up-to-date presentation makes this dish more appetizing, and attractive as well!

Bistecca Alla Pizzaiola-{Steak Pizzaiola}
recipe by; Elisabeth

1/2 red bell pepper
1/2 yellow or orange bell pepper
cored, seeded and sliced into strips
2 Tbsp. olive oil
1 med. sweet onion sliced thin
3 cloves of garlic sliced thin
2 cups white button mushrooms, sliced
1 teaspoon dried oregano
salt and freshly ground pepper to taste
1-14 ounce diced canned tomato
1/2 cup dry red wine
1/2 cup water
1 or 2 N.Y. strip, rib-eye, or T-bone steak

In a large skillet, heat the oil until it sizzles on med-high heat. Add the garlic slices, and the onion slices sautéing them until they sizzle. Add the bell peppers, and the oregano at this time, to infuse the flavor. Season with the salt and pepper. Add the mushroom slices and sauté for about a few minutes. Add the 1/2 cup of water and cook for about another  10 minutes.

Now you can add the diced tomatoes (I added spicy red pepper) you can add crushed red pepper if you don't find this type, or omit the red pepper if you don't want it spicy!

Add the tomatoes to the skillet, and add the 1/2 cup of red wine. You can add about 1/2 of the water to the can, swish it and add that as well.

(you can omit the wine, and add more water 1/2 cup extra)


Bring the sauce with the vegetables to a simmer
and cook for another 15 minutes, until the pepper get soft and the sauce thickens. Set it aside, and keep it warm.


Season the steak (s) with salt and pepper. Heat a cast iron skillet, or a grill pan, and sear the steaks over high heat, covering it if it lets out too much
smoke. I seared mine for about 3 to 4 minutes on each side for medium, but you can sear it 2 minutes for rare, or about 5 minutes on each side for medium-well.

Let the steak rest for a few minutes before slicing it thin, across the grain, or leaving it whole.

To Serve:
You can pile the sauce and peppers on top (the old fashioned way...or gently place the slices of the steak on top of the sauce and vegetables.
Crusty bread makes it even better, or you can cook some rice to serve as a full course, along with some salad greens...yumm!
Serve while it's hot!


SCHMALTZ

Have you heard of the word 'schmaltz?'...it is an old Yiddish word for 'rendered chicken fat'. Back in the old days in Eastern Europe when margarine wasn't invented (which is so unhealthy)...butter, which was too expensive to cook with, you could make this natural, humble 'liquid gold' just from slowly cooking down the skins, and the fat part from the chicken, adding some chopped, or sliced onions (I also added a couple garlic cloves, sliced thin) You couldn't imagine a Jewish household not having their freshly made schmaltz. The best part of the skin from the chicken to render fat is the breast, and using a bunch of backbones which you can buy for very cheap price at the grocery supermarket.
There's so many uses of this fine homemade schmaltz...matzo balls, potato latkes, chopped liver, roasted chicken, and even the American southern dishes; hush puppies, corn bread, and for pie crusts...just to name a few. It may seem like an odd word...SCHMALTZ; which can also describe something expensive, or maybe something 'corny'! Old Yiddish words, used in phrases are totally hilarious!

You probably are familiar with some of these Yiddish words.
KLUTZ= an awkward person.
OY-VEY= how terrible things are.
SCHMUCK=jerk
SCHMOOZ= (is to kiss up to somebody)
SHLEP= carry, or dragging something
NUDNIK= a pest, an annoying person

SHLEMIL= dummy, loser *
SHLIMAZL=unlucky person*
Ever wondered about the 'theme song' of the beloved and funny show from the seventies what they meant?...shlemil, and shlimazl...still love the re-runs!

Chicken Schmaltz
(my way) by:Elisabeth

2 lbs. chicken backs, and roughly cut up
skins
1 large onion, cut into thick slices
2 cloves garlic, sliced

Place the chicken backs, and skins in a large heavy skillet. Add 1/2 cup of water to the pan and on low heat start simmering the chicken backs and skin. After about 10 minutes, push the pieces aside, and add the onion and the garlic.

Continue to cook for another 45 minutes on low
heat. Keep stirring often. You will see the golden liquid and the chicken and onion slightly colored. Do not get it too dark. As you can see in the photo, the onion has a nice golden color to it. Remove the chicken backs to a container (do not discard) You can make a nice chicken broth with the remaining pieces. Discard the onions, and strain the schmaltz through a fine sieve into a container, or jar with a tight fitting lid. Cool, cover, and refrigerate until needed.


Best Ever Chocolate Chip-Banana Muffins

I haven't been able to take decent 'natural light' food photos for the last 2 weeks for a new post, since we've been getting so much rain with heavy winds, and clouds every day...except for last Sunday for about half a day; sun was in-and-out, and we were able to enjoy the beach and the pool. I feel so bad for all of you who live up north and even on the east coast as well; below zero temperatures, and all the snow storms...brrrr!
In order for me to buy more cookbooks, which I still find a few at a different Goodwill store for their original $2.49, or I've been ordering them online from Amazon for 'dirt cheap'...of course, cookbooks do add up and I'm not about to have a huge selection which I used to have; so, I have donated a lot of books that I find...useless! While looking through some of my books for torn out pages from magazines tucked into them, I found this photo copy of a recipe of this amazing and perfect Chocolate Chip Muffins...but wait!...This recipe is from a Bed and Breakfast Inn, called the
The Signal House in Ripley, Ohio.

If you plan to come to Florida...which would be a perfect time now to get away from the freezing cold weather for a while...here's a local Bed and Breakfast, which I personally drive by just about every day. (it is only about 2 miles from the beach)
Sabal Palm House Bed and Breakfast


Best Ever Chocolate Chip-Banana Muffins
recipe from: The Signal House

3 large ripe bananas
1/4 cups sugar
1 slightly beaten egg
1/3 cup melted butter
1 teaspoon baking soda
1 teaspoon baking powder
1/2 teaspoon salt
1 1/2 cups all-purpose flour
6 ounces chocolate chips

Preheat oven to 375 degrees F. Mash bananas. Add sugar and eggs. Add the melted butter, then add the dry ingredients. Stir in the chocolate chips. Pour batter into 12 or 6 cup muffin pan and bake for 20 minutes.


Makes 12 or 6 large muffins...I made 6, and I must tell you they were so moist, not too sweet, and so delicious with morning coffee, or afternoon tea!

Polar Vortex, 2014
Temperatures in all 50 US states dipped below freezing on Tuesday in a rare nationwide chill that will keep a grip on much of the country for at least another day, with cutting winds and blizzards posing the most danger.

Florida, a state that normally basks in its reputation as a warm winter escape, experienced unusually low temperatures. In the Midwest, northeast and eastern Canada, it was dangerous to venture outside. At some point on Tuesday, at least one location in each of the 50 US states recorded temperatures below freezing, with the highest point on Hawaii, Mauna Kea, recording a temperature of 21F (-6C).
The so-called polar vortex that funnelled an Arctic low pressure system into the upper US this week swung south and east on Tuesday. Polar conditions settled over two-thirds of the US.

It was colder in the southern state of Georgia than Alaska as Atlanta plunged to 6F (-14C) – the lowest temperature since 1966 – while Anchorage, Alaska, recorded 27F (-3C) . Wind chills were recorded around -60F in parts of Michigan, Minnesota, Montana and New Hampshire.
Read more...The Guardian New, York, Jan. 7, 2014
 Although we didn't get freezing weather here, in S. Florida...I took these photos this morning, and sure enough it looked like it was about to snow!
Wednesday, 8:20 AM...from my balcony. The wind-chill factor always make it at least 15-20 degrees cooler by the ocean, even in the summer time!
Usually, just about every day, the sun comes out...even if for a few minutes...for the last 3 days this is how our 'sunny Florida' skies looked...more like 'snow clouds'...I have not witnessed this kind of chilly wind, very damp, and cold...it just cuts through your bones! Not making excuses, because I grew up in Ohio, and I have lived through plenty of snow storms and freezing weather throughout my youth!


Chocolate Crinkles

Happy New Year, to all my blogger friends...(not excluding readers who may not comment)...equal time to all!
Hope you all had a wonderful, and safe New Year's celebration...as we also did! This post may seem like a 'forgotten' or an 'after thought' post of my Chocolate Crinkles...but let me assure you that it is not a forgotten post of these lovely cookies that everyone loves around the Christmas holidays!

Chocolate Crinkles
recipe source: Gold Medal Flour
  • 1/2cup vegetable oil
  • 4 oz unsweetened baking chocolate, melted, cooled
  • 2cups granulated sugar
  • 2 teaspoons vanilla
  • 4eggs
  • 2 cups Gold Medal® all-purpose flour
  • 2teaspoons baking powder
  • 1/2 teaspoon salt
  • 1/2cup powdered sugar

Directions

  • 1
    In large bowl, mix oil, chocolate, granulated sugar and vanilla. Stir in eggs, one at a time. Stir in flour, baking powder and salt. Cover; refrigerate at least 3 hours.
  • 2
    Heat oven to 350°F. Grease cookie sheet with shortening or cooking spray.
  • 3
    Drop dough by teaspoonfuls into powdered sugar; roll around to coat and shape into balls. Place about 2 inches apart on cookie sheets.
  • 4
    Bake 10 to 12 minutes or until almost no imprint remains when touched lightly in center. Immediately remove from cookie sheets to cooling racks.


I find it a little odd to be posting a Christmas cookie (now, that Christmas is over) Chocolate Crinkles are so popular here in the U.S. and all over the world by now, I assume. They are so attractive with the light and dark contrast, and most certainly perfect for an interesting addition to a cookie tray or for serving by themselves, any time of the year!

I did not have a Christmas tree at my small beach condo apartment; but at my daughter Lora's they have a beautiful live and tall tree every year, and I spent time just about every day there to enjoy the holiday festivities, especially at City Place!


Christmas @ City Place...West Palm Beach, Florida
Friends, and Family, on Christmas Day Celebration!

MERRY CHRISTMAS!

Photo; courtesy of PINTEREST


The Blessings of Peace
The Beauty of Hope
The Spirit of Love
The Comfort of Faith
May these be your gifts...this Christmas Season.


Good will, Success and happiness be with you,
this Christmas!
 
Wishing you all, a very Merry Christmas!
Hugs,
Elisabeth


Hot Pepper Jelly


So, this is my awesome 'Hot Pepper Jelly' that I have never made before! As you notice those pretty swatches of holiday material...I would have loved to place around the jelly jar top...unfortunately; they were a little small, except for the one jar on the top, but they were extremely slippery for me to try to tie them around the jars, so I left them as 'it is' a little 'place mat'...or a small cocktail napkin, if your prefer, but the jelly turned out so awesome and just the right peppery taste!

My granddaughter Gabby was not impressed...to say the 'least! She was expecting a mild light sweet pepper jelly, which I should have known from the start to make them with all sweet peppers...instead of mostly hot peppers add to some of the sweet. No problem...next time I will use all sweet peppers. At least...we, adults, get to enjoys these lovely gems, slathered over cream cheese topped little crackers...yummm!
It's so easy to make it, just follow the instructions on the recipe.

These are the peppers I used...purchase from the Green Market...the long red ones are the super hot pepper, and all the others are sweet!
KRAFT SURE JELL...Hot Pepper Jelly recipe... 

and I only used red, and orange peppers. The red ones were the hot peppers!
I washed, peeled, and chopped my peppers, and
put them in the food processor to chop them fine.
(be sure to remove the seeds first if you don't want them to be extremely hot)


Bring it to a boil, and skim off the foam...you are ready to ladle them into sterilized jars!


Aren't they so festive...red, and so pretty?
Well, you're not quite finished yet!


Cover the jar with the sterilized lids, and put them into water that covers them almost, to the top.


Cover the pot with a lid, and boil for 10 minutes.
Carefully remove the jars, and let it sit on a kitchen towel on the kitchen counter until it cools down...and your are ready to refrigerate them.


They are so good, served on Ritz crackers, with a dab of Philadelphia cream cheese and a small spoonful of the pepper jelly on top of the cream cheese...yumm! A perfect holiday treat!


Lemon Bread

Christmas is only 10 days away, and the year has gone by so fast that before you realize...2014 is just around the corner. I wish I had something more exciting to post, other than my average baking stuff. This super lemony and not too sweet bread was so easy to make and not planning to bother to post it...only when half of a loaf was gone, that I decided to take a photo of it and said..."why not?"...so here it is, and the recipe is right inside the container of the glazed chopped lemon peel that is only available at this time of the year, along with the glazed candied cherries and pineapples that brings back such great memories from years of past Christmas!
As you can see, this is a Florida local product and it's quite fresh and extremely potent in lemon flavor.
This past Saturday morning; since the sun decided to come out for a change after every day of cloudy and rainy weather, it was so nice to browse around and check out the little Green Market...much smaller than the one we have in West Palm Beach...but this was a really nice way to spend an hour by myself!
 
 
As I was passing through, I noticed this Rasta man weaving what it seemed like palm tree leaves at the flower stand.
 
There were all kind of local vendors selling different things...including homemade breads, rolls, and pastries; jams, jellies, handmade jewelry, candles, soaps, clothes...you name it!
 
What you see in the background are some colorful Tye-dye materials...notice the Intracoastal water on the right side...gentle breeze, and perfect mild and pleasantly warm temperature in the middle of December.
This is the bridge from Lake Worth that takes you across to the island of Palm Beach...otherwise known as S. Ocean Blvd.
The building in the background is a small hotel that used the be the Howard Johnson, years ago..same building, just remodeled.
Of all things...I was able to find some amazing and lovely peppers, hot, and sweet. I promised my granddaughter Gabby that I would make some pepper jelly for her. She loves the pepper jelly that my daughter buys for her at the WPB Green Market and that one is soo good, not too hot, and not too sweet. Hope I can make one just as good. Did google a few, and found some other good recipes on Pinterest. I love this basket, which I got from Goodwill for $1.99  last year!
 
Thank you for your continuous support, and friendship...I hope you are all doing well and getting ready for a wonderful holiday season! xo

Cleveland Winter 2017

Hello my friends, I hope you all had a great holiday. I just got back from Ohio and I thought it would be nice to put together a post to s...