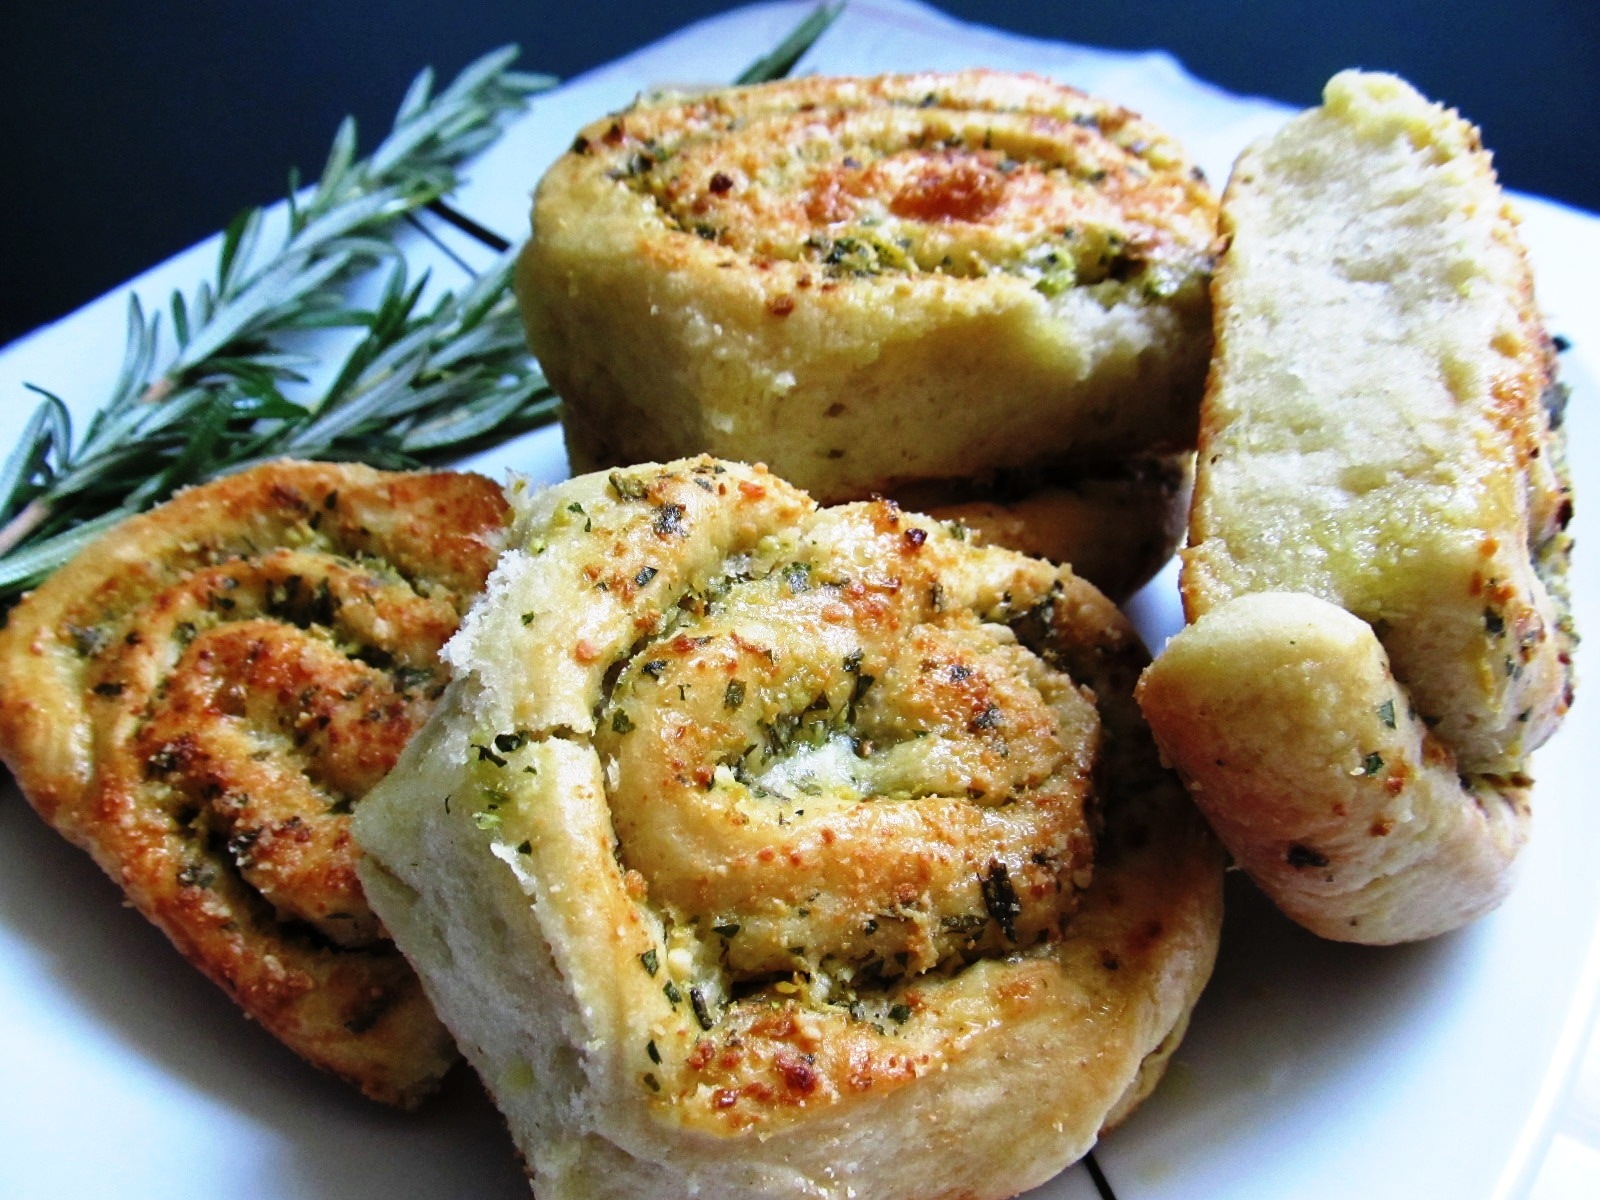
I finally made the long awaited
garlic rolls Sunday morning, and shared it with my family...only to get complaints by the little guys...my 4 little grandchildren. "What's all the green stuff?"...and too much garlic! Although, it was a hit by everyone else...meaning, the adults. Well, at least, all the rolls were gone, in one sitting....and as you notice, they are not tall, but at least they are fluffy, but short, packed full of chopped fresh garlic,
Italian parsley, and rosemary.
The reason they are "little short guys" ...no excuses...but one. I used my
Le Creuset large lasagna pan to bake the rolls in, and instead of 8 rolls, I had enough for practically double at least 14, so I sliced them thinner.
So thank you Suhaina for the amazing dry
yeast from Singapore, and thank you, for the inspiration. Now, I can make this again, with less garlic, and omit the herbs, so my grandchildren will not complain...and make them taller,
using a smaller bake pan.
For the recipe, click on to
Suhaina's My Singapore Kitchen
I didn't have cilantro, or sesame seeds, but I did have the parsley and rosemary, which I used, and also sprinkled grated
Romano cheese on the top before I baked it. Also, the baking time took a little longer, because 350 degrees F. was not high enough for the heavy duty bake pan, so I raised the temperature to 375 degrees F. for a total of 35 minutes, instead of 25 minutes.
I must confess, I have never made these type of rolls before, so I have to pat myself on the shoulders that because of the fantastic yeast, and the step-by-step instructions, I did
OK! I'm always marveling at
Roxana's beautiful yeast rolls, and bread that make it to the
Foodbuzz Top 9...
Mina's amazing sweet breads, and rolls, and just recently,
Mari's gorgeous 4 braided
Challah bread, and
Swathi's beautiful whole grain and rye breads...it's a shame for me not to pursue more yeast dough baking. My daughter
Lora makes quite a lot of delicious yeast breads, and perfect pizza dough, so I do have a good excuse to be lazy about my own yeast baking. Enough of that!
I'm linking this to Hearth and Soul Hop #51
I always had a bit of shying away from Metric measures, but I have a real helpful hint from the back of my New Basics Cookbook....so get your little calculator out, and start multiplying, and dividing!
ounces to grams: multiply ounce figure by 28.3 to get number of grams
grams to ounces: multiply gram figure by .0353 to get number of ounces
pounds to grams: multiply pound figure by 453.59 to get number of grams
pounds to kilograms: multiply pound figure by 045 to get number of kilograms
ounces to milliliters: multiply ounce figure by 30 to get number of milliliters.
cups to liters: multiply cup figure by 0.24 to get number of liters
There are more conversions and equivalents, but these are the most important ones to remember when you need to convert from Metric to the American system, and vica-versa.
Here's the Active Dried Yeast I received from Suhaiana.
So let's do the conversion:
125 grams x .0353 = 4.41ounces
Just look at the tiny pearl like pieces of this fabulous yeast...the minute you pop open the little canister, the aroma of fresh yeast hits you! Not so, with our powdered dry yeast in the little packets.
So here's the little science experiment. ! tablespoon of the dried activated yeast dropped into 1 cup of warm water, (water heated in the microwave for 45 seconds)
As soon as yeast was dropped into the warm water, it started to bubble up, even without stirring.
After about 1 minute, yeast bubbled up like this!
After a few minutes, while I was getting my ingredients together for the dough...it practically overflowed...Wow!...this kind of result never happened with dry yeast before...now I know, I'm on the right track!
This is after 45 minutes, covered in a greased bowl.
I have my Le Creuset pan...btw...this was too large for the amount of rolls, but I already had it prepared, and greased, so next time I will use a smaller bake pan with a rim...even a round one perhaps. I did add a few sprigs of fresh rosemary, taken off the sprigs, and put all three, garlic, parsley, and rosemary.
In the meantime, I practically made pesto, in the food processor, it's OK to make a lot, just mix it up the amount you need with the extra virgin olive oil, and I will show you what to do with the remainder of the herbs.
Is this a perfect punch mark, or what?...ready to punch down the dough!
Now, you got the nice rectangle, and spread the herbs, with the garlic, and olive oil...I think I added a little too much herbs, garlic, and oil.
In the meantime, I opened up Suhaina's blog to double check on the step-by-step great photo instructions...already printed out recipe, but without the photos, so I made sure to check again...and yeppp...I did add too much herbs, but then again...there are NO TWO COOKS ALIKE...THERE ARE NO TWO BAKERS ALIKE...so every person is an individual, and you cannot expect it to be exactly alike...Let's not be "copy cats"...just be your individual self. That's what makes us unique in our own way!...So, moving on...still have a few more to show you!
I don't know how I ended up with so many rolls, but at last count, I think I had about 15 rolls, resting in the pan, and spooning more herbs and oil, on top, also egg wash, and sprinkling it with shredded Romano cheese. The rolls needed to be proofed another 20 minutes, or so!...(or so, meaning, maybe I didn't proof them long enough?)
Was 20 minutes long enough?
I started it out at 350 degrees F....after 15 minutes, nothing was happening, so I raised the temperature to 375 degrees F. and baked it for an additional 20 minutes.
This is how I save my extra fresh herbs and garlic, in a mason jar, filled with pure vegetable oil, or canola oil, whichever I have on hand.
Basically, this is not pesto, but when you are grinding the herbs with the garlic, the only difference is, you spoon it out, to put into a jar, and add the oil to it, which will keep it fresh for up to 3 wks. in the fridge, but you will use it up a lot faster, because there are many uses for the herbs, and garlic. All you have to do is spoon out the amount you need, and add olive oil, and/or butter to whatever your culinary needs are.
The rolls did turn out light, flaky, garlicky, and a distinct flavor of the parsley, garlic and cheese. What I also did was to drizzle an addition of my fruity extra virgin olive oil on the top, and I, myself ate 3 rolls alone...Delicious!


Homemade garlic rolls! Ingenious. Great!
ReplyDeletethese are soooooo delicious I can smell them,, (sniff sniff,) yup I smell them,, yummo!
ReplyDeleteThose garlic rolls are highly addictive,flavorful and delicious..
ReplyDeleteIt was so nice of you to share it with your family...hehe! My daughter would LOVE these, she has been wanting me to make garlic knots for some time now. We both like it with a lot of garlic, it's my husband that says..."wow you can really smell the garlic! That's a lot of garlic" Thanks for the tips I'll be making this recipe for sure (I have the summer off this year I'm not working summer school).
ReplyDeleteThese do look amazing! I love the photos!
Wow now these are awesome looking, the center filling is calling my name.. just delicious looking!
ReplyDeleteWoe, these look fabulous! And I LOVE all the green stuff...but I have a feeling my kiddos would prefer them plain. Very cool how you rolled them like cinnamon rolls...so pretty :)
ReplyDeleteChe buoni! Io li faccio con prosciutto e mozzarella, ora devo provare questa ricetta!! Bellissima anche la foto :)
ReplyDeleteThese look amazing. I love the "green stuff" and the golden brown color. I can't wait to try these!
ReplyDeleteI would have eaten them without complaint. The more green stuff the better in my book. Glad you were ready to tackle these. Nothing like warm rolls. Hope you have a wonderful week.
ReplyDelete-Gina-
Elisabeth!!! You are one great baker!!! I love how these look, I am sure my daughter Ruby will love them...here two favorite ingredients are parsley garlic. I will copy this recipe in my to do. Thank you so much for including me in this post, I feel really honored that you liked my challah bread :)
ReplyDeleteHave an awesome week.
I can smell the aroma of the garlic, parsley, olive oil and cheese. I won't have problem to eat three rolls, too. :D
ReplyDeleteHi Elisabeth. I can't begin to list the great stuff on this post ...
ReplyDelete1. Love the pics, so very detailed and yumy! and I'm definitely going to check out that yeast.
2. Super useful conversion list
3. Thanks for introducing another great blog. I will be poking around there soon.
4. I love the idea of having garlic paste at the ready. Saves so much time and effort ... very practical. I also love the green to it, makes it look so fresh and summery!
Thanks!
The garlic rolls look AWESOME!! Yum.
ReplyDeleteThose rolls sound ammmmmazing! The more garlic the better!! :)
ReplyDeleteI've the same yeast pot. and i've not baked one bread with it...shame on me...the first one will be our Roxana's pani popo. we mainly use yeast to make appams...the rolls look delicious and inviting...i dunno wht your fuss was about lol!
ReplyDeleteI can actually smell them from looking at your pics , ooooh I am gonna make this one today . The type of yeast you used is very common around here , we all use that , glad to know you had fun with it :).
ReplyDeleteHi Elisabeth! This look insanely good! I mean this in all seriousness but I felt I could totally imagine their taste and texture from all your descriptions and the photos! There is nothing like the smell of yeasty bread filling a kitchen! Happy Blogaversary (is that how you spell it?!) too! Hope you are well and summer is fun! xo
ReplyDeleteMost tényleg csorog a nyálam :)
ReplyDeleteElisabeth, annyira jól néz ki ez a tekercs, a fokhagymával meg gondolom isteni lehet!!
ReplyDeleteElisabeth, these look absolutely delicious. Love the savory combination. No wonder the adults gobbled them all up.
ReplyDeleteYour garlic rolls look delicious! I love the photos too!
ReplyDeletethanks so much for visiting today,, I just wanted to say how lucky those people were to have you bringing them food,, you are a wonderful cook, I'm sure they loved it,,
ReplyDeletewow, thank you for this tutorial. i am still scared of yeast sometimes, but will attempt to start baking more with it soon :D.
ReplyDeleteAll the wonderful flavors I love! Great recipe, Elisabeth!! :) Hope you are doing well. Always great to come and see what you've been cooking! :)
ReplyDeleteDelicious garlic rolls, yummy I can see it from the picture.
ReplyDeleteWow! Homemade garlic rolls with lots of flavor... can't stop to try them!
ReplyDeleteEbből most kérek,egyszerűen ínycsiklandozó,még nézésre is!! gusztusos!!!!!
ReplyDeleteHi Elisabeth! I am now following your lovely blog on twitter! Your rolls look absolutely amazing! They remind me of what the babies of a cinnamon roll and a garlic knot would look like! Very cool! Thanks so much for sharing them with us on the hearth and soul hop! All the best, Alex
ReplyDeleteI can easily imagine how good your kitchen smelt when you were baking those buns! Excellent!
ReplyDeleteOh, wow! I have the worst luck making yeast-based breads (& cakes) but I'm going to have to give these a try. It would be a crime not to. Thanks for sharing it!
ReplyDeleteOh goodness these are lovely! I don't really care if they are short or tall, as long as they a fluffy :) Beautiful job Elisabeth!!! I am sure the garlic was a bit much for the little ones, but more for the big kids :)
ReplyDeleteLooks sooooooooooo gooooood! I lost word here. I wish I can have those garlic rolls right now. Looks like a lot of work, but the feeling of accomplishment must be extra good with warm bread in hand. NICE!!!
ReplyDeleteI enjoy everything homemade. These garlic rolls look awesome and totally delicious. Thanks for sharing this tutorial, Elisabeth. I will be trying these out.
ReplyDeleteI think you did a wonderful job. those rolls look amazing!!! I usually get complains I didn't put enough herbs and/or garlic :))
ReplyDeleteThanks for the mention Elisabeth, you're way way too sweet. A real friend
Hugs,
Have a wonderful rest of the week
i can't stop gawking at these rolls!! I am going to make these, you have inspired me bella!!!
ReplyDeleteElisabeth, these garlic rolls look superb! I can almost taste it... almost. Love the mixture of herbs and garlic. Thanks for the conversion info as well. Have a great day!
ReplyDeleteElisabeth, these rolls are PERFECT!! I can feel the taste and wish I could grab some directly through the monitor!! Great job again! :)
ReplyDeleteWOW! Elisabeth they look amazing!
ReplyDeleteHello Elisabeth dear....U have baked the rolls really well... I am very happy for u...
ReplyDeleteBack to normal life in Singapore now...Was very busy in India and did not have time to blog or post...
Happy to know that everyone enjoyed it except the little ones...
Nice clicks too.
Man, those look great. I'm a sucker for anything Italian or containing garlic.
ReplyDeleteÉn kis fokhagymás zsömléket szoktam sütni a borscsleveshez, imádjuk!
ReplyDelete