Romaine and Potato Salad with Artichoke, Tomato, and Parsley Dressing

Just back in September, around Labor day, I was so inspired to make this healthy, and beautiful salad, not realizing that I might want to use it as an inspirational post for my food blog, so I just snapped a photo of it and that was 'that'...in retrospect, now I'm sorry that I didn't take more time getting better 'shots' of this delicious and unusual salad! As the saying goes..."it is what it is, and move on", so I'm moving on, not just with my photos, but with my blog, and mostly with my life!

Nowdays we are all so concerned about eating healthy, and 'clean'...so what really is, clean eating? In my opinion, free of chemicals, antibiotics, mostly vegetarian? I'm not too sure, but I do know it is wise to be eating fresh, raw, green vegetables, fruits, all free of pesticides, and buying organic as often, as you can. It does take a little more time and effort to create healthy, meals, but so well worth it!

This particular photo...I just decided to 'pop' it into my posts to show that even when we were asked to join a simple extended family Labor Day get together, this was my contribution! A healthy and refreshing fresh vegetable tray with simple plain Light Greek Yogurt, and sprinkled with Pink-Peppercorn Lemon-Thyme spice mix, that can be used on meats, and vegetables as well. I just love it and use it in dips as well!


Romaine and Potato Salad with Artichoke, Tomato, and Parsley Dressing

recipe inspired by; Real Simple magazine
  • Per Serving

    • Calories454 calories
    • Fat24 g
    • Sat Fat3 g
    • Cholesterol0 mg
    • Sodium927 mg
    • Protein12 g
    • Carbohydrate49 g
    • Sugar1 1/2pounds fingerling potatoes, halved1 1/2
    romaine-potato-salad-artichoke
  1. 1 1/2 pound fingerling potatoes, halved
  2. 1 beefsteak tomatoes chopped
  3. 1 15.5-ounce can artichoke hearts, drained and quartered
  4. 1/3 cup chopped roasted almonds
  5. 1/4 cup chopped fresh flat-leaf parsley
  6.  1/3 cup extra virgin olive oil
  7.  2 tablespoons red wine vinegar
  8.  kosher salt and black pepper
  9. 4 romaine hearts, halved or quartered if large

DIRECTIONS

  1. Steam the potatoes in ½ inch water until tender, 12 to 15 minutes. Drain and let cool.
  2. Meanwhile, combine the tomato, artichoke hearts, almonds, parsley, oil, vinegar, and ½ teaspoon each salt and pepper in a medium bowl.
  3. Serve the dressing spooned over the lettuce and potatoes.

Thanks!


Torta Soffice di Mele {Light Apple Cake}

Hello everyone! Just when I thought I was returning to my blog...my world have seemed to have fallen off a large cliff, and it was not so easy to climb back. Since the first week of last October of 2015, everything have seemed to change...sudden death of my beloved older sister Anna (Aniko) in Cleveland...who I have blogged about one year ago...my weird and bizarre (at home) accident, ripping my upper arm open...(due to falling over my simple little Pilates chair in the middle of the night...goes to show you that if you can't see to go to the bathroom...have a 'night light'...which I do have but did not turn on! (some of those exercise equipment do have sharp edges that can actually, certainly injure you. Got rid of it after having it next to my bed for six years!
Spending two weeks in the hospital, due to allergies to 3 different antibiotics did not help either for the wound to heal, instead...making it worst for infections. I ended up having to be hooked up to a wound vacuum machine, at the hospital, and using a smaller version of it at home...having a nurse come out every day to change bandage! So, October and November of last year was the worst 2 months of my life...I must admit honestly. December was slightly better, and I went back to my beloved home town re-visiting my family and painfully missing my dear sister Aniko who has left this world but her presence is forever there at the house, and in our hearts!
It seems like I have abandoned my blog...which actually I did, in a sense that I did not even want to peak in to see what's going on; not just with my blog, but with others' as well! I owe all of you friends, and followers a huge apology...not visiting, and commenting on your beautiful blogs. To make things worst...I have lost nearly 100 followers, not blaming them for leaving because I was a 'no show'...simple as that! Since then, my photos have show up regularly and 'thrift' blogs...yet, another 'food and thrift' blog...taking away from entering into my blog...which is totally different. I tried to change the name, but will have to really start all over, perhaps and have my own domain?! which will co-host it, not worth the hassle! Besides the familiar name I decided to chose close to the 'food' name is taken by another blogger some time ago...so I will remain with the same title that I chose close to 6 years ago, and that's ...that!
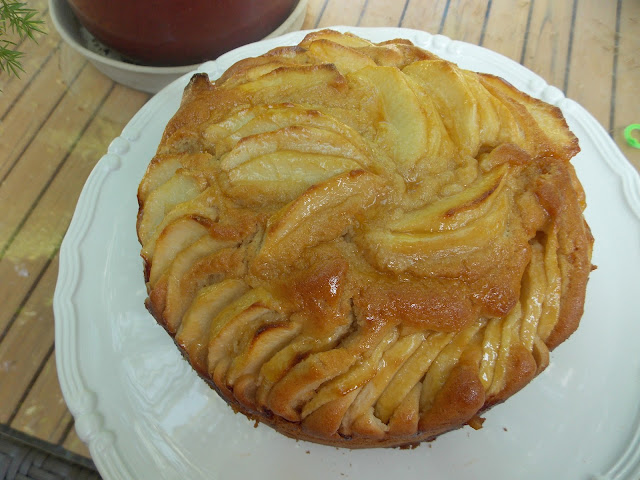
I made this Italian apple cake last September, and was going to post it, and I did not get a chance. Photos are not the best, taken with my cell phone camera, but then again...I was not anticipating to want to post about it, so I did not bother taking better pictures with my camera...and of course, cloudy and dreary day did not help either...although, the sun does peak out just about every day here in S. Florida, even if for an hour or less which is really nice! The cake is light, buttery, and so very moist and delicious!
Since the last few months, I have been quite active on Facebook, keeping up with some of my food blogger friends, and old and new friends, as well. As for family, not so active...for some reason, they don't want to associate with their own...due to 'exposure', I guess, not wanting the world to know 'who belongs to whom'?! My daughter never, ever posts anything about me, and has told me, she wants to keep her Facebook page, and friends private...knowing that her friends know who her family, i.e. (mom) is...I suppose it's better this way!

Now, I have totally gotten off the subject about the Light Apple Cake! I made this amazing cake withe the fresh apples, at my sister's house when I was there last October, and I was so thrilled that she absolutely loved it, and wrote down the recipe...but sadly she passed away one week later!

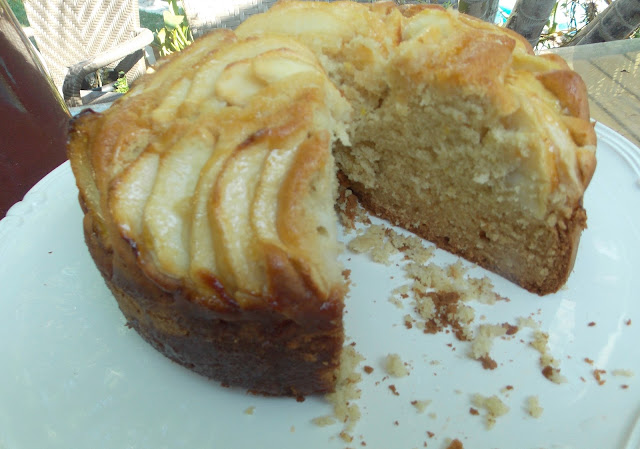
Torta Soffice Di Mele{Light Apple Cake}
2 1/2 cups flour
2/3 sugar
3 eggs
2/3 melted, unsalted butter
grated zest of 1 lemon
1 teaspoon baking powder
pinch of freshly ground nutmeg
1/3 cup milk
3 apples (golden delicious or granny smith work well)
Preheat oven to 350 degrees. Combine all ingredients except the apples. Mix until smooth batter is formed.
Butter and flour a 9″ spring form pan. Pour in the batter. Peal and core apples, then slice thinly and arrange in a circle pattern on top of batter. Apples may sink slightly into the batter.
Bake the cake until a wooden toothpick inserted into the center comes out clean, about 1 hour. Remove room oven and let cake cool slightly on wire rack. Remove the pan sides and slip the cake onto a serving plate. Serve at room temperature.
The only addition I made, I added 1 teaspoon baking soda, juice of 1 lemon as well, 1 tteaspoon cinnamon powder ( for me, cinnamon goes well with apples, and it's a must have. I also changed it to 1/2 cup of cup of milk, for softer texture!


Our last 'selfie'...together, one week later
on Oct. 7th, 2015
she collapsed and 'died'!
I made the Torta Soffice di Mele the second time a month later in Cleveland, for my sister, and I do think it turned out better than the first time. I added the sliced apples in half of the batter, and added the remaining sliced apples on the top, and also sprinkled it with a mixture of cinnamon, and sugar. The additional added ingredients made it lighter, and not like a pound cake batter, which is also good, but I prefer a light cake. Pound cake is...pound cake, but this recipe is supposed to be a (Light) version, which the title says so, therefore I had to adjust it. Not every recipe is 'true'...so you have to make it 'tried and true'

I did miss all of you dear blogger friends, and I will try my best to keep blogging, which is a good 'therapy'...and NOT to be occupied with thoughts of sadness...life has to continue, which is proper to say, and most importantly we all have families and loved ones that need us here, right now. Everything in it's earthly, and heavenly order must be decided and done to the best to our ability, and... capability. Heavenly matters are, and will be decided by a 'higher power' at the right time when it is decided by God!
Love, and Peace,
Elisabeth

White Chicken Chili

I've been contemplating whether to just quit the whole blogging, or continue on, even if I post once a month...at least it's better than none at all. I've invested five years into food blogging. so I'm not gonna stop now! I've been using my smart phone to take quick photos of everyday 'life' and I must say it's a lot more convenient than lugging around your digital camera although, today I decided to get my camera out for this 'brainstorming' quick idea of making chili...not just any chili with the beef, I decided to use white chicken breasts...no big deal just leftover rotisserie chicken from my local Publix supermarket.

What a fun way to welcome September, and fall season just around the 'corner' to come up with all these beautiful and vivid falls colors, and hardy 'stick to your bones' goodness with a bowl of warm chili with chicken which is so much lighter than beef. Instead of making it in the slow cooker (crockpot) I just didn't want to wait for it to cook for 6 hours...although, I did cook the dark red kidney beans, and the Great Northern beans ahead of time separately, and added the shredded chicken at the end of cooking time.
 Let me tell you, this amazing chili with is such a $ stretcher...a real 'thrift' bargain, you can feed an 'army' with it and they will love it and thank you for it, and you can 'pat' yourself in the back that you have a winning recipe idea on your hand. Also, you most likely have most of these ingredients in your cupboard and in your fridge. As for the spices, they are also very basic as well. You can make this as hot, medium, or mild if young children are eating it. Since I'm such a Pinterest 'geek' I actually did find this recipe on Pinterest by a well know food blogger, so I will post her recipe and my adaptation of how I made it!


    { Crockpot} White Chicken Chili
My adaptation in BLUE
serves: 8-10

  • 1 large yellow onion, chopped
  • 1 can (15-ounces) low sodium Great Northern Beans, drained and rinsed well
  • 2 cups dry cooked Great Northern Beans+ ( save1 cup of the liquid it was cooked in)
  • 1 can (15-ounces) low sodium Red Kidney Beans, drained and rinsed well
  • 2 cups dry cooked dark Red Kidney Beans + (save 1 cup of the liquid it was cooked in)
  • 2 cans (10-ounces each) diced tomatoes with green chilies
  • 1-28 oz can diced tomatoes (drain liquid and save in a measuring cup)
  • 1 can (15-ounces) sweet corn kernels
  • I used 2 fresh leftover cooked corn (shaved off the kernels to add at the end)
  • ¼-teaspoon chili powder
  • 1 teaspoon chili powder
  • ¼-teaspoon ground cumin
  • 1/2 teaspoon ground cumin
  • ¼-teaspoon garlic powder
  • 1/2 teaspoon dry granule garlic and parsley
  • ⅛-teaspoon paprika
  • 1 teaspoon Hungarian sweet paprika
  • salt and fresh ground pepper, to taste
  • 1 cup low-sodium chicken broth
  • 2 cups of the liquid from the beans it was cooked in
  • 1 tablespoon extra virgin olive oil
  • 1 bottle (12-ounces) beer
  • 1 bottle Samuel Adams beer
  • 4 chicken breast halves
  • whole breast of a store bought rotisserie chicken taken off the bone
  • 1 avocado, diced, for garnish
  • shredded cheddar cheese, for garnish
  • sour cream, optional
Instructions
  1. Place the chopped onions, beans, tomatoes, and corn in the crock pot.
  2. 1-1lb. bag of dry Great Northern Beans soaked for 2 hrs. after bringing it to a boil (in a large pot covering it with water) adding 2 bay leaves, 1 half onion, salt and pepper. Do the same with the red Kidney Beans. Simmer beans on low heat till almost tender to the 'al dente' about 1 hr.
  1. Stir in chili powder, cumin, garlic powder, paprika, salt and pepper.
  2. Add both beans with their liquid to a 'Dutch oven' (heavy duty large pot) the drained diced tomatoes, add the spices, and the beer. Cook for an additional 1 hr. on med- low uncovered.
  3. Add chicken broth and beer.
  4. Place chicken breasts on top.
  5. Cover and cook for 3.5 to 4 hours ON HIGH, or until chicken is thoroughly cooked. Or cook
  6. on LOW for 5 to 6 hours, or until chicken is done.
  7. Shred the deboned chicken breast, and add it to the pot, along with the corn kernels. Add the olive oil. Add 1/4 cup of flour to the reserved tomato juice, which is about 1/2 cup, whisking it till a smooth paste, and add it to the pot with all the ingredients. Simmer for an additional 25 minutes
  8. Remove chicken breasts from the pot and place on a cutting board; let cool for a few minutes.
  9. Shred chicken and stir it back into the pot; cover and continue to cook for 15 minutes.
  10. Ladle chili into bowls and garnish with avocado, shredded cheddar cheese and sour cream.
  11. Serve.
Notes
RECIPE SOURCE: DIETHOOD
Nutrition Information
Serving size: 486 grams (17-ounces) Calories: 345 Fat: 5.3 


Cream Cheese Filled Banana Bread

By the time I get to catch up posting again...I will be going back to Cleveland for another visit to check on my sister; who is not improving with her mental and physical health...sad to say! In the meantime, I have not spent any time on my blog for one month. I do have several photos of things I have made that I would love to share with you and this amazing Banana Bread with Cream Cheese filling is one of them!
Now that I have joined Weight Watchers again, for the 'upteenth time'...in my opinion, this time is the best time joining and still losing the desired weight is beyond my 'wild' expectation. It is so easy to track the points and stay within the 'portion control' is so important. The extra point allowance of (49) is used at your own convenience, which I chose for Saturday and Sunday. That's when I can bake and cook to my 'heart's content' and I love it.
We all love a good homemade banana bread and my daughter and I make a loaf every week makes a loaf with the leftover ripe bananas. Actually I just make the special ones every now-and-then when a new recipe catches my eye! Since I'm a Pinterest addict, I save quite a few interesting and new recipes...although this may not be so new, but 'new to me'!

Cream Cheese Filled Banana Bread
Ingredients
  • 1 cup sugar
  • ½ cup butter, softened
  • 2 eggs
  • 3 mashed ripe bananas
  • 1 tsp. salt
  • 1 tsp. baking soda
  • 4 TB sour cream
  • 2 cups flour
  • 1 TB Sugar
  • ½ tsp. cinnamon
Cream Cheese Mixture :
  • 8-10 ounce cream cheese, softened
  • ⅓ cup sugar
  • 1 egg
  • 1 TB flour
Instructions
  1. Mix sugar, butter & eggs. Dissolve baking soda in sour cream, add bananas, salt and 2 cups flour. Mix all together.
  2. Divide ½ of this mixture into 2 floured loaf pans.
  3. Combine cream cheese ingredients and spread over mixture in pans. Spread remaining banana batter on top.
  4. Sprinkle top with 1 TB sugar mixed w. ½ teaspoon cinnamon before baking.
  5. Bake at 350 for 50 min. Cool and serve. 

Been having much needed rain here in Palm Beach...just wanted to share this beautiful photo with you that I snapped at the 'spare of the moment' with my Smart Phone...also, all the previous photos have been taken with my cell phone since most of the time I'm not prepared to take photos and do not have my camera 'on hand'.
Wishing you all a beautiful Sunday...although in most parts of the globe Sunday has ended, so have a beautiful and pleasant week, to all my friends!

My Cleveland visit...Part 2.

Here we are in the middle of summer, and I'm showing you winter photos...how silly is that!?
The reason for that is because I need to catch up over the last six months that I have missed posting.
Thank you so much for your sweet and kind comments that you left on my blog, and I truly appreciate that you care and have missed me...as I certainly have missed you!

So here we are, on our way to visit my parents' grave near by...me taking the beautiful scenery winter photos which I rarely get to experience since I moved away from Ohio decades ago to sunny S. Florida! One thing for sure, I don't miss the terribly cold winters, but I do love the snow when it's just like this, with a bit of sunshine, clear skies -minus- the snow storms.

We arrived at the cemetery, all the graves are covered with blankets of crisp fresh snow, glistening in the sun. It's about 27 degrees F. way too cold for me, but I decided to take a 'selfie' of us and my sister actually was happy to pose for the photo!
Now comes the good part...she thinks she recognized our parents' grave which is near that tree in the background (turns out it was actually in the next row) also near the tree!
In the meantime...she decides to say a prayer and have a conversation with our parents standing on the wrong grave...to say the least!
I must share this most amazing, super moist and sooo delicious Apple cake that Susan, (my nephew's wife) made for us, after a scrumptious Bolognese sauce with homemade gnocchi!
You probably recognize this famous Jewish Apple cake...a recipe which I also had from the seventies and eighties that is still very popular!
This apple cake is super moist, with all these wonderful apple chunks half of them in the middle of the batter, and the other half on the top which makes it so attractive...so pretty!

Mom’s Apple Cake
by: Smitten Kitchen 

6 apples, Mom uses McIntosh apples
1 tablespoon cinnamon
5 tablespoons sugar
2 3/4 cups flour, sifted
1 tablespoon baking powder
1 teaspoon salt
1 cup vegetable oil
2 cups sugar
1/4 cup orange juice
2 1/2 teaspoons vanilla
4 eggs
1 cup walnuts, chopped (optional)
Preheat oven to 350 degrees. Grease a tube pan. Peel, core and chop apples into chunks. Toss with cinnamon and sugar and set aside.
Stir together flour, baking powder and salt in a large mixing bowl. In a separate bowl, whisk together oil, orange juice, sugar and vanilla. Mix wet ingredients into the dry ones, then add eggs, one at a time. Scrape down the bowl to ensure all ingredients are incorporated.
Pour half of batter into prepared pan. Spread half of apples over it. Pour the remaining batter over the apples and arrange the remaining apples on top. Bake for about 1 1/2 hours, or until a tester comes out clean. Cool completely before running knife between cake and pan, and unmolding onto a platter.

My Cleveland visit...part 1

Hello Everyone...all my dear {food} blogger friends!

You may, or may not welcome me back to the 'food blogging' world, but as for me it's been quite a journey staying away from my blog that I've built over the past 5 years; actually almost to the exact 5 years next month (I think)...just can't remember exact dates on important events.

I've missed you all, and I truly am sorry for not visited and commented on your blogs all these months...6 months to be exact. I have not looked into my very own blog and have begun to think that I had 'squatters' taking over, just like in abandoned houses...as in, abandoned blog is what 'food and thrift' has become...sad, but true!

I'm gonna start from the beginning, where I left off, although I have been somewhat active on facebook and have kept in touch with some of you, and of course, on Pinterest which have kept me busy pinning all the yummy foods, and pretty things. This has been an up-and-down emotional 6 months for me and I came up with every excuse in the 'book' why I should not return to my blog...now, I must admit to myself the real reason...other than...my blog isn't 'good enough' to continue.

Some of you may know that I took a short 10 day trip to my hometown Cleveland, (suburb outside of the city) to visit my older sister and family. The worst time of the year, in January, the coldest month of the winter time. My sister Aniko has been ill for some time with various problems...mostly back problems for the last decade or so, but she has always been active in her beautiful home...a proud wife, mother, grandmother...an amazing cook, baker, and so proud of her beautiful home that she kept in perfect and beautiful style...mostly gorgeous Hungarian art and paintings and mostly the world famous Herendi ceramic sculptures, and figurines.
I call it the... Bordó...Bordeaux...formal living room at my sister's house

 Unfortunately, she has given up all interest in her home, and recently in her life...her memory is slipping, quite rapidly these last few months...could be Alzheimer's...not so sure, I'm so skeptical about approaching that 'subject' from family members...all I know, our conversations are getting less and less via phone, to almost a 'yes' and 'no' replies from her. This beautiful vibrant happy woman has diminished into a stranger I do not know any more. We have always been close throughout the years...growing up, and as adults.

On the left, is the formal dining room.
As in most Northern homes...this is where the family spends 99% to hang out...chill out, in the family room
a split level type house, downstairs, 
I love their back yard, it's like a 'national park'...so large and huge trees; the deck is so great in the summer time.
such a pretty winter scene in the back yard
This is the front of the house...typical Northern home


Life has taken a sharp turn and now we just have to prepare for what the future will hold next!
Cilu, their beloved Siamese mix...rescue cat, so beautiful and wise!

The famous West Side Market, in Cleveland...a 'food lover's dream' come true!
A 'selfie'...me, and Susan...(nephew Denes' wife)...she is more
like a niece to me an amazing cook and baker, getting her
culinary degree!

While my short stay in Cleveland, I enjoyed every minute of my stay with my family, and shopping in my beloved city...especially the West Side Market that's been around for decades, maybe a century...will have to 'google' that!


Hungarian sausages, better known as... kolbász...stocked up on it to take back to Florida; sooo good!
Most amazing Artisan breads
Susan...(my nephew's wife)...and nephew Denes buying fresh produce


GIVE...THANKS...

Ahh...the famous American Green Bean Casserole! Who can forget this classic side dish for Thanksgiving and Christmas from the famous Campbell's Soup company...originated way back in 1955, when it was made with canned green beans; yikes! Graduating to frozen green beans in the seventies...and now, made with fresh green beans, but still the same recipe! Can't leave out the 'cream of mushroom' soup, or the French's fried onions, otherwise you will lose the original concept!
I have such fond memories of past Thanksgiving, growing up in midwest, Ohio...remembering the super cold weather; most years on Thanksgiving without snow...unlike what they are having at this time of the year with so much snow all over the country. Also, at this time of year we must remember our 'homeless' and 'hungry' people that live right here in the 'country of plenty'; we are all responsible to give...and 'Give Thanks' if we have our health, family, a 'roof' over our heads...and enough food to eat!

This year...as of the last few years, we've been sharing Thanksgiving with 3 other families...the 'more, the merrier'! Do you see the little 'red' magic button on the breast of the turkey?...well, that's what makes it perfect...no under cooking...no over cooking the turkey! The stuffing is just the plain and simple herb stuffing!

Campbell's Classic Green Bean Casserole
from the Campbell's Soup Kitchen

1 can (10 3/4 ounces) Campbell’s® Condensed Cream of Mushroom Soup or Campbell’s® Condensed 98% Fat Free Cream of Mushroom Soup or Campbell’s® Healthy Request® Condensed Cream of Mushroom Soup
1/2 cup milk
1 teaspoon soy sauce
1 dash black pepper
4 cups cooked cut green beans
1 1/3 cups French's® French Fried Onions  
                                                                                                                                                       
Stir the soup, milk, soy sauce, black pepper, beans and 2/3 cup onions in a 1 1/2-quart casserole.                                                    
Bake at 350°F. for 25 minutes or until the bean mixture is hot and bubbling.  Stir the bean mixture.  Sprinkle with the remaining onions.                                           
Bake for 5 minutes or until the onions are golden brown.


Lottie Greer's Country Biscuits


Have you ever came across a recipe to learn that you don't really agree with the ingredients are off, and you either fix it, or just ignore it and move on to something else. Homemade Southern buttermilk biscuits are always so comforting to have served with chicken, breakfast, or just have it for a snack with fresh sweet butter slathered on it...yumm!

I have so many great cookbooks, but I always end up googleing for recipes on the Internet to get quick results. I purchased this lovely cookbook called Jan Karon's Mitford Cookbook and Kitchen Reader at World Thrift store for a mere $2.95...2004 edition, which is still popular and has the author's Southern family recipes which were no doubt 'hand-me-downs'...probably verbal and not all of them tried and tested before being published!

I was so thrilled that the biscuits turned out so nice, crunchy and perfectly baked out the outside, and super flaky, and delicious on the inside. Also, I want to share a little tip with you regarding the buttermilk and the self-rising flour. I must be the only one that does not particularly favor self-rising flour...only because, it tends to be too salty, and has a distinctive flavor on its own. (just my opinion)
Buttermilk is being wasted if only used in just a certain recipe; so, it's wise to use an easy substitute!
These awesome biscuits freeze well, just pop them into a plastic baggie, and when ready to use one or all, they heat up in the oven so nice, just as fresh as you made them.

You can actually see the flakiness of the biscuit, as I split it in half. Seriously, I will continue to make my own buttermilk, and save money, but not spare the flavor. As for self-rising flour, (maybe the American brand)...just not a fan of it and will stick with the all-purpose flour!
You can purchase Jan Karon's Mitford Cookbook and Kitchen Reader on Amazon


Lottie Greer's Country Biscuits

Chef.Foodie's picture


Ingredients
Shortening8 Tablespoon, chilled (More For Greasing The Baking Sheets)
I used 4 Tbsp. shortening and 4 Tbsp. unsalted butter...also use parchment paper to cover baking sheet (no greasing baking sheet; removed parchment paper when done, for photo shots)
Self rising flour3 1⁄4 Cup (52 tbs) (White Lily, More For Rolling Out The Dough)
made my own 'self-rising' flour from all-purpose flour, using the 'alternating method'
1 cup all-purpose flour
1 1/2 teaspoon baking powder
1/4 teaspoon salt
For 1 cup of all-purpose flour=1 cup of self rising flour
Salt1⁄2 Teaspoon...no additional salt needed
Granulated sugar2 Tablespoon...way too much sugar...I did use 2 teaspoons organic sugar
Baking soda1⁄2 Teaspoon...1 teaspoon
Buttermilk2 Cup (32 tbs), chilled...I used the 'alternating method' ...ONLY 1 CUP OF BUTTERMILK IS NEEDED1
For 1 cup milk...whole milk, 2 % or heavy cream
1 scant cup of milk
1 Tbsp. white vinegar
Combine milk w/ vinegar, let stand 10 min. it will slightly thicken and bubble; use in place of buttermilk
Directions
Preheat the oven to 475°F...450 degrees F. is needed
Grease a couple of baking sheets and set aside....no greasing needed when parchment paper is used.
Combine the flour, salt, sugar, and baking soda in a large bowl.
Cut in the shortening with a pastry blender until the shortening is the size of small peas.
Add the buttermilk and stir until just mixed.
The dough should be very wet....THE DOUGH WILL BE JUST RIGHT IF ONLY 1 CUP OF MILK IS USED! DO NOT USE 2 CUPS...
Place some flour in a shallow bowl.
Spoon a heaping tablespoon of wet dough into the flour.
Flour your fingers and sprinkle flour on the top of the wet dough.
Roll the dough gently in flour just to coat the outside.
 Try not to mix too much extra flour into the dough.

Add a handful of flour on the board or counter, and gently gather your dough patting it lightly into a disk...no rolling is needed at all!
 Shape into biscuits, using floured hands, working the dough as little as possible.Shape into biscuits using 3 inch biscuit cutter, or smaller....3 in. cutter will make 9 biscuits, and smaller will make 12. Use scraps up, gently shaping and cutting it.
Arrange the biscuits, touching each other, on the baking sheets.
Arrange biscuits...DO NOT touch together!
You can brush extra milk on the biscuits (optional) before baking.
 Bake for 15 to 20 minutes, or until just brown on top.


Cleveland Winter 2017

Hello my friends, I hope you all had a great holiday. I just got back from Ohio and I thought it would be nice to put together a post to s...